



Enjoy!
I'm curious to hear what folks think of this technique applied to UW photographs ...


Photo / Video Showcase / Archived topic
Started by jeremypayne ·
Read-only discussion
Enjoy!
I'm curious to hear what folks think of this technique applied to UW photographs ...
I like the first one; not sure about the others, I find the OOF backgrounds distracting in them.
Enjoy!
I'm curious to hear what folks think of this technique applied to UW photographs ...
Like Jeff, the first one worked the most for me. I think it is because it seemed to punch out more there (in the first one) in terms of the foreground/background.
So Jeremy, are you going to tell us what you did to get the fake tilt shift. Sorry, guess I missed the first post. 
Steve
So Jeremy, are you going to tell us what you did to get the fake tilt shift.
Sure! The technique in a nutshell is quite simple ... In Photoshop:
** enter "quick masking mode" by hitting the "Q"
** use the gradient tool with the "three bars" - two dark, one light - to draw a gradient mask creating an focus plane with the mask as you will ultimately blur everything else (you can also touch up with the paintbrush or any other tool to modify the mask created by the gradient tool)
** exit quick mask mode and enter a Blur Filter mode ... the best is "Lens Blur", but only available if you have CS2 or higher I think ... but even plain old gaussian will work
** use the lens blur (or similar) ... a radius of 50+ works well with the Lens Blur
Other "tricks of the trade" - flavor to taste - include: adding a little barrel distortion, boosting specular highlights in the Lens Blur tool, adding a tone curve with additional high-end boost, upping saturation, extra sharpening and local contrast ... all of these can help enhance the "fake miniature" look - if that's what you are after.
I first heard about this technique/fad last year in an article in the New York Times (follow link).
Here are some other examples from topside ...

Like Jeff, the first one worked the most for me.
I think I'm liking the first one a lot as well.
I do like the colors in the second one ... I might try a tighter crop and see if I can't "save" it.
I'm getting vertigo looking at the rooftop parking lot
Definitely the first one. Yesterday I finally tried your T&S method on an image. What a train wreck! I am going to practice some more today. Like you said, the ones which seem to work best, you are looking down on the subject and underwater we don't do that much. What about looking up?
Definitely the first one. Yesterday I finally tried your T&S method on an image. What a train wreck! I am going to practice some more today. Like you said, the ones which seem to work best, you are looking down on the subject and underwater we don't do that much. What about looking up?
I completely agree with Matthew; the selective focus defines the "message" 0r emphasis of the image. IMHO, out of or soft focus in the foreground distracts from the image.
I completely agree with Matthew; the selective focus defines the "message" 0r emphasis of the image. IMHO, out of or soft focus in the foreground distracts from the image.
While I agree that image 2 doesn't really work (although a crop does work better and I may post that later), I don't agree with this:
"out of or soft focus in the foreground distracts from the image"
as a hard and fast rule.
Has anyone tried adding a graduated mask to the blur layer: this mimics the behaviour of a real lens, and makes the image a little less obviously processed? It doesn't give the "model" appearance, but underwater subjects are so unfamiliar to most viewers that the "model" appearance only works for the underwater photographic audience, anyway.
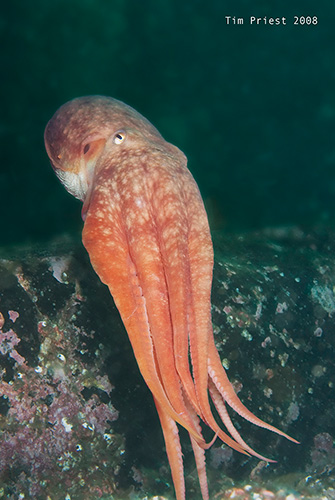
The original had a greater depth of field and a distracting background.
Tim

Has anyone tried adding a graduated mask to the blur layer: this mimics the behaviour of a real lens, and makes the image a little less obviously processed? It doesn't give the "model" appearance, but underwater subjects are so unfamiliar to most viewers that the "model" appearance only works for the underwater photographic audience, anyway.
The original had a greater depth of field and a distracting background.
Tim
I use a gradient mask and then apply the Lens Blur filter even when trying to achieve the "model" look ... I agree with you - the lens blur plus the gradient helps make it look more like real bokeh.

Terms of Use Privacy Policy Guidelines We have placed cookies on your device to help make this website better. You can adjust your cookie settings, otherwise we'll assume you're okay to continue.

A worldwide community for underwater imaging.
