



Skip to content

Lights, Strobes, and Lighting Technique / Archived topic

Fixing an optical cable

Started by mtornio ·

  • 19Posts
  • 19Replies

Read-only discussion

Fixing an optical cable

19 posts
  1. After arriving to Sydney I noticed that my Sea & Sea optical cable had been cut in two parts during transit. Any suggestions how to fix the cable, either a temporary solution or hopefully something bit more permanent (that doesn't involve buying a brand new cable)? Internal strobe flash still passes through the cable just fine, but unfortunately my quick & dirty duct tape fix wasn't durable enough for actual use. :lol:


    I'm using Sea&Sea RDX-550D housing with two Sea&Sea YS-110 alpha strobes. For macro work just one strobe is fine, but for wide-angle I'd really prefer to have two working cables.
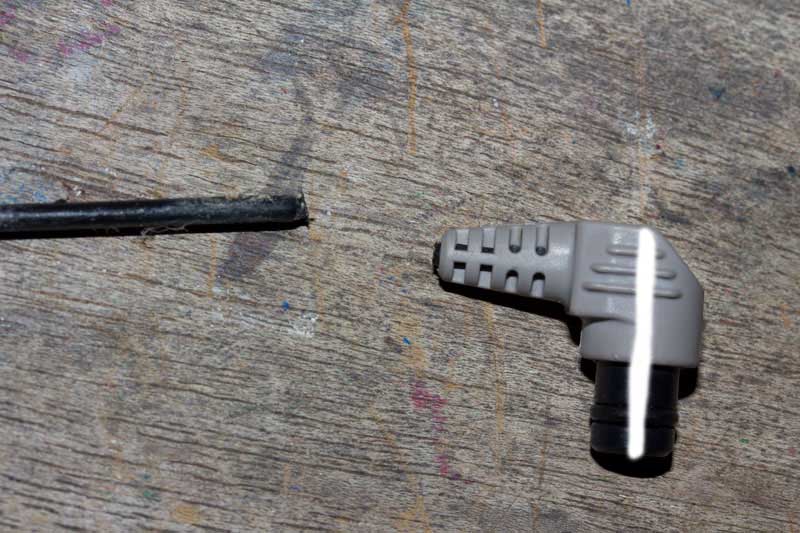
     

    Photo of the damaged cable

  2. Are you using one fibre optic cable or two ?

  3. I've never tried this, but you may be able to fuse together the cable by applying heat with something like a soldering iron. If your travelling, just go into any store that fixes electronics and i'l sure they wouldn't mind letting you use one. (e.g a car stereo store, appliances repairer, camera repairer etc)


    Last resort, superglue.

  4. Since it is broken at the end, just drill the connector top to bottom in the white direction of the attached picture and insert the cable with a strong glue etc... I make my own cheap optical fiber cords like that.

    post-4794-1330363494.jpg

  5. Any way to get the broken part out of the connector? Then you could insert the cable into that location. Might require glue or duct tape to hold it in place but would get you through. It worked for me with a different designed connector for a different housing.

  6. Unfortunately the new Sea and Sea 'L' connectors do not disassemble. I tried a while ago to fix a Nauticam connector to one end (which does disassemble) without cutting the cable, but it's impossible. You could fix one of the old Sea and Sea connectors which do allow disassembly.


    HTH, Tim

  7. How about shrink tubing? Can you get any near that size? When you heat it, it shrinks. Used for electrical insulation fittings. hardware stores would have it. I would hose clamp both ends in place after shrinking it. Its used for insulating, not structural strength, but might give enough support to hold together if clamps keep the cable inside.


    Another idea is splints and small hose clamps. Add a small splint on each side of the cable, with cable in desired location. Toothpicks might work for splints...might need several. Clamp the tubing to the splints at each end. The splints are on each side of the cable. If using toothpicks, use several but leave space for the clamps to compress it all. The splint is handling the lateral stress while the clamps are holding it all together. Not pretty but might get through a week of diving. rather like setting a broken leg in the wild.

    If you cannot get shrink tubing small enough for the first idea, use toothpicks to up the size enough for shrinking to work. Then hose clamp both ends of it then.


    Just some ideas to keep the pot stirring.

  8. I've never tried this, but you may be able to fuse together the cable by applying heat with something like a soldering iron. If your travelling, just go into any store that fixes electronics and i'l sure they wouldn't mind letting you use one. (e.g a car stereo store, appliances repairer, camera repairer etc)


    Last resort, superglue.


    I don't think, it would work. The two polished surface should be perfectly aligned, and melting, gluing would destroy this structure. By the way according to my experience, superglue dissolves the optical cables.

  9. Thanks for all the replies, at the moment drilling the connector open and then inserting the cable in there seems like the most reliable fix. I'll just need to find someone over here in Sydney with suitable tools. As Tim said I don't think you can disassemble this particular connector without excessive force, that would have been an even better option.


    Luckily this isn't a pure diving trip for me and I still have one fully functional strobe anyway.

  10. I'm using a cheap toslink cable with my Sea & Sea YS-110 strobe. If you cut the edges of the toslink connector a little bit, it fits perfectly into the strobe! Maybe you can find such a cable as a temporary (or permanent) solution too?


    The only downside of the toslink cable is that it's a straight connector, and not a 90 degree angle like the original Sea & Sea cable. If anyone knows where to get such an L-shaped connector, or how to open an original Sea & Sea connector I'm interested too.

  11. The only downside of the toslink cable is that it's a straight connector, and not a 90 degree angle like the original Sea & Sea cable. If anyone knows where to get such an L-shaped connector, or how to open an original Sea & Sea connector I'm interested too.

    You could simply heat the cable and bend it 90 degrees and it will stay that way.


    Personally I prefer these and just buy a few meters worth of toslink cable for about $1 per meter and make my own lengths as needed. Way cheaper in the long run and you avoid incidents such as this.


    buying sea&sea fiber-optic cable feels like buying an apple product, grossly overpriced for its function :swimmingfish:

  12. Personally I prefer these and just buy a few meters worth of toslink cable for about $1 per meter and make my own lengths as needed. Way cheaper in the long run and you avoid incidents such as this.


    This 10bar plug looks interesting. Except for the shipping costs (US $42.50), which are about 3 times the costs of the plug itself (US $14.95). Does anyone know an European shop selling these plugs?


    I bought my optical cables (2 x 6ft) from some ebay shop for US $0.10. A bargain compared to the original Sea & Sea cable, even with the US $3,65 shipping costs included :-)

  13. This 10bar plug looks interesting. Except for the shipping costs (US $42.50), which are about 3 times the costs of the plug itself (US $14.95). Does anyone know an European shop selling these plugs?

    You can probably contact OpticalOcean and ask if they can put it in an envelope or something instead, guess that would be 2-4 usd in shipping.


    This is an alternative, don't know about shipping cost from them, not in Europe I'm afraid.

  14. We had these plugs designed for us from 10Bar, not sure if others are selling them. They are field replaceable, just screw the pieces together. Not so sure Toslink cable will fit, as it needs to take a tight bend.

    424896_10150804245909112_1637871573_n.jpg419912_10150804245994112_882622164_n.jpg


    We now offer a small items >1# shipping rate, but it's still a lot more than $2-4 ;-) Shipping is expensive these days.

    Jack

    Edited by JackConnick
  15. Much appreciation to this post, so I'm paying it forward to others who don't want to get robbed having to pay for a new cable or purchasing new cable ends.


    I have a similar cable that the end broke off of, and I followed the instructions for drilling out the plug and inserting the cable end. Actually improved on that by:

    1. Drilling out the plug from the insertion end towards the back (I started at the insertion end to ensure that I got the hole in the correct/centered place for when the plug is inserted into the receptacle) using a bit that was the same diameter as the outer diameter of the optical cable. The cable was very easy to drill out using a slow speed on a hand drill with the tip held in a vice.
    2. After going from that direction, I then drilled another hole from the broken spot at the cable flex collar perpendicular to and into the hole that I just drilled from the tip to the back end.
    3. Followed by using a razor blade to cut out a channel in the back of the plug that reached the hole coming up from the flex collar and split the flex collar with a razor blade to create a channel up to back of the plug and connecting to the hole leading to the tip.
    4. Then used a heat gun to bend the broken end of the cable at 90-degrees about 1-inch from the end using very little heat and holding the cable with a pair of needle nose pliers. It heated and bent VERY fast and easily, so don't use much heat.
    5. Once finished, pushed the bent end into the hole leading to the tip, until the bend fell into the channel that I created, then pulled the flex collar (which I had split on the back side with a razor blade) around the newly inserted cable and clamped with a nylon wire tie at the base of the flex collar.
    6. Sealed the entire thing with black caulk to hold it together, and good as new!
    7. Already tested the optic functionality before caulking, and it works great.

    Total job took about 15-20 minutes. I shot photos, but I couldn't figure out how to add them to the post. If someone can tell me what to do to add photos from my computer to the post, I'll be happy to add them.

  16.  


    Very temporary, use an pencil eraser head and poke a hole with a paper clip, thread cord through.


    That's a wicked idea!

Ultralight Control Systems

Account

Navigation

Search

Search

Configure browser push notifications

Chrome (Android)
  1. Tap the lock icon next to the address bar.
  2. Tap Permissions → Notifications.
  3. Adjust your preference.
Chrome (Desktop)
  1. Click the padlock icon in the address bar.
  2. Select Site settings.
  3. Find Notifications and adjust your preference.

