Skip to content

Photography Gear and Technique / Archived topic

Gentle removal of vacuum valve?

Started by TimG ·

  • 18Posts
  • 18Replies

Read-only discussion

Gentle removal of vacuum valve?

18 posts
  1. I'd welcome advice, guys:

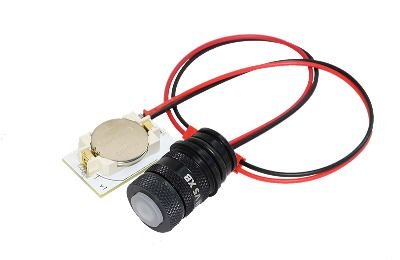
    I need the temporary removal of my Vivid Sentinel vacuum valve (the XB model) from my housing. The valve (the black bit in the photo) is circular about 2.5cm (1") tall and about 2cms (3/4") in diameter. I can't get it to unscrew by hand from the bulkhead.

    I'm really wary of using, say, pliers, as I fear damaging it with too much pressure. Can anyone advice on options? Strap wrench maybe? Or are they too big for the job?

    Thanks! 

    iu.jpeg

  2. There are strap wrenches made for 1/4 inch (6 mm) diameter bits, but I would use a slack jaw pliers with a rubber insert (often called a plug pliers). Or simply wrap the valve with some old wetsuit piece and then use a regular pliers carefully.

    Bill

  3. Many thanks, Bill. That's really helpful.

  4. Deposits and corrosion from ocean water may have gunked the joint. Put a drop or two of penetrating oil on the joint between the valve and the housing, let is soak in overnight, then unscrew per Bill's suggestion.  Carefully and completely wipe the oil, and any deposits, after removing, and replace the O ring as it may be damaged.    

  5. 1 hour ago, Kraken de Mabini said:

    Deposits and corrosion from ocean water may have gunked the joint. Put a drop or two of penetrating oil on the joint between the valve and the housing, let is soak in overnight, then unscrew per Bill's suggestion.  Carefully and completely wipe the oil, and any deposits, after removing, and replace the O ring as it may be damaged.    

    Cool, many thanks, Elias :good:

  6. What is the story of this valve problem, does it have a happy ending? Please do tell.

  7. Judicious use of a large hammer :)

  8. Large Hammer applied to Tim's head or to the valve?

  9. 25 minutes ago, Kraken de Mabini said:

    Large Hammer applied to Tim's head or to the valve?

    Would either make any difference?

    Weird I thought I replied to this but can't see it....

    Just to update you: I'm waiting for a spare part so I can repair the system without surgery. Unscrew one bit, screw in a new bit. Once this simple bit is done, I plan to undertake micro-surgery on the defective bit. If I make a mess of it, at least I have the replacement part installed and functioning. If I can fix it, bingo, I have a spare.

    As for:

    6 hours ago, adamhanlon said:

    Judicious use of a large hammer :)

    I have always felt that the Swiss Watches Makers' Tool (known in the UK as a 4lb lump hammer) was a valuable addition to any precision toolbox.

  10. Great progress! And please tell us more detail: What is the defect in which part?  

  11. 2 hours ago, Kraken de Mabini said:

    Great progress! And please tell us more detail: What is the defect in which part?  

    Well there's the thing, Elias. Neither Miso nor I are entirely sure at the moment.

    He thinks it's probably the transparent disk has slipped and is covering the airway that allows the vacuum to release. But the only way of finding out for sure is taking apart the valve and adaptor. As you and I have discussed through PMs, I don't want to tackle that until I have a replacement part and can carry on diving with a functioning vacuum system. I'm wary of trying to take the various bits apart with the risk of damaging them before I have the replacement.

  12. Please let us know what caused the malfunction once you have the opportunity to take the vacuum unit apart.  Good luck until then!
     

  13. Sure, will do!

  14. 17 hours ago, Kraken de Mabini said:

    Large Hammer applied to Tim's head or to the valve?

    That's mean :)

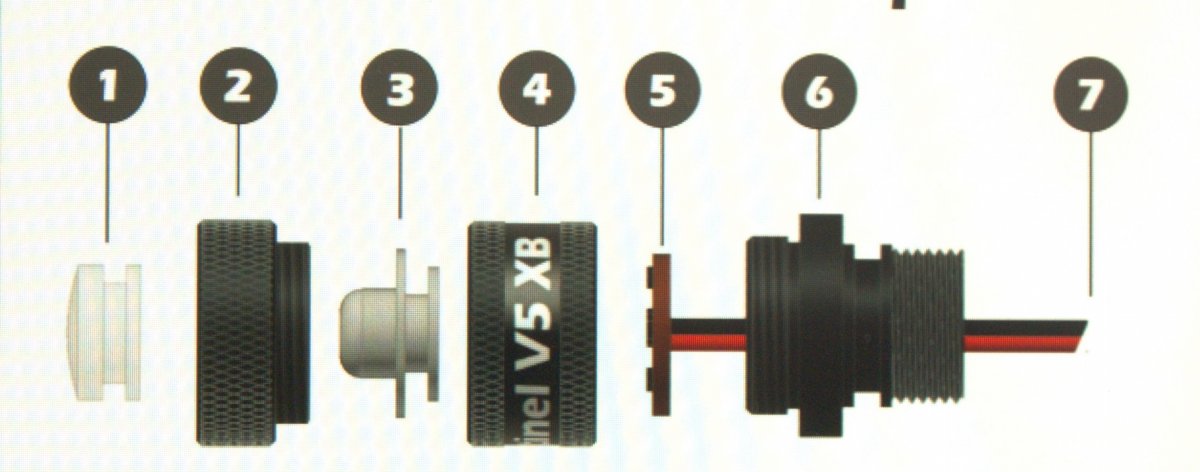
  15. A diagram of the Vivid Vacuum Leak Detector may clarify the situation, as it shows the two possible blocks to air entry to relieve the vacuum, one between the smaller disc of soft valve 3 and supporting ring 4, and another between the adjacent surfaces of electronic disc 5 and ring 6. 

    An air block between 3 and 4, is unlikely as the soft flapper valve 3 is moved and an air gap created when it is is lifted to break the vacuum.  

    A block is likely between electronic disc 5 and its supporting ring 6, if disc 5 sticks, from dirt or similar, to ring 6. The cure is to unscrew ring 4 from 6, and clean the mating surfaces of 5 and 6.  

    Should ring 4 be difficult to unscrew from ring 6, then a small amount of lubricant or vinegar can be applied to the crack between them, and left overnight to loosen the threads. Or gripping the rings with a rubber strap, or some rubber and slip pliers, to unscrew them, should do the job.

    1360280188_P2015750(4).thumb.jpg.3f9471e8ef2a7a4af960d0986ba62b5f.jpg

    (Figure is from the User's Instructions of Vivid Vacuum Leak Detector, v5)

    Edited by Kraken de Mabini
  16. Thanks, Elias.
    Yep, as you and I have PMd, the problem is probably between 4 -5-6. 

    I will indeed explore this once I have the replacement parts and can work on the faulty bit without fear that I’m destroying my vacuum system. .Assuming I can sort out the problem, I’ll then have a backup valve. 
     

    Tim

  17. Sounds like a good plan.

    An inexpensive backup for a vacuum leak detector is to carry a bulkhead plug to screw into the housing if the leak detector fails. Subal plugs have 1 x14 mm  screw threads and Isotta plugs have 1x16 mm screw threads, both of black plastic, with a sealing 0 ring.   


    Edited by Kraken de Mabini
  18. Guys

    Just in case anyone else comes across the same issue:

    I could not get my Vivid to release the vacuum no matter how I tweaked the rubber release button (part 3 - see above). The only way I could equalise the pressure in the housing (and remove the housing back) was by unscrewing a bulkhead cover.

    With advice from Miso of Vivid and Kraken de Mabini: I unscrewed (eventually - long story) parts 2-6 and cleaned them all. Between parts 4 and 5 there is a very thin, plastic disc which helps press the activation button on the circuit on part 5. This disk is supposed to be held on the back of part 3 but mine seemed to have detached and was actually helping form an airtight seal on part 5 thus preventing the vacuum being released when moving part 3. (I hope you are with me so far!)

     Miso advised that the disk needs to be centred on the back of part 3. This I did, reassembled everything and, as of 10 minutes ago, bingo - the system holds the vacuum; and by moving part 3 now releases the vacuum as it is supposed to with the usual satisfying "plop".

    Miso suggested, if necessary, just making a cut towards the centre of the plastic disk slightly so that the disk will allow air to pass more easily when part 3 is pressed.

    So..... phew. Big thanks, as always, to Miso and Kraken de Mabini (Elias).  Two super helpful people.

    If you come across this problem (Miso thought highly unlikely) and you can't figure out what I have explained above (and who could blame you), drop me a PM and I will try and explain in more detail. 

    I'm now going to lie down with a cold towel......

    Edited by TimG

Account

Navigation

Search

Search

Configure browser push notifications

Chrome (Android)
  1. Tap the lock icon next to the address bar.
  2. Tap Permissions → Notifications.
  3. Adjust your preference.
Chrome (Desktop)
  1. Click the padlock icon in the address bar.
  2. Select Site settings.
  3. Find Notifications and adjust your preference.