Everything posted by danka94
-
Here is the full travel summary on my website: https://danielmkainz.com/en/blue-sharks-of-the-azores/
-
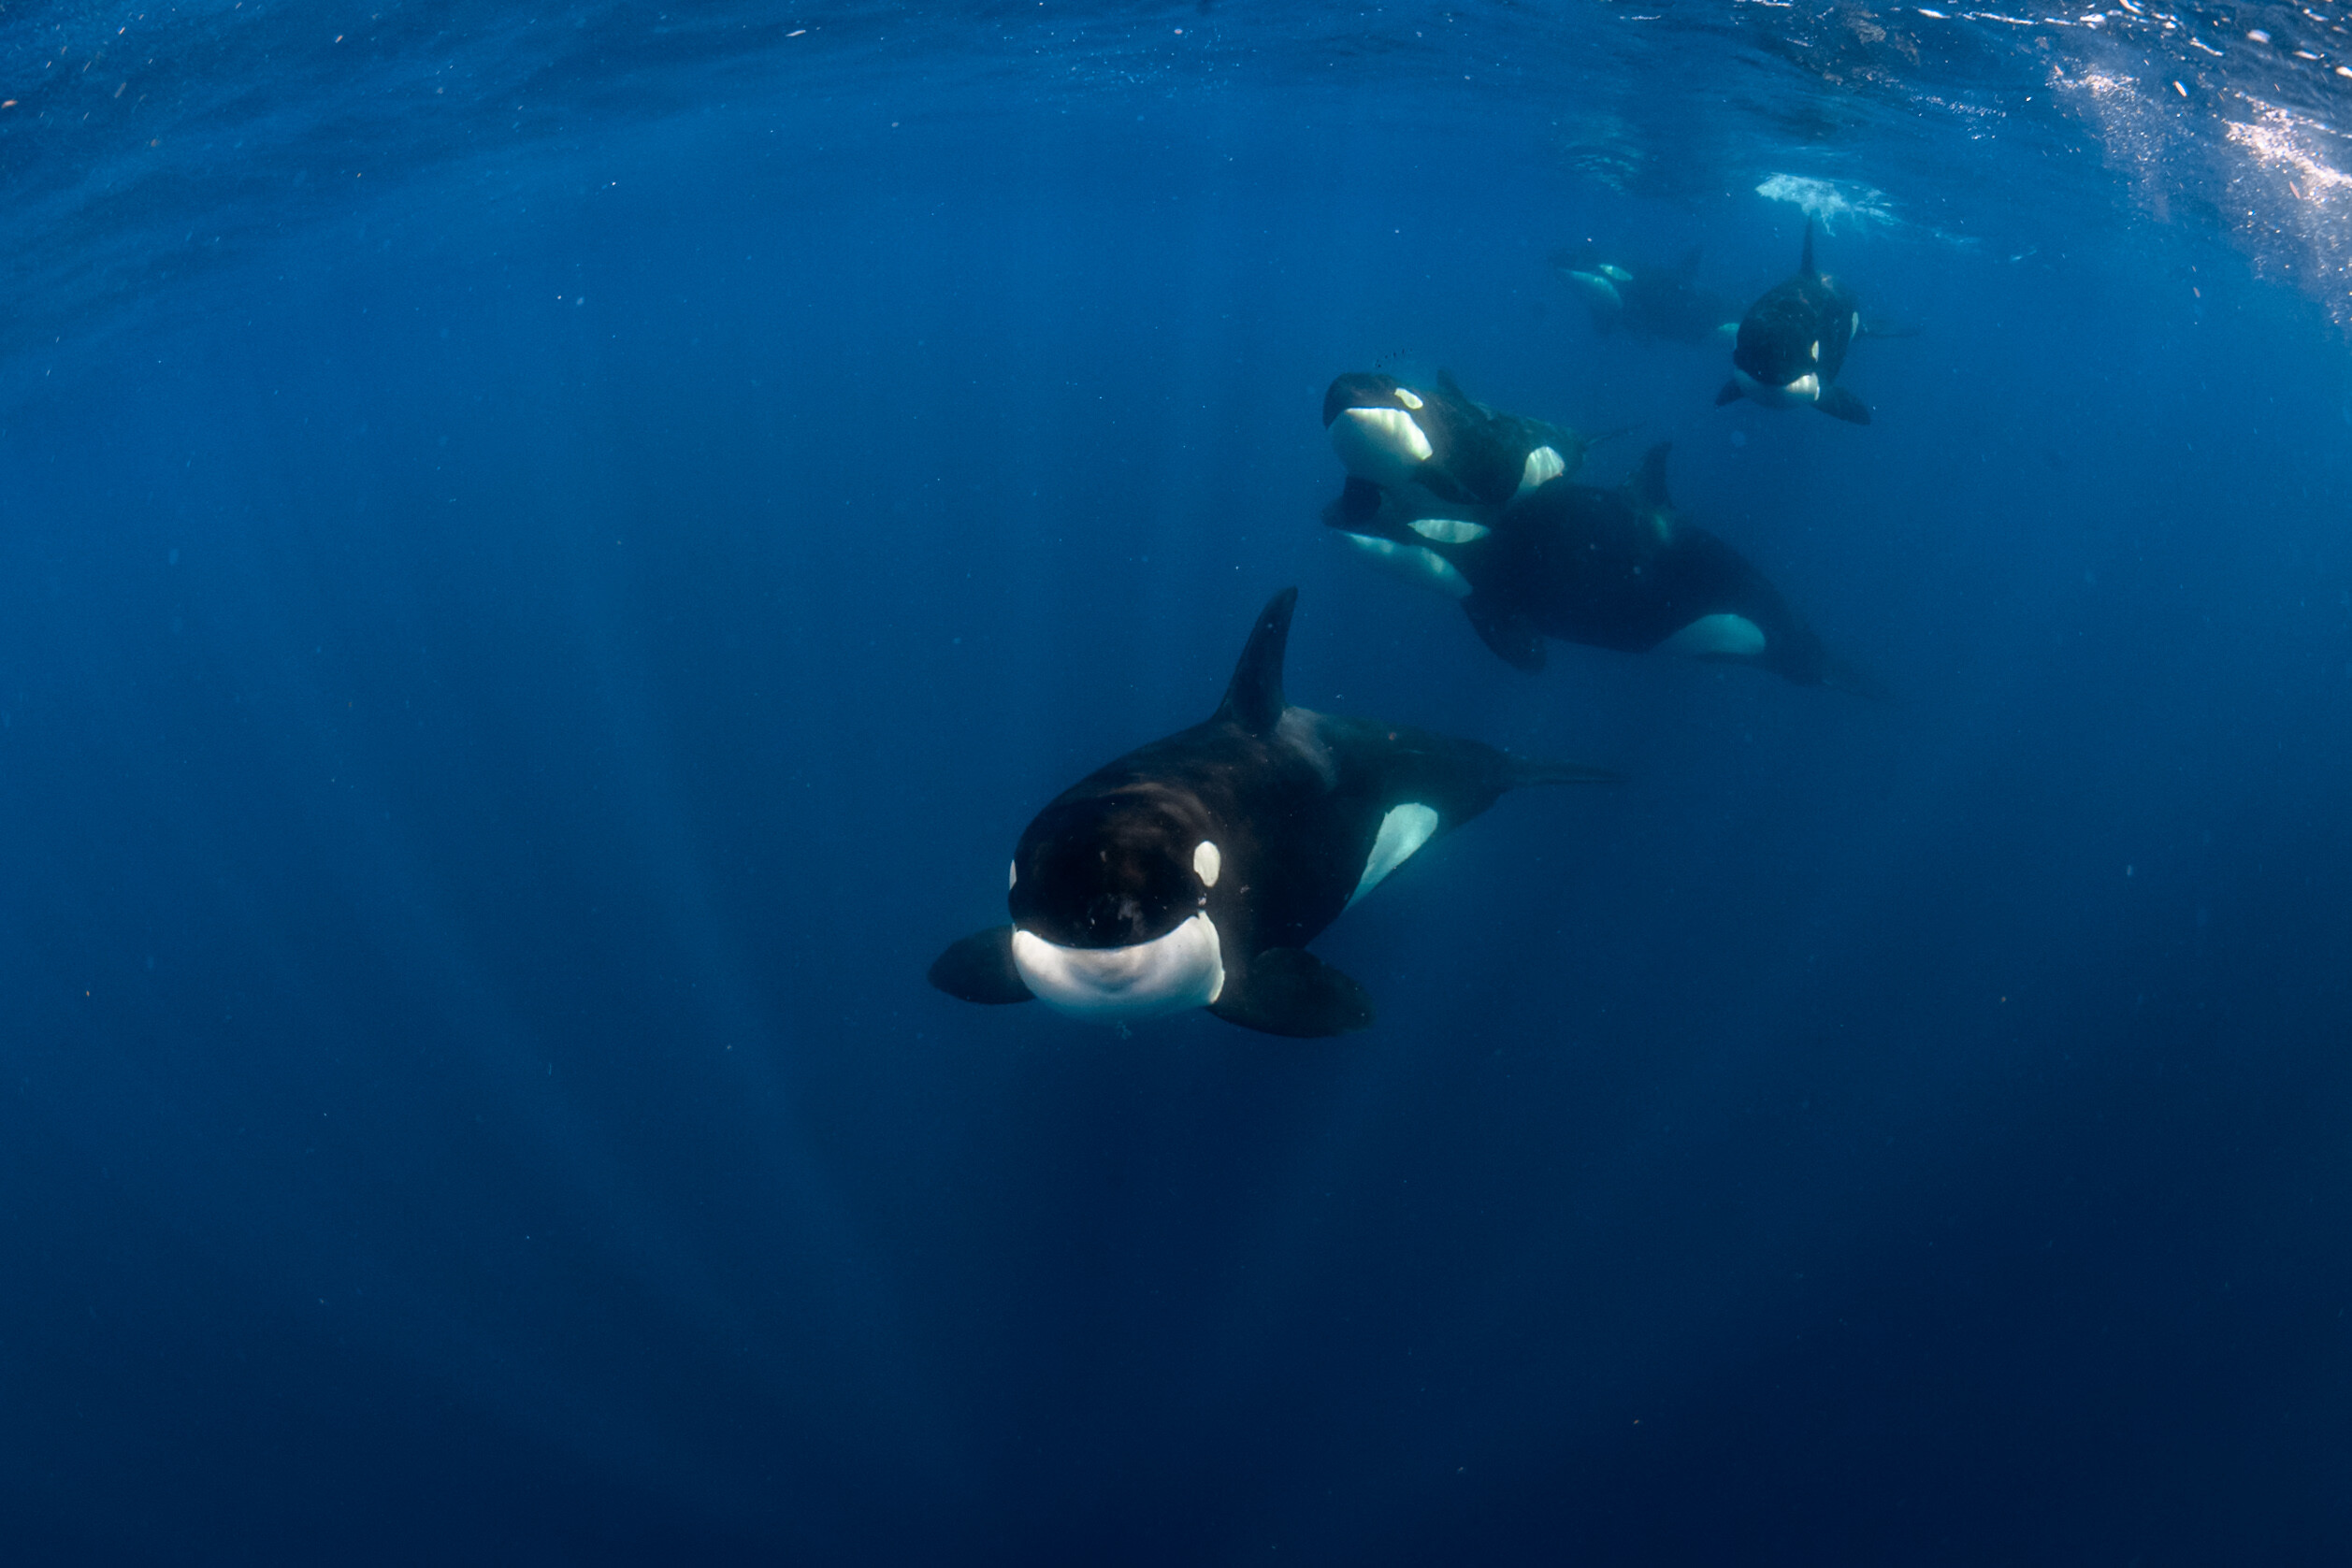
Thank you all for your kind words! As some of you have said, yes it is Condor Banks and another, older spot (I don't know the name, have to ask my buddies). We did four dives in total (2x2days). The vis. was quite good, around 25m maybe. The temp. was good, around 21/22°C, in a two piece 5mm wet suit with a hoodie and gloves (required!) no problem. The depth varied, but was limited to 15m due to the line we were clipped on. @Davide DB I tried to limit the slow motion, but I simply love the slow shots of sharks crusing by haha Yes, I shot in N-Raw, 8K60fps ind N-Log. The files were huge, but color grading was a breeze. I did a manual WB at around 10 meters, but kept it there, because of the constant vertical change in position. The lights are 4XR Ambient lights with an extra 6m Ambient filter. No filter on the lens. As some said, yeah the rules are strict. Bight colored fins or other heavy contrast equipment needs to stay on land. You must wear a hoodie and gloves for low contrast. Lights and strobes were no problem with us, they told us, that they can get nosier with that additional magnetic fields.
-
Hello, I edited a short video form my diving trip to the Azores last summer. I know that a few cuts need to be faster, but there wasn't enough good material ;) I left out B-roll from above water etc. on purpose, because I wanted to show just the dive, without preparation of the chum or anything else. Everybody knows how it looks like, when five divers get ready, jump into the water and they throw blood and fish guts next to you. I would love to hear your honest feedback and critique :)
-
I was on the island of Pico for about two weeks in August and September of 2025. We just stayed in one place and did nothing else beside diving. Our dive shop was Pico Island Adventures. On the day of our arrival we learned that a hurricane passed the Azores a few days ago and that the sea is still rough. The check in at the dive center was pretty shocking for us, because they cancelled a two day trip to Princess Alice, because their boat broke down. That was a huge bummer, because we were thrilled to do this trip and they could have told us earlier. Also due to the weather a lot of dives were unsure and postponed to the 2nd week. The first few days we did check dives, shore dives and a few very nice boat dives to caves full of young eagle rays. After that the weather got better and we could do all our planned dives, like 4 shark dives, a day trip to Princess Alice and some night diving. It was absolutely stunning. Especially the shark dives were great. I was lucky to have a line for myself almost all the time, so I could change my vertical position quite easily. Diving was a 8/10. On the last day we did some hiking (of course after 24h ;)) to visit some lava caves and the foothills of the volcano. The infrastructure and climate of the island was great. It wasn't too hot, but almost every day we had sunny weather and hardly any rain. There are for sure better islands for families with kids, because there is nothing else to see on Pico except for diving and the volcano. Getting there was easy: we took our flight from Vienna to Lisboa and then directly to Pico. It was without a doubt a very nice and relaxed trip and I can recommend it without hesitation. Here is a short video from our shark diving days: https://vimeo.com/1153335617
-
Thank you Davide for sticking it to my first thread about this topic. The problem is the monitor. It is almost 1kg negative in water. I 3D printed a bridge for the floats a few days ago, so it looks nicer now, but I cannot get them closer to the rig. I am thinking about a custom float foam piece for the bottom of the rig, so I could split the load. What do you think? The torque on the wrist were not that wild, the weights were a good support, especially when I am going to upgrade to heavier ones. I could archive a slight tilt with the small tire weights, so I am optimistic that heavier ones will work perfectly. Yes, I am going to open a new thread for the Azores :)
-
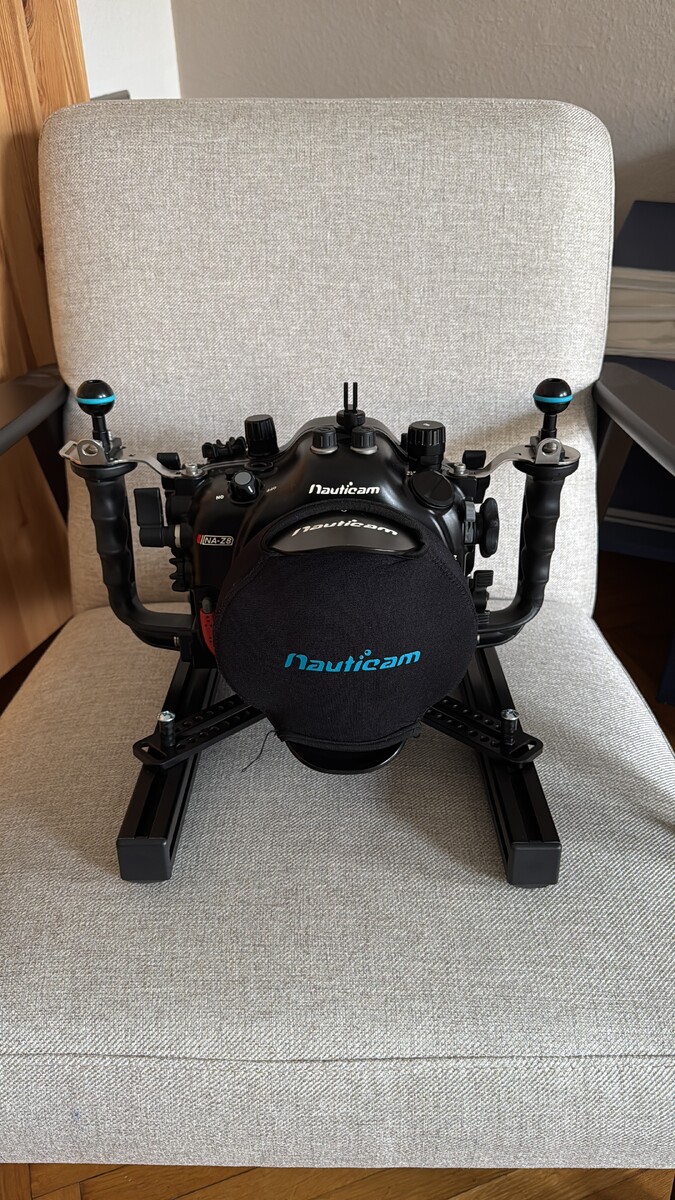
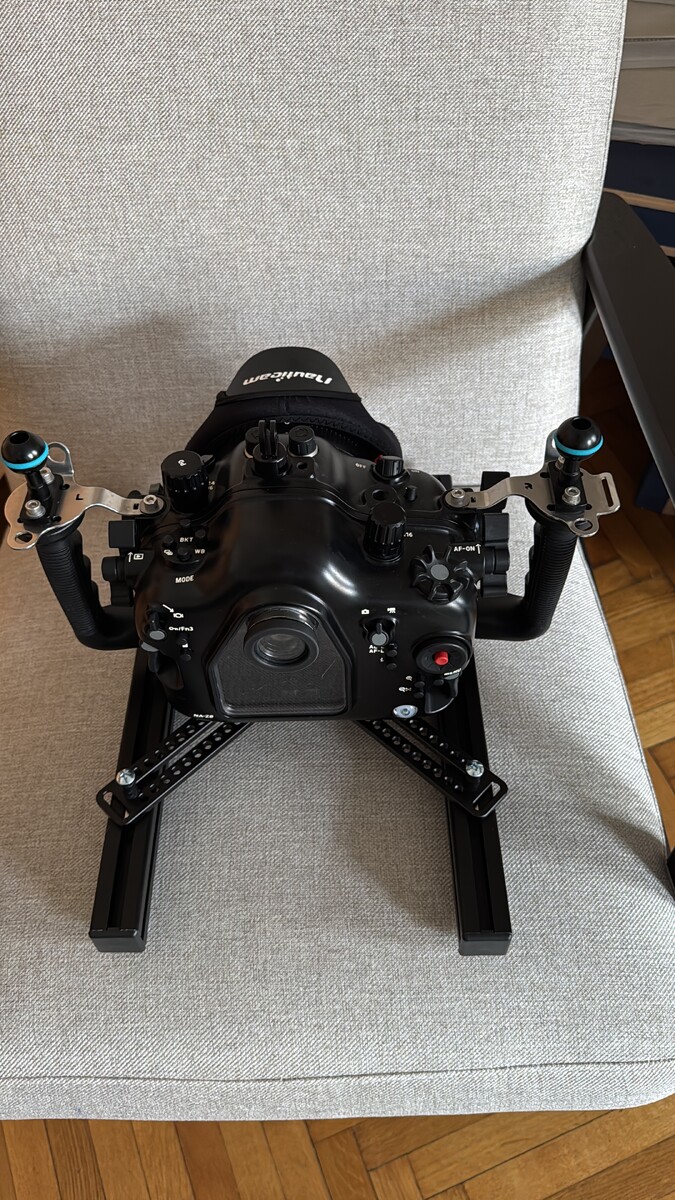
Hello everyone, I posted my initial plan to build a Nauticam trim sled with aluminum profiles a while ago. In August/September I was on the Azores to test the final setup. It was heavily positive, but I could fix it during the first check dive. The 6inch monitor is honestly the best thing. You can see everything from every angle. During the shark dives it was great to have one eye on the monitor and the other one on the sharks. The aluminum profiles worked great. We had some rough sea and the tray protected the housing from too hard bounces. I swapped the nuts to 3d printed ones, because they were rusting. Also the float situation is not great. I need to design and print an holder for the two buoyancy arms on each side. After some of you guys said that I should balance the floats, I put some of them below, but the bigger part on top. The weights on the sled were also a DIY quick and dirty project. This one needs proper lead weights with a proper screw, but the trim worked underwater. All in all it is a great setup, it is still a little bit positive, but nothing a few lead weights couldn't fix ;) The Keldan wireless remote is a funny gimmick and keeps me radius small, so I don't have to reach that far to change the light output. The dives in the Azores were absolutely great and almost 4TB of data wait to be edited haha If you have any questions just write me a :)

-
Hey Dave, do you maybe have the file for a Nikon Z105mm Macro lens? Or do you have any tipps for making one?
-
@Chris Ross Your input is very interesting. When I started with this project a few months back I thought about the difference in putting floats on the strobe arms or bowl the camera. I think there are a few kilos negative I have to balance. The space below the housing and between the rails is perfect for a custom flat foam block, to generate lift from below and not pulling from above. Fortunately I have a glass dome, so it is a little front heavy and the monitor in the back is going to pull the whole rig back. Unfortunately I still don't have my lights yet and no time to really test is before the next trip to the Azores end of August. But I am definitely going to follow your ideas. Balance the lights to neutral, the buoyancy still needed will be split between a bottom foam block and some buoyancy arms. With a little bit more on the top. Do you think it is better to leave it slightly positive and then add the trim weights or balance it with the weights and then the trim is easier to archive?
-
Hey, thank you for your nice comments, i try to answer everyone in this posting. @bghazzal I used this: 2x400mm https://www.innovalu.at/de/30x30mm-schwarz-eloxiertes-aluprofil.html 10x https://www.innovalu.at/de/nutenstein-M6-nut-8.html 2x https://www.innovalu.at/de/profilgummiauflage.html 4x https://www.innovalu.at/de/endkappe-30x30.html I think the weight system are going to be trim weights from a small camera gimbal. They have like 20g each and a thread on one side, so I can directly screw it into the T-nuts. @SwiftFF5 Yeah that‘s the next thing I have to consider. The monitor mount. I am thinking about a small profile, the same I used as the sleds and then a ball mount into the T-nut. @Davide DB Thabk you :) The monitor mount is still a thing I have to think about. I bought a 6inch Fotocore monitor, which has a thread in the back. Maybe I find a sleek solution, as i mentioned a few sentences above. The weights are going to be trim weights from a small camera gimbal. Something like this: https://www.smallrig.com/de/smallrig-counterweight-kit-for-dji-rs-2-rsc-2-selected-zhiyun-gimbals-3125.html?skuId=1517092352715550721&gad_source=1&gad_campaignid=21452025728&gbraid=0AAAAA9ksdxnnV3mUnnX4AgHUGDQ4xJUHd&gclid=Cj0KCQjw64jDBhDXARIsABkk8J7JMMawtmDLSQLNOzEJmcCwaDykZwWx--88QyH6l9RYFRgWSh2jWeYaAvEdEALw_wcB Yes tripod legs, like I saw here in the DIY forum with ball mounts and carbon arms are possible on the inside of the profiles. If i use spacers on one side, I can flip them and store them perfectly below the housing. @Tom Kline It may looks more elegant, but I still have to test it ;) But I love your pole cam setup!! It is really great. What do you use as a pole?
-
The new ATOMOS Shinobi II allows to control and for some cameras even touch focus options. All you need is the monitor (300€) and a custom USB-C cable. You can take Nauticams USB-C bulkhead and maybe someone will build the cable for you. I talked to DiveandSee, but he doesn't do it, because he doesn't know the monitor. It would be my dream setup for a polecam system. Where you can control the basic settings, hit record and change focus by touching the monitor.
-
Hello, I built myself a trim system for my Nautical Nikon Z8 housing. It consists out of two aluminum profiles and a few amazon aluminum cheese plates. The goal is to have neutral rig with adjustable trim (with small weights on a sled), so I can do some tilted shots against the sun and so on. The profiles are that long on the rear end, because of the 6inch monitor, so I have enough space to mount ist perfectly for alle my needs. An additional benefit is that I can put my camera down, without the hazard of scratching the housing. There is a rubber boot at the bottom of the profile. The products you can buy are too expensive and sometimes too small. I tried to keep everything as close to the housing as possible to mimic a bigger cine housing. What do you think? Daniel

-
Thank you :) Yeah I think Nikon stepped up their video game A LOT in the last years. The Z8 and Z9 are one of the best mirrorless cameras in the moment regarding especially video. 12 Bit intern Nikon RAW in 8K 60 fps or 4,1K 120fps is absolutely massive. I had a white balancing card with me and tried to adapt WB to the depth I was at. Regarding the wide and shaky shots: Yes you are right. I now would select fewer shots for the video. Also making it a little bit shorter. @Music: We tried something to something different ;)
-
Thank you very much for your feedback, Davide :) The lens was great for this trip. Unfortunately it is a DX lens, so no use for my Z8. The Z6II cropped in for 4K 60fps, so it was no problem back then. The dome was a 6,5 inch glass dome. The editing and music selection wasn‘t actually done by me. My best friend is editor. I have a similar opinion as you do, when I watch the video now. I think it is too long after the sharks. But we saw so many incredible things, it had to fit everything haha
-
Nice! What do you direct? TVCs or more Features/TV/Series :)
-
This is my first underwater travel video. It was shot in one week on the „Blue Storm“. We did a liveaboard and visited Deadalus and Fury Shoals. The camera was a Nikon Z6II with an Isotta housing and two no-name lights. The lens was a Sigma 17-70mm 2,8-4f lens. Color Grading was done in DaVinci Resolve. I would love to hear you feedback and opinions! :)
-
Hello, my name is Daniel and I come from Vienna, Austria. I learned scuba diving in very cold, very murky and very dead lakes. The first time in the Indian Ocean was a game changer for me ;) I work as a freelance focus puller / 1.AC in the movie industry. As a hobby I started underwater photography and videography. My current setup is a Nikon Z8 with a Nauticam housing and a selfmade trim sled. In the next few weeks I am going to upgrade my rig with Keldan 8XR Ambient lamps and a 7inch uw monitor. My website is constantly growing with new content: www.danielmkainz.com I am looking forward to learn a lot of new things :)