


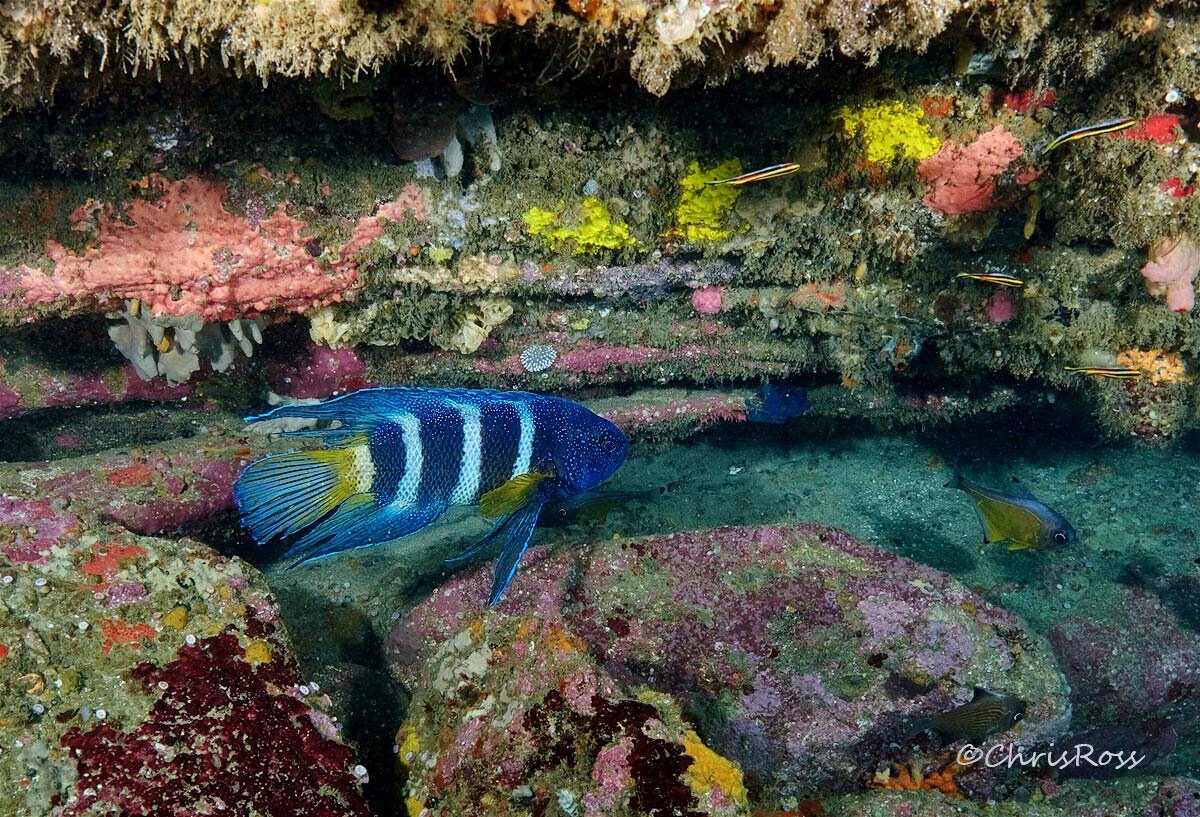
Everything posted by Chris Ross
-
Ikelite seem to promote using this dome with a fisheye for CFWA, the discussions mention that the edges of the image may not be great and imply it's not important. Fisheyes seem less prone to problems with dome positioning but you usually won't see the problems in a 1024 pixel wide image on the web. Rectilinear lenses show more pronounced problems if not positioned correctly. You can look at the post by Dreifish here to see some examples of different dome positions: Testing Nauticam N120 Port Extension for 140mm and 180mm domes with wide angle lenses - Photography Gear and Technique - WaterPixels Keep in mind that these domes are maybe up to 10-15mm out of ideal position, the dome you mention will be much further from the correct position for many lenses. One of the problems is that most test images you can find online might be up to 1200 pixels wide and it is hard to find problems in such images.
-
The other issue is that if you haven't used good equipment you don't really know what is possible and people looking at it on smart phones won't know the difference as suggested. To me the phrase "do this instead" means it promoting some dodgy scheme, supplement or whatever and I resist clicking on the link. In the same class as "xxxxx doesn't want you to know this"
-
Yes for photos if you are going to print you need to turn down the display otherwise your prints come out too dark. Also a matte display tends to be better by avoiding reflections it's easier on the eyes. The thing with sRGB vs Adobe RGB particularly for blues, you don't know what you are missing until you edit on an Adobe RGB monitor and convert to sRGB. The blues really are much nicer.
-
what do you mean by using the focus guides - are you using focus peaking?
-
@Adventurer again people have been posting their test results to the forum using their own strobes and a supplier provided strobe in the case of the maxi and taking a lot of time to test and compile results to benefit the forum participants. You however again imply an ulterior motive as the reason the Apollo III strobe doesn't win. As far as I can see the reviewers have detailed what their methodology has been and reasons behind it. Please if you disagree with results or methods don't accuse (or imply) people of having ulterior motives, rather address the issue you have with their methodology, why you disagree with the methodology and what you suggest they should do instead and why. You can also agree to disagree. Implying ulterior motives is a form of ad hominem response and we discourage that on the forum. We are all for vigorous discussion about the subject being discussed as long as it is directed to the subject not the forum member. As far as my question , I believe it a statistical possibility that can't be resolved with the samples at your disposal. You can only draw conclusions based upon the strobes you actually have available to you. As far as a fair way to compare - my thought is that determining the max power level at which the strobe can rapid fire without dimming or dropping frames at a given frame rate (10 frames/sec , 5, 3 whatever the reviewer chooses) and comparing the light output when firing at that rate makes the most sense. The strobe with the highest light on the subject under those conditions wins. Any tests with dimming and/or frame dropping just makes a lottery of whether your shot is exposed correctly or not.
-
OK thanks, you could probably utilise the higher power of the S&S strobe. Optically triggering might be better if you want TTL . Wired sync cords have another set of o-rings you need to maintain and only support manual operation it seems. Optical sync of course would need a trigger.
-
no, don't believe so, my calcs show around equivalent to a 28-30mm lens and I actually use the 8-15 on my OM-1 which is a 2x crop so the same as a 2x on your full frame, so I can compare fields of view directly. This post has some test shots showing the zoomed in 8-15 has about the same field as a 14mm rectilinear lens - which is 28mm full frame equivalent. In any case you can compare the fields of view through the zoom range from the pics I posted. The advantages of fisheye zooms! - Photography Gear and Technique - WaterPixels
-
The previous Sea frogs models were pretty poor and didn't work as advertised, very little info available on reviews online so a bit of a gamble. On the S&S the 5 pin cable connection seems to be manual only. TTL underwater is not necessarily better, some of the newer strobes which emulate the camera manufacturers TTL protocols seem to do quite well, slave TTL possibly not as good, probably depends on how well the strobes slave TTL matches with the manufacturers system. Manual strobe UW is not that difficult and is more repeatable. You don't say what camera you use, this can make a difference. If you are using a TG series camera, these strobes might be overkill.
-
Don't forget Nauticam is not the only game in town, Isotta has quite a big presence in Australia and their housings and particularly ports are quite a bit cheaper. If budget is tight, don't rule out buying second hand, if you are flexible on what system you get, you can get away from a lot of the issues with pre-flash cancel etc with right camera body - one that will allow manual flash and more so if it has a popup flash or like a small accessory flash. Expect to pay 40% or less of new price for one-two generation old gear. I'm sitting on my EM-1MkII housing and camera as selling is a hassle and returns not that high, so I haven't bothered trying to sell since I switched to my OM-1. I was a long time Canon shooter and when it came to buying UW gear I went with m43, in aluminium housings the price for the housing is significantly less, lenses, ports etc are all cheaper. They have a small accessory flash that can fire at 1/64 power and is perfect to trigger strobes. Plus they have arguably the best range of lenses suited to UW work. I ended up switching above water shooting to Olympus as well and find the image quality is good enough for me. Full frame is in general too expensive and bulky to take UW.
-
While you can attach a Tokina 10-17 lens to the A7C, it is an APS-C lens and the image circle is only designed to cover that format. Apparently it will work on full frame and produce an image but the quality drops off rapidly as you move outside the APS-C frame. Unfortunately strobe triggers are a niche product which are reverse engineered to work with a great many camera models and to play with a wide variety of strobes, the market is relatively small and there is a lot of work to reverse engineer these systems to give you something that actually works. There are manual triggers available which cost quite a bit less, but still not cheap. If you can get an AOI housing for your camera then the built in triggers do save you some money.
-
It depends on the capabilities of their printing system. Ideally you would soft proof your images using the profile they use in their system. If you send Adobe RGB images into a system that can only do sRGB, you have no idea how it will impact colours unless you soft proof or convert to that profile. Googling Mixbook process says they use a CMYK digital press. Traditionally CMYK has a more limited gamut than what can be displayed on your monitor. Inkjet prints done on a high end printer can match 100% of Adobe RGB, however the prints produced are not really suited for books as they can be quite fragile. So in short given that they don't seem to provide soft proofing profiles, it would be best to follow their recommendations for sRGB.
-
I don't believe video editing places any special demands on a monitor as long as it has a decent refresh rate. Might be good to ask the question of an experienced video person though. A separate switch is indeed an option for and is a good idea if you are using two separate machines. Good ones can be pricey if they are 4K capable though. Many high end monitors have multiple inputs that you can switch between on the monitor itself, if you get one like that you can get a basic KM switch to switch keyboard, mouse and any other USB peripherals and they are quite cheap. For example there is a 32" BenQ model that has two HDMI and one display port and one of the Eizo models has two display ports. I would add that we spend all this money on the best cameras lenses, etc. but for 95+% of people we only ever view the finished product on our monitors. I know everyone has a budget they need to consider, but it seems to me cheaping out on a less capable monitor throws away a portion of all that effort to get the best image. There are diminishing returns of course, but I think full or near full Adobe RGB coverage, good contrast and good calibration facilities are important, and this means looking at the colour accurate series for your monitors.
-
They are basically only used for stills to keep shutter speed within range of flash sync speed if you shoot macro lenses fairly wide open for shallow depth of field. something like a 4 stop filter would allow you to shoot a lens at f2.8 where you ordinarily use f11 and be happy with the Background brightness. For much of Lembeh unless you are in shallows and also wanting to shoot wide open ambient light is not that strong.
-
Looks like you've swapped a HF-1 filter diffuser with Retra diffuser and put them on different strobes.
-
As far as I can tell my Olympus flash unit in combination with the OM-1 does auto super FP, I normally have that turned on in flash menu and the flash knows what speed is set on the camera. it seems that this might be incorporated into either the flash or the trigger? When I get back home I'll see if I can test this out.
-
As you are in Australia you'll know prices can be high. If you are sticking with wide angle work you could consider the INON S220, a surprisingly capable little strobe with good coverage and quite even light. They are quite reliable. If you want more power there's been quite a few released recently. I've seen good reports on the new circular tube AOI strobe on the forum recently. Like you I shoot in sometimes murky temperate waters (I'm in Sydney) and I recently upgraded to Retra strobes, I got the pure model before it was discontinued. What I found was the combination of that strobe with the reduction rings was night and day to my old Z-240s in terms of backscatter reduction. All using the same strobe positions. Not in every shot, but I had way less particles being lit up. I'd suggest getting strobe that allow you to add reduction rings. Regarding full frame I am convinced it's not needed UW if you are not doing it professionally . Sure if you can afford it and can handle slepping the bigger rigs around go for it, but it's really not needed IMO. I shoot m43 and I remain happy with that - lenses, ports housings are all smaller and lighter and as you don't need to stop down so much (f8 is fine) lower powered strobes will do the job.
-
Yes that is correct. The advantage of the 2x is you can you all the way from 8-15 with more reach and with the Sony 2x image quality is reported to be as good by several people.
-
Agree, you can see what happens when you convert to sRGB, The water colour goes off completely. I used to convert to sRGB for web display, but these days I leave it in Adobe RGB.
-
All I'm trying to say is two people have done reviews and found the HF-1/maxi performing a little better in the high FPS performance and you have tested and found your Apollo III better. There is the possibility based on this that your samples of HF-1 or their batteries aren't up to speed, just like you suggested that the Apollo III strobe samples one of the testers has were not up to scratch. To be fair high FPS is not important to everyone I used to use high FPS on land a little and ended up getting sick of examining hundreds of near identical images to pick the image I thought best. But each to their own if you see an advantage to this in your shooting, more power to you. If it's important to you, make your choice of brands that can perform like this using testing like we have seen on this post to guide you.
-
appears it is a standard gamut monitor covering sRGB only. I find the extended blues and greens in Adobe RGB particularly useful for UW work. The Eizo panels cover all of Adobe RGB colour space.
-
Both lenses? I know at least the Nikonos lenses don't reach focus in air. I would assume the S&S lens would be similar.
-
I would suggest examining the port chart to see what you can re-use or minimise buying new ports. If you have or want to use a macro lens in future consider if you can use the same port with an extension tube. I believe the collapsing pancake lenses, at least some models aren't that reliable. For example the Panasonic 14-42 (not the- PZ) takes the 35 port, you can add a 30mm extension to use the 60mm macro. There will be other combinations.
-
I would observe that we have two independent people stating the HF-1 out performs the Apollo III strobe and one person reporting that the Apollo III is better compared to their HF-1. Surely it's equally possible that the HF-1s in question(or their batteries) are under performing compared to the Apollo III samples as the only data available is the comparative performance of the strobe samples that are owned. It could also be related to the batteries being used in each model as these seem to critical to achieving this sort of performance. Backscatter in particular are quite vocal about using the right type of battery and it's not unheard of for batteries to lose performance after some use.
-
The field can be estimated same way as any lens and 8-15 with 1.4x becomes a 11-21mm lens. You still get the full 180deg diagonal at 15mm actual focal length, this means 11-14.9mm (actual focal length vignettes with the corners dark, similar to what you see between 8 and 15mm on the bare lens. I've done the calculations assuming an equisolid fisheye projection and with the 1.4x at 15mm FL (11.2mm on the zoom ring) the horizontal field is 144 deg, while zoomed all the way in to 21mm the field is 96 deg wide which is about equivalent to 16mm rectilinear lens. Comparing horizontal fields gives a better idea of coverage in my view.
-
There are lots of monitor choices around these days, but the field for truly colour accurate monitors is much more limited. I have a pair of Eizo color edge monitors, One is a CS2731 and the other is a more basic Eizo model. I use the good panel for my image and the second screen will have the various toolbars, like actions, libraries, history etc on it. It is also used when I need another app open and visible at the same time. Realistically as far as I have been able to work out Windows only properly supports one monitor profile, though I haven't dug in more deeply recently. If I recall correctly I calibrated the secondary panel once and used a workaround to apply the calibration. One of the reasons to have a high end monitor is so that they can be calibrated well to show the full colour gamut they are capable of, so to me it makes sense to have one good quality monitor and a second for more pedestrian work that doesn't need the colour accuracy. I think you won't go wrong with Eizo panels. Though they mostly have 27" panels and some larger ones in the high end CG range but they are quite pricey. They have good warranty cover and dead pixel policy. This company is enthusiastic about colour accuracy and you read their monitor recommendations here, they recommend Eizo and for cheaper monitors BenQ range: Monitor Recommendations | Image Science


