

Kamaros
Content Type
Profiles
Articles
Events
Forums
Gallery
Store
Posts posted by Kamaros
-
-
3 hours ago, Matan said:
Thanks, I'll just source new Nauticam ones and stop the lubing thingy.
(yeah they are expensive but a one time payment for them every few years is still cheap - my CCR costs more annually 😄 ).
Matan.
Are you looking at the right o-rings? $16 USD for a pack of 10 (Backscatter, Bluewater Photo, etc) sounds like the cheapest purchase related to this hobby you might ever make 😛
-
 1
1
-
-
51 minutes ago, Davide DB said:
Didn't you find anything useful here?
The Caribbean is well-covered because Humann/DeLoach had a dedicated Reef Coral Identification book for that region, and I think some of the Red Sea books cover corals as well, but coverage is lacking for other regions. For example, most of the books for the Pacific specialize in covering fish or nudibranchs (at least, that's what their names suggest; I didn't actually look at the table of contents for each book to confirm), and the one Reef Creature book (which I own) is pretty limited - there's only one page on reef-building corals, one page on gorgonians, two pages on sponges, etc.
-
I have a Cinebags Grouper XL that I use for transporting my rig when diving locally. I also found it useful last year when I was on a photo workshop in La Paz where we were schlepping our gear between a hotel and our boat every day, and where the boat's camera table was too small to fit everyone's gear.
I used to carry a "minimum viable setup" (camera, housing, viewfinder, vacuum system, one lens + port, strobes and cables, a pair of clamps to mount the strobes directly onto the housing, batteries and chargers for all the above) in a ThinkTank Airport Commuter backpack which I could just barely squeeze under airplane seats if I took out my laptop and headphones and shoved them in my seat pocket. It wasn't very comfortable and always felt like I had a brick pressed against the small of my back, so I've decided to try switching over to a hiking bag with a camera insert. I haven't tried flying with it yet, but I've picked up a Decathlon Quechua MH500 40L backpack (based on recommendations from this megathread) and a Lowepro Gearup Camera Box XXL II which seems to fit snuggly.
Here's a sample loadout for the A7RV + Nikon 60mm macro on Monster adapter as an example. I'm waiting on Backscatter to get the FCP and 10mm extension ring back in-stock to see if other lens + port combinations will fit the insert.

Here's the backpack with the insert loaded.
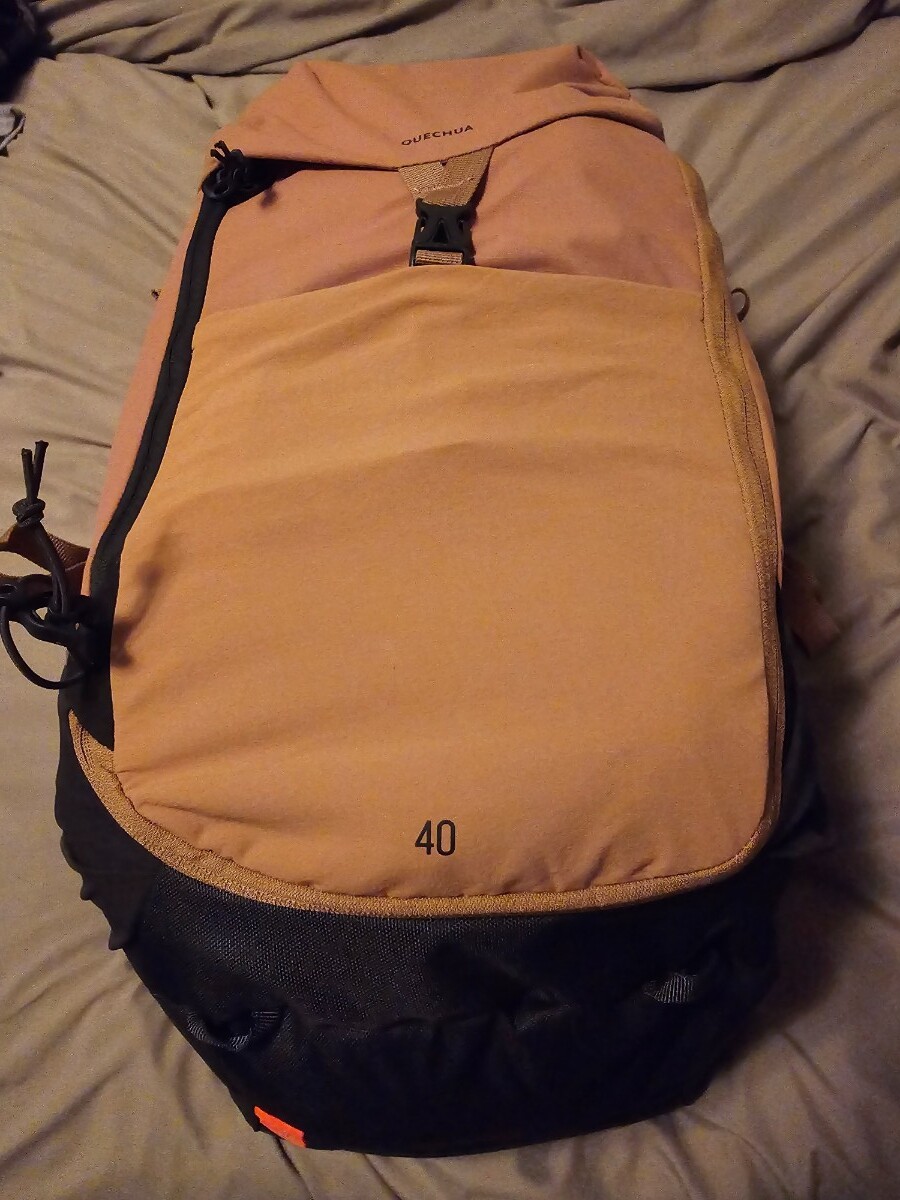
I don't actually know if this would fit under and airplane seat, but in the worst case I could probably take the insert out and use it as my personal item, then try to shove the empty backpack (which flattens down reasonably well) into an overhead bin like you might do with a jacket. I also didn't bother to unscrew the mounting balls on the housing here, which could be removed to decrease the required depth by another inch or so.
Aside from the backpack with the minimum viable rig, I like the Tenba Roadie Air Case Roller 21 as a carry-on roller for all the other gear that doesn't fit in my bag - it's rugged like a hard case, but looks like a normal roller bag instead of screaming "STEAL ME" like a Pelican case. I'm also a fan of the internal organizer pockets, which I stash things like my remaining arm clamps, spare cables/batteries, etc into.
-
1
-
-
1 hour ago, Floris Bennema said:
Not that there are many, but from which region?
A photo uplad could help too.
This was more of a general question about identifying corals and sponges from wherever I decide to travel to, not a request to identify something in a specific image. Of course, there's the option of posting here for help with a particular species, but I was hoping someone might have resources to make this more self-serve.
-
Does the 140mm dome actually provide better image quality than the 230mm for fisheye lenses? Is that just in the center, or does "larger is better" still apply to corners in this case?
-
I think the dome (and consequently, the size of the hard cover) are bigger on the WACP-C than the WWL. At the very least, I haven't had any issues operating the pinch lock mechanism with my dry gloves (Showa CS720 smurf gloves with Fourth Element xerotherm glove liners).
-
1
-
-
Before I sold mine, I used to just take the hard cover with me on the dive. Both the pockets on my drysuit as well as my tech shorts were large enough to comfortably fit the cover, with ample space to also fit a DSMB and pocket snorkel.
Honestly, I've been rather wary of neoprene covers ever since one of them caused a scratch on my 140mm dome - some particulate got trapped between the dome and the cover when exiting a shore dive and scraped against the glass the next time I tried to take the cover off.
-
1
-
-
Has anyone tried the Saga Trio diopter with the Sony 90mm macro lens? I recently switched from a D850 to an A7RV and found that if I tried to reuse some of the ports I already had (Nauticam 35.5mm N100-N120 adapter + N120 extension ring 20 + N120 Macro Port 60), the 90mm was fine on its own, but resulted in significant vignetting if I tried to use the Saga Trio on top of it. That port combination is 10.5mm longer than the N100 Macro Port 105 recommended by Nauticam's port charts, so I was wondering if anyone had tried this combination with the recommended 105mm port to see if it would fix the vignetting, or if I would be forced to switch to smaller diopters with this lens.
-
Rear-curtain sync:
- Good to have as a default setting when NOT deliberately trying to do blur shots because fast moving subjects might still result in some motion blur, in which case rear-curtain will result in a more natural trail behind the subject
- Also good for deliberately blurred shots where there isn't necessarily a single direction of motion, such as schools of fish that aren't moving together, or something like a juvenile sweetlips with erratic motion
- The downside of using rear-curtain sync is that you're at the mercy of the subjects' movement, so you don't have much control over where the final image of the subjects frozen by your strobes will be in the frame
Front-curtain sync:
- Generally preferred for shots where you're deliberately trying to introduce blur by panning your camera in the same direction the subject is moving, but at a higher speed than the subject (sometimes referred to as "accelerated panning" shots). This is because your strobes freeze the subject in the position they were in when you initially press the shutter button, giving you more control over the final composition.
- The downside of front-curtain sync is that you'll end up with unnatural looking motion trails ahead of the subject if you don't pan fast enough, or if you forget to switch back to rear-curtain sync for non-panning shots
-
3
-
-
I'd also consider chucking all your clamps into a ziplock bag and applying some WD-40.
-
1
-
-
59 minutes ago, hellhole said:
hm..okay.. i will try that out.. maybe i have been using it all wrong!!
Unfortunately, I don't think you can do this with an A7RIV. Sony added a new setting called "Full Time DMF" to the A7RV which I don't believe is available on their older cameras that allows you to switch to manual focus at any time and on any focus mode by turning the focus ring. On the A7RIV, I think you only have access to the dedicated DMF focus mode (basically AF-S with the ability to manually focus), so it can't be used with AF-C or tracking.
-
1
-
-
I was there in February. While it's possible to get some close encounters, you'll want some additional reach most of the time. I think the 8-15mm is a reasonable choice, but may still require some cropping to fill the frame with some subjects.
I think your partner will struggle with just the 8mm, particularly for skittish subjects like sharks. The WWL is just about perfect for Socorro (in fact, I personally shot exclusively with the WACP-C + 28-70 when I went, which actually has less zoom range than the 14-42).
I don't shoot video so I'm not really qualified to comment on that front, but many subjects were frequently out of strobe range so I'm not sure more powerful video lights would make a difference in most cases.
-
2
-
-
7 hours ago, Interceptor121 said:
There is a dust and scratch filter in photoshop however needs to be used sparingly as it softens the image
when the backscatter is on the subject removing the individual spots is always better
Yes, I find the dust and scratches filter is generally a good solution for open water backgrounds, but doesn't work very well for backscatter sitting on top of any surfaces with details you'd like to preserve since it tends to blur everything underneath as well. The reason I was excited to discover Retouch4Me Dust was that it does a better job at leaving underlying details untouched. I think it's still best paired with some masking to prevent false positives from being removed, as well as some additional spot removal for any backscatter it failed to identify, but overall it seems a lot faster than the alternative for certain shots.
-
3
-
-
2 hours ago, Architeuthis said:
Did you test how the software effects detail/resolution in the photos?
(Some 100% crops of a photo, very well in focus and with a lot of details, before and after the different treatments would be very helpful)
Wolfgang
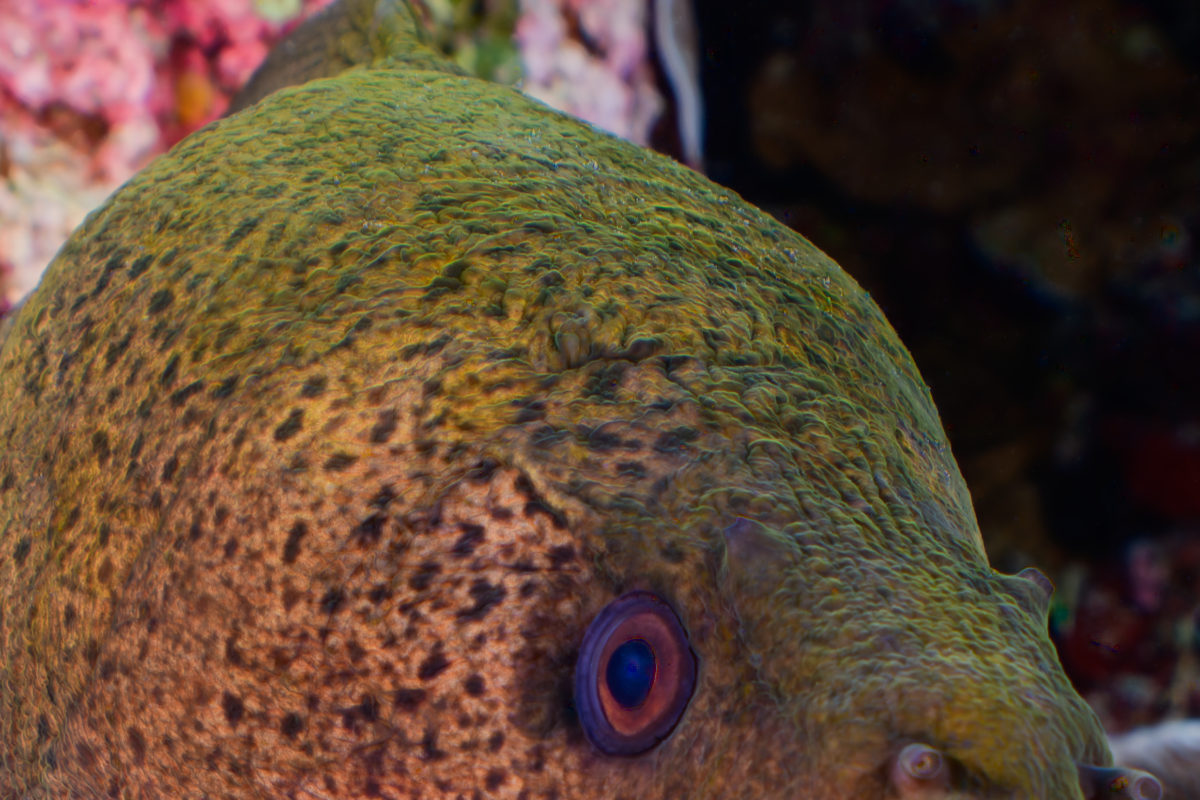
Here's an example of a shot of a giant moray (and not quite in focus bluestreak cleaner wrasse) taken at a much closer distance:

This is what it looks like after applying all 3 filters again (though I think just the medium dirt filter probably would've been enough on this one). As you can see even without zooming in, the software incorrectly removed some false positives, such as the white around the pupil and some of the natural patterning on the moray:
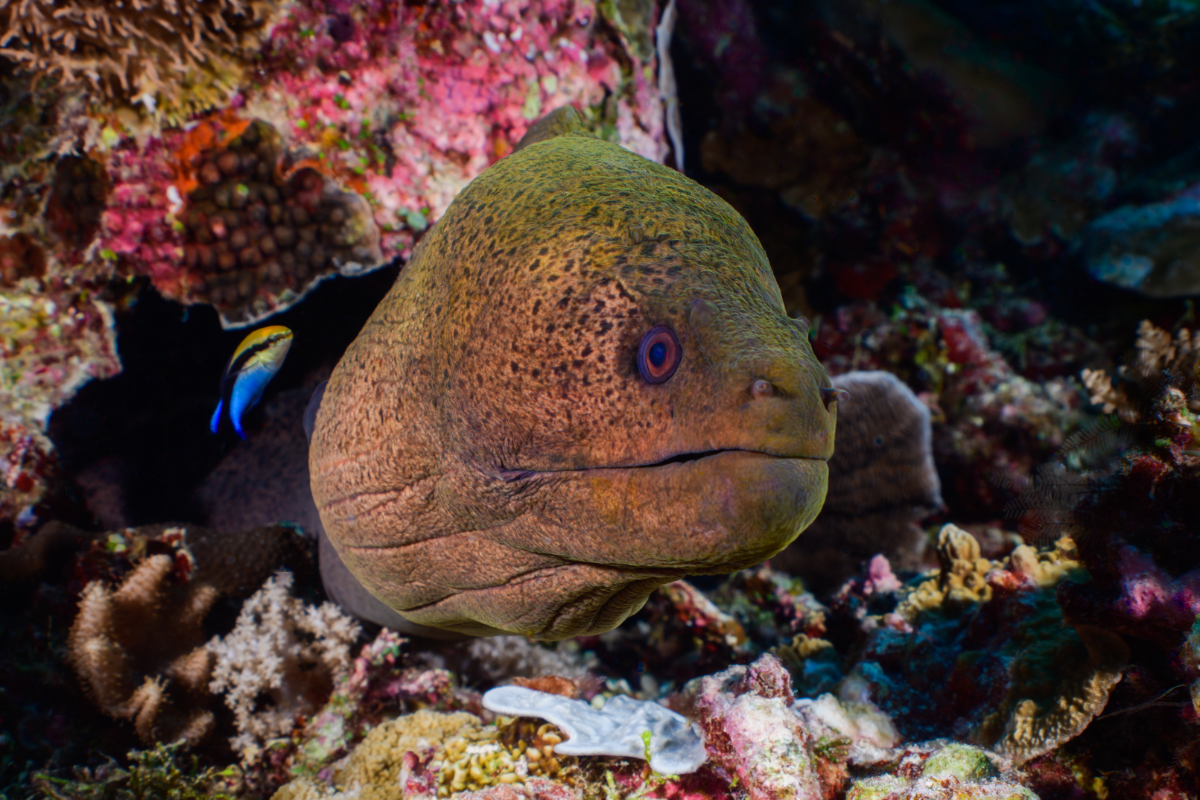
Here are before and after crops of the top part of the moray. Sharpness and detail has generally remained unchanged, but as mentioned before, some of the moray's spots were lightened and the white ring around the pupil was removed erroneously:

It seems to do a better job when it comes to removing backscatter from out-of-focus areas, like in the before and after of the top left portion of the image:


If I was editing this photo seriously, I'd probably try to use a layer mask that selects the background + the lighter parts of the moray using some sort of luminosity mask to preserve the moray's spots, and then also paint the pupil ring back in (or at least, I would if I knew how to create a luminosity mask in Photoshop...)
-
1
-
 1
1
-
-
We didn't go through the Classifieds board, but I just concluded a very pleasant transaction with @Brandon Cole where I traded him my D850 rig and some additional cash in exchange for his A7RV rig. Brandon flew down to California from Washington to make the exchange in person, and also walked me through how he had configured all the camera controls for underwater usage.
Brandon, if you're reading this, it was a pleasure to meet you and I look forward to (hopefully) crossing paths again in the future.
-
2
-
-
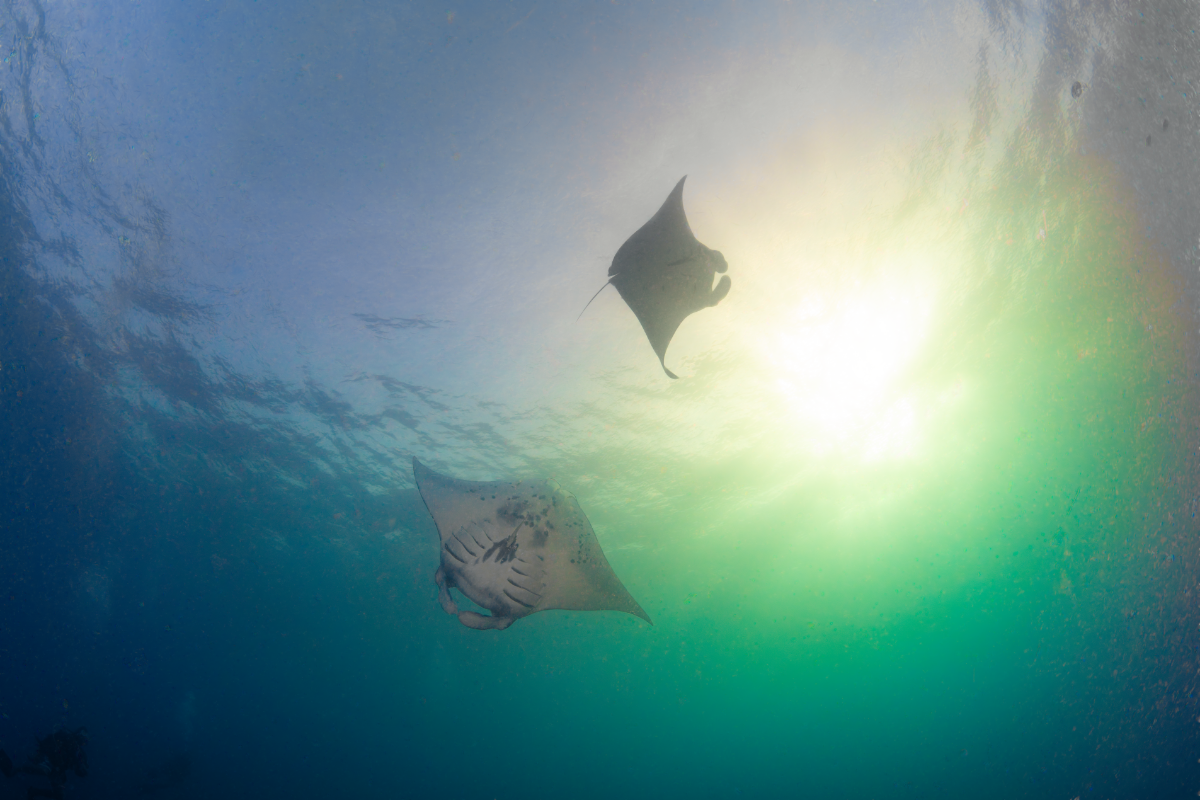
As anyone who's ever tried to process an underwater photo knows, backscatter removal is frequently an incredibly tedious process. While you can sometimes speed things up with shortcuts like the dust and scratches filter in Photoshop, it can still require you to carefully paint masks when you have backscatter in textured areas. For example, consider this photo of a pair of reef manta rays from the German Channel in Palau. This was my first ever attempt to photograph mantas, so I botched the shot by forgetting to turn off my strobes, resulting in me lighting up every speck of backscatter in the ocean. While it'd be relatively easy to remove most of the backscatter in the bottom half of the frame with the dust and scratches filter, it would be difficult to do the same with all the backscatter covering the textured surface of the water without carefully painting over every speck, at which point it's not really any faster than using one of the spot healing or clone tools instead.
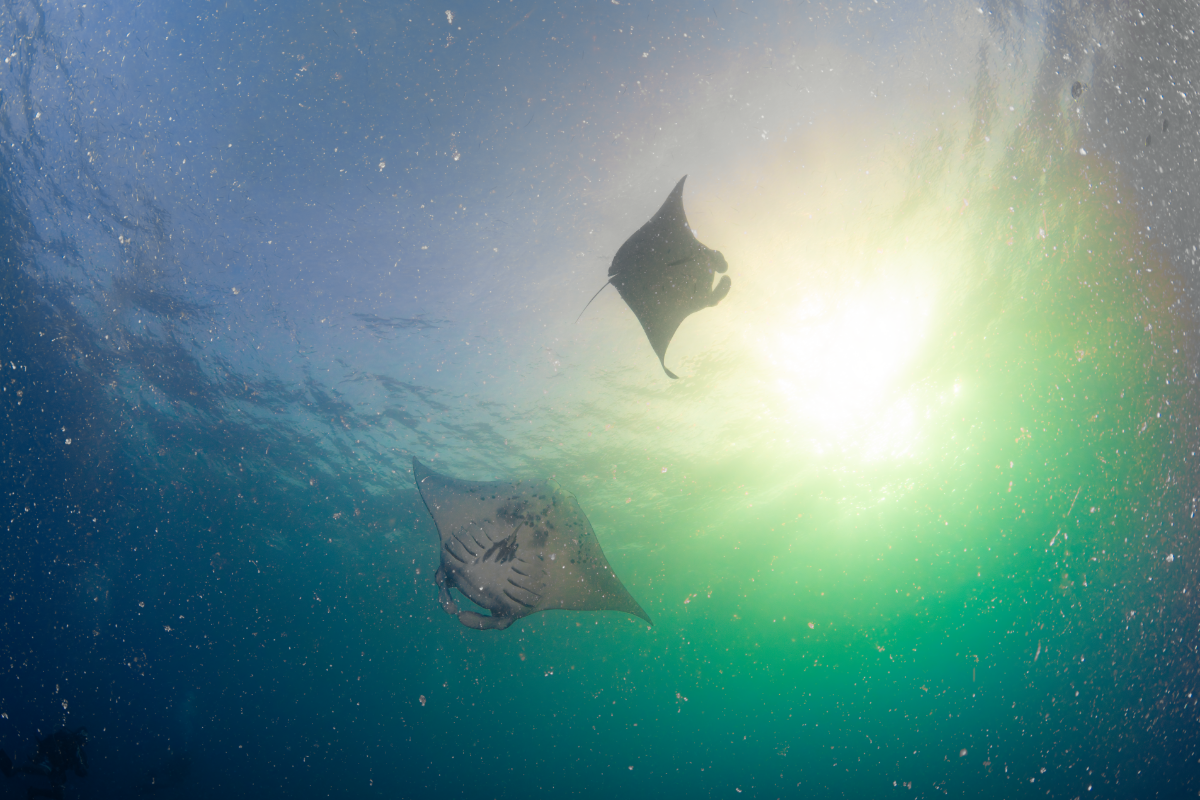
However, I just discovered a piece of software called Retouch4Me Dust (https://retouch4.me/dust) that is designed for removing dust particles from product and portrait photography. To use it, you would go `Filter > Retouch4me > Retouch4me Dust` and select from one of 3 AI models: "coarse dirt", "medium dirt", and "fine dirt"; these are each optimized for different sizes of particulates. Here are the default results from each model on this image:
Coarse dirt:

Medium dirt:

Fine dirt:

As the backscatter in this particular image exhibits significant variation in size, I found that the results were better if I applied all 3 models in succession:

Retouch4Me erroneously removed some of the patterning on the lower manta and darkened the space between the cephalic fins of the upper manta, but that can be easily resolved by applying a layer mask to preserve the markings:
There are still a few remaining spots here and there, as well as cases where Retouch4Me only darkened a spot but still left a little grey patch behind, but overall I think the software did a pretty good job on this image with minimal effort on my part. The listed price is $124, but I found that you can save 20% by searching for affiliate links in sponsored YouTube reviews and the like. I've only tested it on this one photo so far and may end up looking like an idiot if Adobe decides to add their own AI dust removal at some point, but for now I'm pretty happy with my purchase.
-
5
-
1
-
-
I find I can only process a handful of images every night, so it takes me months to finish processing my photos whenever I get back from a trip. I was curious to see how much time others were spending on each of their photos, and what they were doing for their workflows.
-
@Alex_Mustard Are you using any special port adapters in order to use your previous ports with the Nikon lenses and Monster adapter on your Sony housing? Nauticam's port charts specify a 35.5mm N100 to N120 adapter to convert to the Canon EF port system, but don't mention anything about what to use for the Nikon F port system.
-
Has anyone had a chance to shoot the FCP with the old Nikon 28-70 yet? The port charts list it as compatible but with "slight" vignetting from 28-31mm. I haven't seen any photos shot under those conditions yet, so I was wondering how bad the vignetting was. A little cutoff at the corners can be easily dealt with in Photoshop, but it would be a dealbreaker for me if you're effectively forced to shoot at 32mm or higher (or at least be a very good motivator to replace my D850 with an A7RV, which I've been reluctant to do because the autofocus speed of their 50mm macro lens seems to be something of an inside joke at this point).
-
I'm not sure about what effects (if any) salt may have, but I've personally scratched a 140mm glass dome following a shore dive because some sand or similar particulates got trapped between the neoprene cover and the dome and scraped against the glass when I tried to take the cover off.
-
1
-
-
Does anybody have any recommendations for resources to help identify different categories of corals and sponges? I've recently started keywording my images with the help of the Humann/DeLoach identification books (RIP to the former, who passed away last month), but never have any idea if the thing occupying 60% of my reef scene is some sort of staghorn coral, gorgonian, etc.
-
1
-
-
It took a while for me to get access to Photography Experts (it seemed like someone needed to manually approve my sign-up so I ended up waiting like a week and eventually only got approval after sending a message via their in-browser chat), but I haven't had any issues accessing https://www.photographyexperts.com/reboot-with-alex-mustard after that. I'm currently in California using Chrome, in case that's relevant.
So far, I've watched the intro, wide-angle, and composition lectures (skipping over macro for now because I'll be on the Bluewater Socorro workshop starting Thursday) and have found the content very interesting and useful. I'd caution anyone brand new to underwater photography that the course is not suitable for beginners as it doesn't cover the really basic stuff, but I think it's excellent for anyone who already understands the fundamentals and is looking to elevate their photography to the next level. The one annoyance I had was that the lecture videos weren't listed in the correct order when the course first went online, but that seems to have been fixed.
-
1
-
-
The approach I've been using:
- Do your best to pack your main rig in a camera backpack. Carry-on bags might still get checked at the gate for busy flights (and subsequently lost in transit), but the your "personal item" will always stay with you. For me, that'll usually be a D850, housing, 45 degree viewfinder, 2 Ikelite DS232 strobes, 28-70mm lens, a WACP-C, and some arm clamps for wide-angle destinations, or a 105mm + port + Saga Trio diopter for macro destinations. I can't fit float arms in the bag, but it's enough to do close-focus stuff in a pinch, though I do need to disassemble the viewfinder and arm mounting balls from the housing for everything to fit.
- For other lenses, ports, and other gear, try to pack them in a carry-on with configurable divider panels. I've found them to be enough that I don't need to bring bulky padded bags for my ports. I personally like the Tenba Air Case for this role because it's very sturdy, but not as heavy or as obvious of a target for theft as something like a Pelican case.
- Some airlines like Philippine Airlines weigh your carry-on bags as well, which you should keep in mind if that'll be a concern. If you're forced to fly with one, you may want to consider wearing a photo vest that lets you carry some of your lenses and accessories on your person instead of in your carry-on, though you should be warned that it might not be the most comfortable in a cramped airplane seat.
- You can save space by putting your camera body in your (unsealed) housing. I've heard some people expressing worries about potentially causing the camera tray to get misaligned from too much jostling - it's not something I've personally run into, but if you're worried, you could also pack a lot of accessories in there instead.
- Avoid leaving a lens attached to your camera body if possible, as you risk damaging the connecting thread if your packing job exerts force on the wrong spot
-
3
-
-
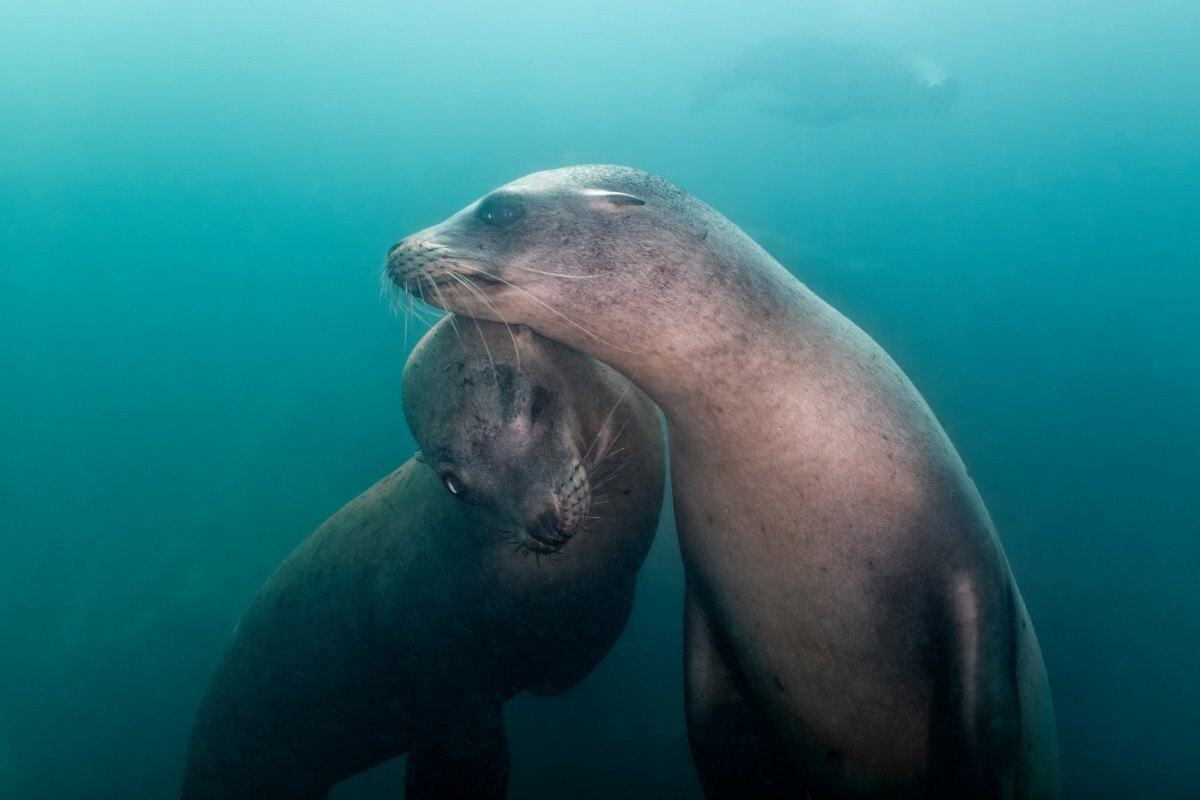
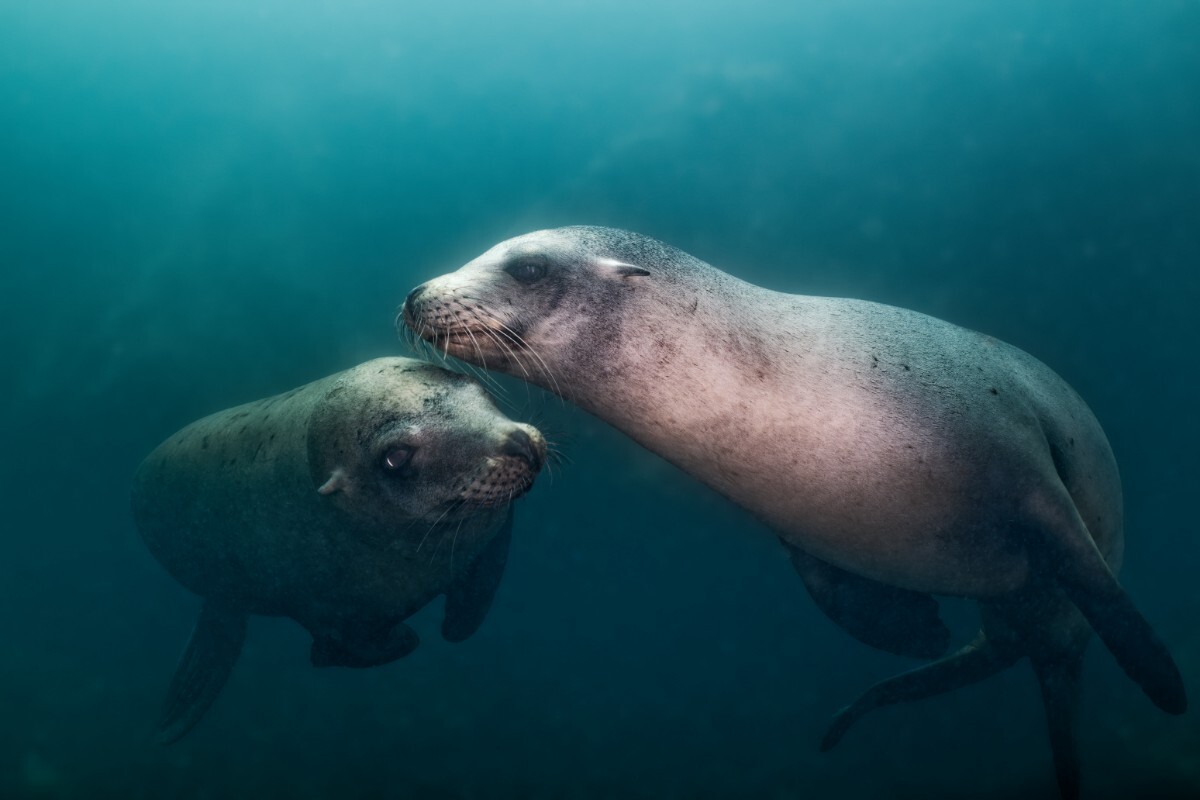
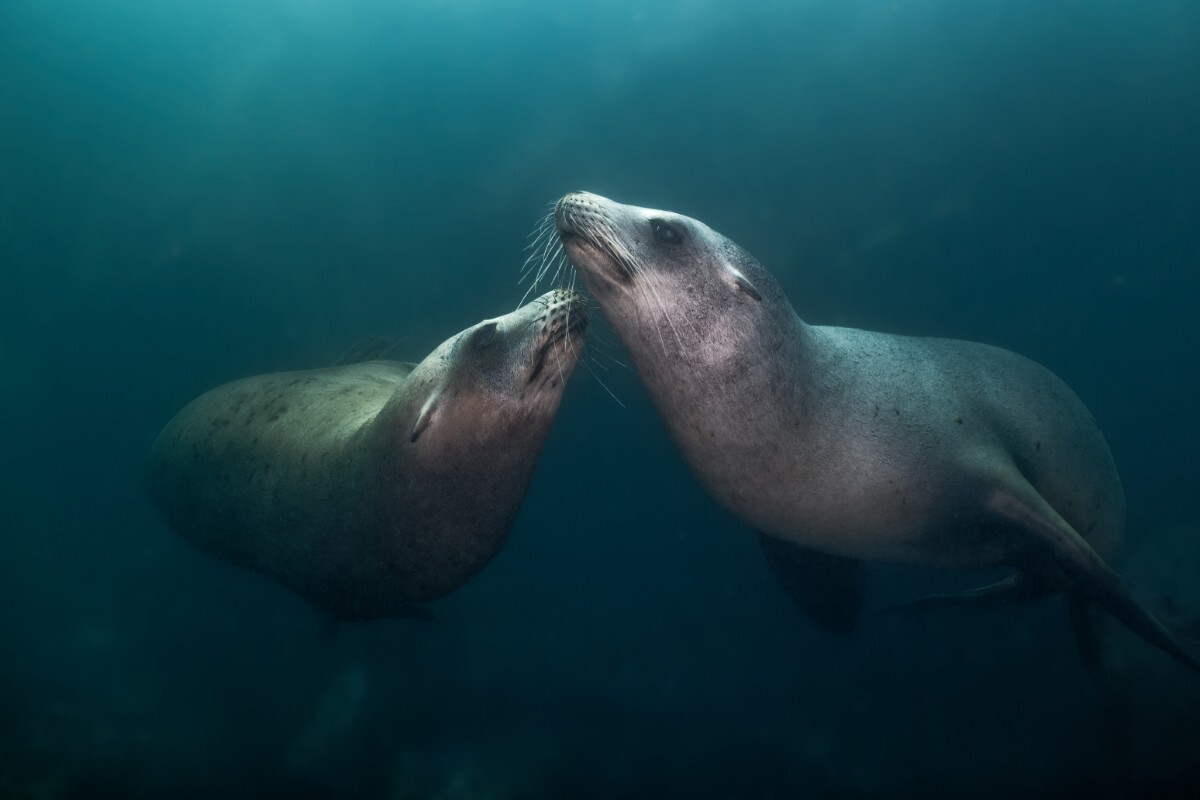
I haven't finished going through all of my photos from last year, but of the ones I've developed so far, it would probably be one of these sea lions. I've been diving with the Monterey sea lions on a regular basis for the last few years, but it was only last year that I was finally able to capture some photos of them that I actually liked, which I attribute mostly to investing in a copy of @Alex_Mustard's Masterclass book and picking up a WACP-C, which does a much better job of filling the frame for shots like these compared to the 8-15mm fisheye I was using previously.
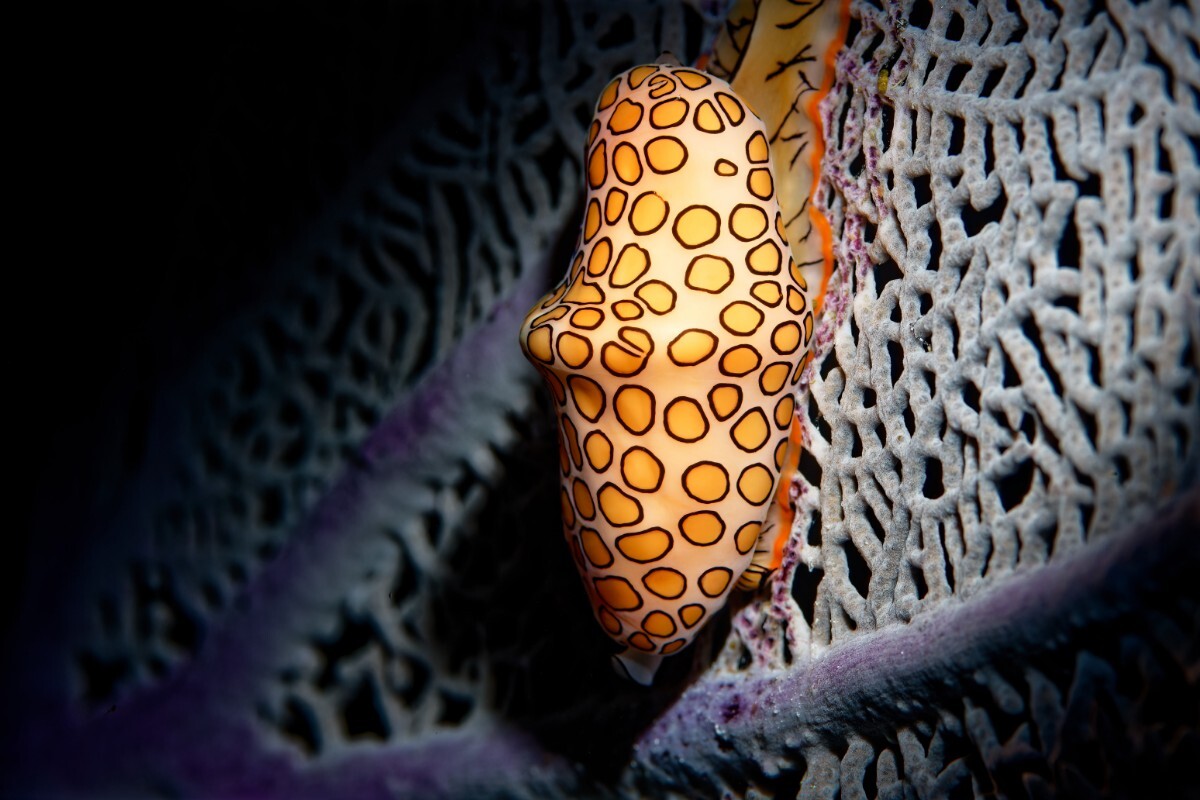
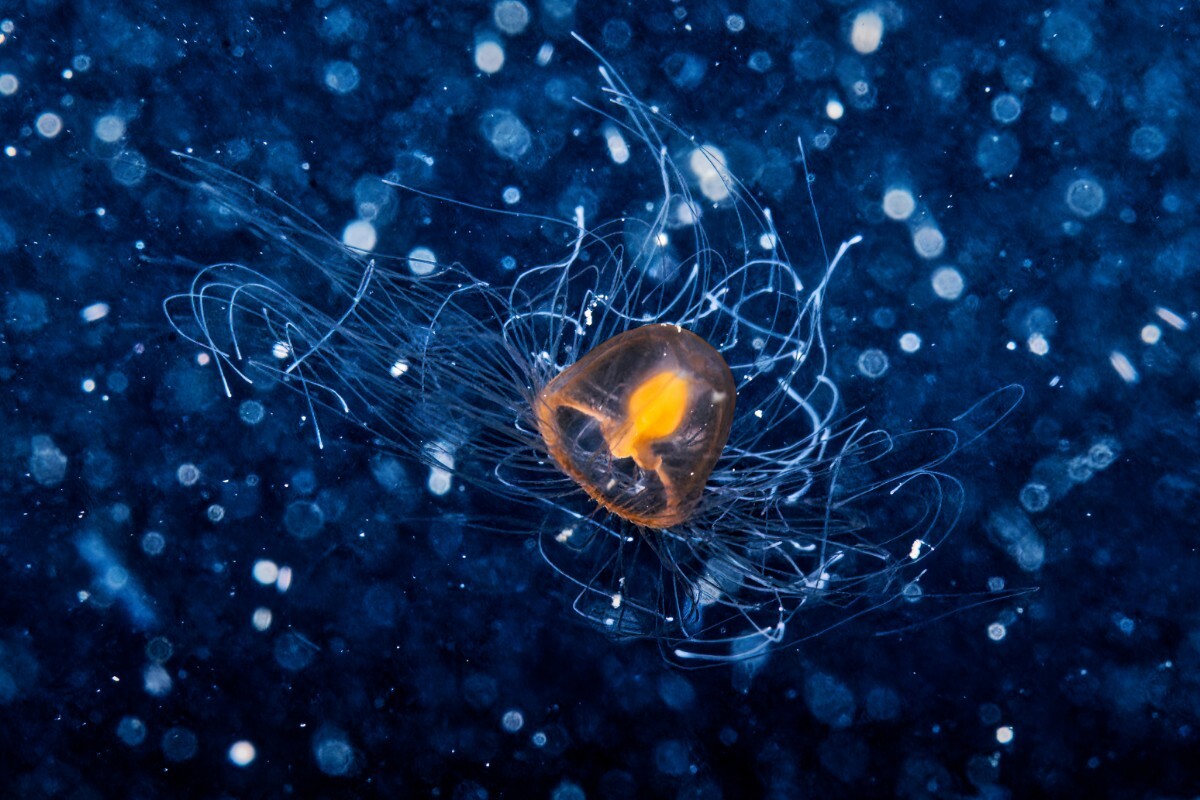
Honorable mention goes out to this shot of a flamingo tongue snail from my second ever attempt at using a snoot, and this jellyfish (some sort of turritopsis?) from the only blackwater dive I had a chance to do last year, which I like for being one of those rare examples of a photo where backscatter actually enhances the image.
null
-
5
-
1
-
SLR to Mirrorless - Macro or WA first?
in Photography Gear and Technique
Posted
Ultimately, if you prefer shooting one over the other, you should go with the one you like more.
If you don't have a preference, I'd be biased towards macro. As others have mentioned, it's easier to travel with a macro setup than a big dome port, and you'll probably appreciate the advantages of full frame mirrorless over DX SLR when shooting macro. Aside from that, Sony doesn't have a native fisheye lens yet, so it's arguably a little more future proof to buy a native 90mm macro lens that's less likely to be replaced soon than Canon 8-15mm fisheye + adapter that might become less desirable if Sony ever releases their own fisheye (or if you ever decide to splurge on a FCP).
If you also do any topside photography, a factor that might encourage you to start with wide-angle instead is that common rectilinear wide-angle options like the Tamron 17-28mm also have broad applicability above water, while fisheye and macro lenses are considered pretty niche and have better alternatives for most other use cases (eg. 85mm f/1.4 or f/1.8 is generally preferred over the 90mm macro for most situations unless you need close-focus capability).