


-
Thanks all, I think I'll be bringing the MFO-1 over the SMC-3.
-
I've got an upcoming trip to the Port Hardy area in northern Vancouver Island (often referred to as God's Pocket due to the eponymous resort, though I'm not diving with them). I was trying to decide what wet lenses to bring with me. I have a dual-flip adapter, so I'm realistically probably only going to bring 2 out of the MFO-1, MFO-3, and SMC-3 with me on a dive. Assuming the MFO-3 is always coming with me, the decision is between the MFO-1 and SMC-3 as the second lens. As such, I was wondering if there were any notable subjects small enough to warrant needing the 2.3x magnification of the SMC-3, or if the 1.2x magnification of the MFO-1 would be preferred.
-
I was pretty impressed when I tested it yesterday. While I've tried other software that did a comparable job of getting rid of small specks of backscatter, I also tried it on a photo with large out-of-focus blobs of backscatter and it was able to identify those as backscatter and remove them as well. I also tested a photo with hotshots from strobes being too far forward (so the backscatter is on top of a light background instead of the usual dark background) and it was also able to handle that fairly well.
-
Ultimately, if you prefer shooting one over the other, you should go with the one you like more. If you don't have a preference, I'd be biased towards macro. As others have mentioned, it's easier to travel with a macro setup than a big dome port, and you'll probably appreciate the advantages of full frame mirrorless over DX SLR when shooting macro. Aside from that, Sony doesn't have a native fisheye lens yet, so it's arguably a little more future proof to buy a native 90mm macro lens that's less likely to be replaced soon than Canon 8-15mm fisheye + adapter that might become less desirable if Sony ever releases their own fisheye (or if you ever decide to splurge on a FCP). If you also do any topside photography, a factor that might encourage you to start with wide-angle instead is that common rectilinear wide-angle options like the Tamron 17-28mm also have broad applicability above water, while fisheye and macro lenses are considered pretty niche and have better alternatives for most other use cases (eg. 85mm f/1.4 or f/1.8 is generally preferred over the 90mm macro for most situations unless you need close-focus capability).
-
Are you looking at the right o-rings? $16 USD for a pack of 10 (Backscatter, Bluewater Photo, etc) sounds like the cheapest purchase related to this hobby you might ever make 😛
-
The Caribbean is well-covered because Humann/DeLoach had a dedicated Reef Coral Identification book for that region, and I think some of the Red Sea books cover corals as well, but coverage is lacking for other regions. For example, most of the books for the Pacific specialize in covering fish or nudibranchs (at least, that's what their names suggest; I didn't actually look at the table of contents for each book to confirm), and the one Reef Creature book (which I own) is pretty limited - there's only one page on reef-building corals, one page on gorgonians, two pages on sponges, etc.
-
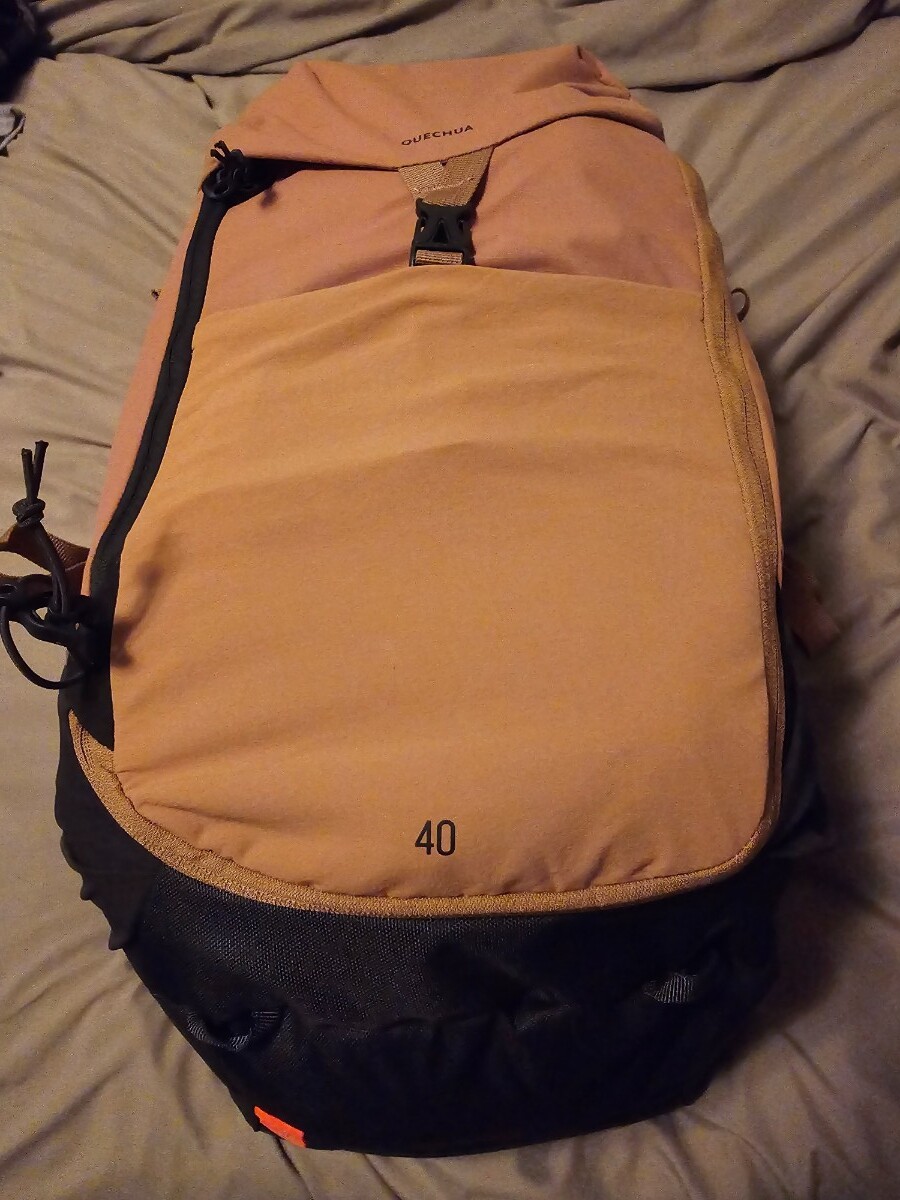
I have a Cinebags Grouper XL that I use for transporting my rig when diving locally. I also found it useful last year when I was on a photo workshop in La Paz where we were schlepping our gear between a hotel and our boat every day, and where the boat's camera table was too small to fit everyone's gear. I used to carry a "minimum viable setup" (camera, housing, viewfinder, vacuum system, one lens + port, strobes and cables, a pair of clamps to mount the strobes directly onto the housing, batteries and chargers for all the above) in a ThinkTank Airport Commuter backpack which I could just barely squeeze under airplane seats if I took out my laptop and headphones and shoved them in my seat pocket. It wasn't very comfortable and always felt like I had a brick pressed against the small of my back, so I've decided to try switching over to a hiking bag with a camera insert. I haven't tried flying with it yet, but I've picked up a Decathlon Quechua MH500 40L backpack (based on recommendations from this megathread) and a Lowepro Gearup Camera Box XXL II which seems to fit snuggly. Here's a sample loadout for the A7RV + Nikon 60mm macro on Monster adapter as an example. I'm waiting on Backscatter to get the FCP and 10mm extension ring back in-stock to see if other lens + port combinations will fit the insert. Here's the backpack with the insert loaded. I don't actually know if this would fit under and airplane seat, but in the worst case I could probably take the insert out and use it as my personal item, then try to shove the empty backpack (which flattens down reasonably well) into an overhead bin like you might do with a jacket. I also didn't bother to unscrew the mounting balls on the housing here, which could be removed to decrease the required depth by another inch or so. Aside from the backpack with the minimum viable rig, I like the Tenba Roadie Air Case Roller 21 as a carry-on roller for all the other gear that doesn't fit in my bag - it's rugged like a hard case, but looks like a normal roller bag instead of screaming "STEAL ME" like a Pelican case. I'm also a fan of the internal organizer pockets, which I stash things like my remaining arm clamps, spare cables/batteries, etc into.

-
This was more of a general question about identifying corals and sponges from wherever I decide to travel to, not a request to identify something in a specific image. Of course, there's the option of posting here for help with a particular species, but I was hoping someone might have resources to make this more self-serve.
-
Does the 140mm dome actually provide better image quality than the 230mm for fisheye lenses? Is that just in the center, or does "larger is better" still apply to corners in this case?
-
I think the dome (and consequently, the size of the hard cover) are bigger on the WACP-C than the WWL. At the very least, I haven't had any issues operating the pinch lock mechanism with my dry gloves (Showa CS720 smurf gloves with Fourth Element xerotherm glove liners).
-
Before I sold mine, I used to just take the hard cover with me on the dive. Both the pockets on my drysuit as well as my tech shorts were large enough to comfortably fit the cover, with ample space to also fit a DSMB and pocket snorkel. Honestly, I've been rather wary of neoprene covers ever since one of them caused a scratch on my 140mm dome - some particulate got trapped between the dome and the cover when exiting a shore dive and scraped against the glass the next time I tried to take the cover off.
-
Has anyone tried the Saga Trio diopter with the Sony 90mm macro lens? I recently switched from a D850 to an A7RV and found that if I tried to reuse some of the ports I already had (Nauticam 35.5mm N100-N120 adapter + N120 extension ring 20 + N120 Macro Port 60), the 90mm was fine on its own, but resulted in significant vignetting if I tried to use the Saga Trio on top of it. That port combination is 10.5mm longer than the N100 Macro Port 105 recommended by Nauticam's port charts, so I was wondering if anyone had tried this combination with the recommended 105mm port to see if it would fix the vignetting, or if I would be forced to switch to smaller diopters with this lens.
-
Rear-curtain sync: - Good to have as a default setting when NOT deliberately trying to do blur shots because fast moving subjects might still result in some motion blur, in which case rear-curtain will result in a more natural trail behind the subject - Also good for deliberately blurred shots where there isn't necessarily a single direction of motion, such as schools of fish that aren't moving together, or something like a juvenile sweetlips with erratic motion - The downside of using rear-curtain sync is that you're at the mercy of the subjects' movement, so you don't have much control over where the final image of the subjects frozen by your strobes will be in the frame Front-curtain sync: - Generally preferred for shots where you're deliberately trying to introduce blur by panning your camera in the same direction the subject is moving, but at a higher speed than the subject (sometimes referred to as "accelerated panning" shots). This is because your strobes freeze the subject in the position they were in when you initially press the shutter button, giving you more control over the final composition. - The downside of front-curtain sync is that you'll end up with unnatural looking motion trails ahead of the subject if you don't pan fast enough, or if you forget to switch back to rear-curtain sync for non-panning shots
-
I'd also consider chucking all your clamps into a ziplock bag and applying some WD-40.
-
Unfortunately, I don't think you can do this with an A7RIV. Sony added a new setting called "Full Time DMF" to the A7RV which I don't believe is available on their older cameras that allows you to switch to manual focus at any time and on any focus mode by turning the focus ring. On the A7RIV, I think you only have access to the dedicated DMF focus mode (basically AF-S with the ability to manually focus), so it can't be used with AF-C or tracking.


Important Information
Terms of Use Privacy Policy Guidelines We have placed cookies on your device to help make this website better. You can adjust your cookie settings, otherwise we'll assume you're okay to continue.