Skip to content

Shooting Technique, Workflow and Editing / Archived topic

The Post Processing Challenge!

Started by kcf955 ·

  • 25Posts
  • 25Replies

Read-only discussion

The Post Processing Challenge!

25 posts
  1. I thought it would be fun as well as educational to see what would happen if we all processed the same RAW file and posted our results in this thread. It would be interesting to see what each others workflow is and see what the differences are in the resulting images.


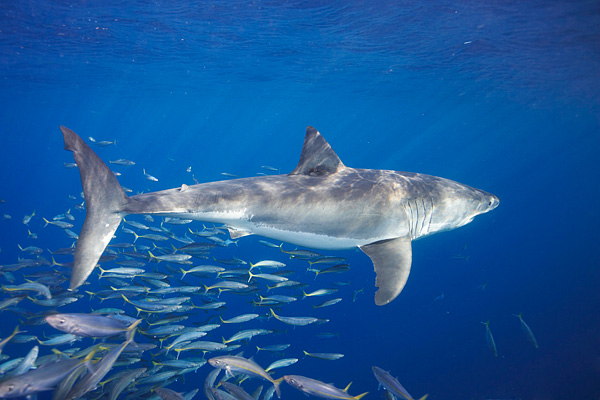
    I have put up a Canon RAW file that can be downloaded below. The file is 13 megs so be patient. The image is of a White shark that I took recently at Guadalupe, you are more than welcome to use it as you wish, just send me checks or cash if you sell the image ;)


    When you post your processed image save it out as a jpeg 800x533pixels so that the images are the same size for comparison purposes and list the steps you took in your image conversion.


    DOWNLOAD RAW FILE

    -------------

    Here is a jpeg of the RAW file with no correction/processing except to resize and convert to jpeg so you will have an idea of what the original RAW file looks like:


    VW6B0714orig.jpg

    Edited by kcf955
  2. Here is my shot at it:


    Convert in Adobe Camera Raw

    White Balance Tool/eyedropper and find a neutral white area and click.

    Exposure adjustment to +.66

    Bump Contrast to +33

    Saturation +12

    Under Lens tab adjust Vignetting to +50 (Pitfall of using 17-40mm at17mm/f4.5 on a 1Ds)


    Open in PS

    Re-size to 800 x 533 @ 72 ppi (for this example)

    Levels Adjustment Layer and adjust mid point to the right for a little more contrast

    Convert Mode to LAB color, select the Lightness Channel

    Unsharp Mask 300/.3/0

    Save for web

    ----

    VW6B0714.jpg

  3. Interesting idea Keith. I think you will get some of those with a fast internet to do it.


    Will be interesting to see the results

  4. Sorry about the file size. I tried to compress it using Stuffit and it only reduced it to 12megs. I'm not real versed in zipping things.

    Edited by kcf955
  5. The downloading it was the easy part. My computer really does not appreciate 16mp files. Perhaps I need to upgrade my computer before I consider upgrading cameras.

  6. Sorry about the file size. I tried to compress it using Stuffit and it only reduced it to 12megs. I'm not real versed in zipping things.


    The Canon raw file are already compressed. I'm not surprised generic compression applied to it does not compress it much further.


    Here's my version... This is not one where post processing can make a big difference.


    VW6B0714.jpg

  7. The Canon raw file are already compressed. I'm not surprised generic compression applied to it does not compress it much further.


    Ahhh, thanks Herb, just learned something new.

  8. This is a GREAT IDEA, and we should do it more. In the future, if you ever need hosting for the raw image, please let me or James know and we'll put it up on Wetpixel.

  9. A quick attempt. Conversion with Capture One (white balanced, a bit of exposure adjustment), and some Photoshop work (crop, selective darken of blues).


    echengwhitesharktest.jpg


    echengwhitesharktest-crop.jpg

  10. Thanks Eric for the conversion with C-1! I have heard a lot of postive comments about using C-1 for RAW. Can you get the same results with PS CS2 or is C-1 just better? I know, kind of a subjective question but interesting...


    Keith

  11. Here's mine. I went for a more contrasty scene than the others. Probably over processed but I was having fun.


    I converted in adobe. I found the necessary WB was too high >10000K so the red channel was quite noisy. So I dropped the red chanel and replaced it with the green chanel. The noise probably wouldnt show up at this size but it was very obvious at larger sizes. I also added some of the green chanel to the blue chanel to get more contrast between the subject and the water. I then adjusted hue/saturation to make the water closer to the right colour. I then hand drew a curve for the red channel to get water the colour I wanted it. Finally I increased contrast further with USM. Resized and sharpend.


    VW6B0714.jpg

    Edited by acroporas
  12. gallery_638_105_23587.jpg

    My attempt using Photoshop CS2

    RAW Conversions with White Balance Alteration and saturation adjustents to blues

    Photoshoped the redness in the fish in the foreground and auto everything else.

    oh and cropped it some too. Which i dont normally do .. but seemed to work better here.


    Not perfect but not bad


    and here's my 100% crop


    gallery_638_105_39979.jpg


    Just as well to add .. the image I can see in photoshop before saving is a lot darker and more contrastey and doesn't appear overexposed as this one does .. I used save for web .. not sure if that is why the image seems to change or not.


    Giles

    Edited by digitallywet
  13. Giles - there's another thread about converting to srgb before saving for web. Did you do that? ;)


    In general, I'm not a fan of Adobe Camera RAW. I much prefer C1's output. I only with C1 had CA correction built in!

  14. Eric ... your result and mine is very similar when viewed by me ..


    .. my sharks white areas look a little over exposed compared to yours .. you think that is difference in processing .. or somethign i did ?

    Edited by digitallywet
  15. Great post and exercise.


    I prefer Eric's adjustment. I will try to play with this myself and see how I do. I have learned form this already so great thread idea.

  16. Eric ... your result and mine is very similar when viewed by me ..


    .. my sharks white areas look a little over exposed compared to yours .. you think that is difference in processing .. or somethign i did ?

    Yours looks over-processed to me. It has to be a difference in processing, since that's the only thing that's different... ? ;)


    Anyway, mine has a touch of red that I don't like, but it was a 3-min job, and I didn't have time to make it perfect.

    Edited by echeng
  17. I like Eric's water - The blue is not too overdone & the sunbeams look more like sunbeams than artifacts.


    I like Keith's shark - Nice tones, not blown out.


    Make's me thing going RAW is gonna be a real challenge ;)

  18. I don't usually use any layers...but some of the tools I used to work on this image employs them, so whatever ;)


    rawcopy.jpg


    C1Pro using EOS-1DsMkII generic profile -> sRGB IEC61966-2.1

    WB Temp: 12800K

    Tint: 22

    Hue: 35deg

    Sat: 13

    Film standard

    EC: +0.45

    CC: +7

    CS: 0.0%

    Standard Look, 16%, 3

    Exposure 21, 0.97, 255

    Crop

    Output to 8bit TIFF, 100%


    PS CS2

    PixelGenius PhotoKit Color - RCA Gray Balance Fine

    PixelGenius PhotoKit Color - Blue darken + mask (opacity 20%, blue sat 40%, mask 30%)

    PhotoKit Capture Sharpener - Digital Hi-Res Sharpen, Wide Edge Sharpen

    Resize to 800x533

    PhotoKit Output Sharpener - Web and Multimedia, 800px Wide Edge Sharpen

    Save to jpg


    Time? 2min max.


    ~Matt Segal

  19. In general, I'm not a fan of Adobe Camera RAW. I much prefer C1's output. I only with C1 had CA correction built in!


    I would agree with that.

    Another worthy competitor is Raw Essentials 2005 from Pixmantec. Definitely worthwile checking out as it is FREE!

    Raw Essentials 2005

    Edited by AndreSmith
  20. so lets see what you got with it then

Reef Photo & Video

Account

Navigation

Search

Search

Configure browser push notifications

Chrome (Android)
  1. Tap the lock icon next to the address bar.
  2. Tap Permissions → Notifications.
  3. Adjust your preference.
Chrome (Desktop)
  1. Click the padlock icon in the address bar.
  2. Select Site settings.
  3. Find Notifications and adjust your preference.