Skip to content

Lights, Strobes, and Lighting Technique / Archived topic

Use of 2 Seacam Seaflash 150D with Nauticam Housing

Started by muellema ·

  • 26Posts
  • 26Replies

Read-only discussion

Use of 2 Seacam Seaflash 150D with Nauticam Housing

26 posts
  1. Hi,

    want to use my 2 Seacam Seaflash 150D with S6 cable connection at Nauticam NA D850 housing (Nikon iTTL). My Questions

    1. Seacam Manual for 150D say that it is necassary to use Electronic SEACAM- NIKON digital dual strobe connector S-N DDSC. This is installed in the Seacam Nikon housings. Is there any other way to connect/wire the two S6 Bulkheads with the Nikon hotshoe inside the Nauticam housing?

    2. Nauticam has two M16 threads. The S6 Bulkheads have M14 threads. I`m looking for adapter that fits. I know Nauticam has M16/M14 adapters, but I don`t know if the M14 thread depth is enough to make everything pressure tight.

    Might be somes use the same setup (Nauticam housing with Seaflash 150D) and can path me some info on a solution.

    Br Markus


  2. Hi Markus,

    Nauticam NA-D850 housing has 2 holes on the front part: M16 and M14.  So, you need only 1 step-down adapter M16-to-M14 Nauticam #25019.

    UWTechnics parts of TTL system are the following:

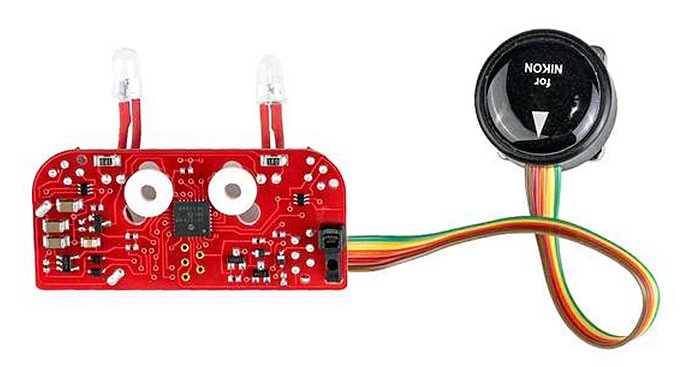
    1) #11031-HSS TTL Converter for Nikon / Nauticam

    2) #91342  Bulkhead S6 with 4-pin MicroMatch connector - (2pcs.)

    Edited by Pavel Kolpakov
  3. Hi,

    as already mentioned in PM thanx for info.

    Br.Markus

  4. Seacam makes something called a splitter so that you only need one housing port. Here is a link but no specifics: https://www.backscatter.com/Seacam-Flash-Splitter-TTL-Nikon

    I have never seen one of these so cannot say much!

  5. Hi Thomas,

    thanx for the hint . Will check. Might be good option due to my location in Germany. Br Markus

  6. I have used @Pavel Kolpakov "s UW Technics board, and the Seacam splitter to use use 150Ds with a nauticam housing. Alternatively, it is also possible to get cables with an S6 on the strobe side, and a Nikonos 5 pin plug on the housing side. 

    The splitter works well!

    I have not really used them in TTL mode much, but am pleased to report that it is a reliable solution for manual triggering.

    Adam

  7. Hi Adam,

    why did you use the UW board + the splitter together? is this necessary? Br Markus

  8. I had Nikonos bulkhead on my housing, so uses a two way splitter with S6 and then an S6 to Nikonos cable for connecting to the housing.

  9. As I understand it the Seacam has TTL electronics for Canon or Nikon built in so only requires the correct cables/plugs to work so external TTL boards are not strictly necessary. 

    It should be possible to use adapters as long as the o-rings seat correctly and you can tell this as the connector screws in to a hard stop, though the Nauticam adapters are quite shallow and the M14 seacam bulkhead threads are too long as confirmed here:

    View archived post in: Best way to connect two Seacam flashes to Nauticam with one Bulkhead?

    Seems the best solution is to use the splitter with a single M16 bulkhead.

  10. The use of "dual sync cord" (with a splitter in the center) is usually a necessary measure, if a housing does not have an ability to install a second bulkhead. It is acceptable. But it doesn't make sense for the Nauticam housing, because it has 2 normal holes for the bulkheads installation.

    I often use 3 versions of such dual sync cords (with a splitter in the center) made by Ikelite, Sea&Sea and Subtronic, because i work with very different housings every week. And my opinion, that 2 separate sync cords is more comfortable, than a dual cord. In case of dual cord, the coiled cable is stretched between 2 strobes, it is less comfortable for strobes separate wide positioning and operations with the housing. Also, during the movement and operations, the central part (splitter) strikes the housing.

    Also, the external splitter body (with connectors on it) is one more sealed gadget in the salt water. And it requires 3 pcs. (!) sealed cables. So, the leakages potential increases proportionally. If dual sync cord connection to the housing is leaked, the sync system is totally dead. In case of leakage of the same connector in separate cable system, user can simply not use one cord and use only another strobe connection, the TTL flash lighting works in this case. The separate sync cord system is more durable in the diving trip.

    Edited by Pavel Kolpakov
  11. 15 hours ago, ChrisRoss said:

    Seacam has TTL electronics for Canon or Nikon built in

    Actually, there are specific versions for Canon or Nikon. This can be changed, but requires a return to Seacam HQ to do so. 


  12.  

      On 2/12/2023 at 10:03 AM, ChrisRoss said:

    Seacam has TTL electronics for Canon or Nikon built in

    9 hours ago, adamhanlon said:

    Quote

    Actually, there are specific versions for Canon or Nikon. This can be changed, but requires a return to Seacam HQ to do so. 

    This requires a different architecture of the TTL system than the classical one. Such version Seacam strobes (with built-in TTL module inside the strobe) can work in a pair in TTL only if both strobes are connected to the Seacam special communication electronic circuit. This case one strobe is a "Master", the second strobe is a "Slave". That circuit must be installed inside the camera housing. Both bulkheads and HotShoe plug must be connected to it.  The circuit has almost the same size as casual TTL Converter, but has a square shape and no any mount for Nauticam housings. How to install it into Nauticam? glue it somewhere (but where?), drill something inside the Nauticam housing to create any mount? How to pull by the HotShoe cable hardly later when use (will it be reliable)? Ok, if user is a specialist, it can be solved finally. The second problem, - this electronics circuit has rather rare "Molex" style 6-pin sockets onboard, it requires to use only Seacam original bulkheads and Seacam HotShoe cable/plug. User must buy those parts. Ok. Then, user can pay attention that Seacam bulkhead does not fit to the Nauticam housing screw hole M16-M14 adapter, because of Seacam long length thread on the bulkhead. User must lathe the bulkhead to delete the 10мм down part of the thread. Ok, let's imagine that this is also available for the specialist and the bulkhead will be alive after that. Then the last question arises: why such difficulties and efforts to make TTL system in Nauticam housing? :)

    Edited by Pavel Kolpakov
  13. Hi Pavel,

    thanx for comment. How do I install your board 11031-HSS TTL Converter into the Nauticam housing and does your Electronic work also like the Seacam Master/Slave principle to use TTL with Seaflash 150D? Br Markus

  14. 1 hour ago, muellema said:

    Hi Pavel,

    thanx for comment. How do I install your board 11031-HSS TTL Converter into the Nauticam housing and does your Electronic work also like the Seacam Master/Slave principle to use TTL with Seaflash 150D? Br Markus

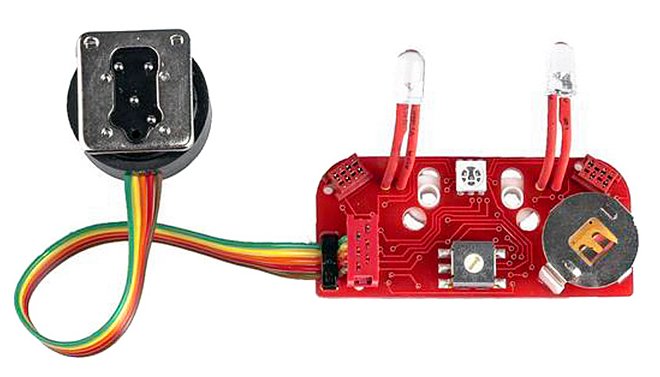
    UWTechnics TTL board #11031-HSS is developed for Nauticam housings. It fits to all Nauticam housings for Nikon. This board has special mount holes and plastic inserts, - for 2 bolts mount, as a replacement of plastic mirror in the Nauticam housing. User installation is easy, it takes 1 minute.

    This TTL board does not use a conception of "Master"-"Slave", it performs a real TTL for each strobe separately, independently of each other.

    This TTL board simultaneously performs Electric TTL via 2 outputs and Optical TTL via 2 optical outputs. So, you can use different strobes by optics or by wires, and even both simultaneously, when you need (Inon, Sea&Sea, Ikelite, Subtronic, Retra with HSS, etc.). All 4 strobe outputs works in real TTL.

    The strobe type (TTL-curve type) should be set by onboard rotary 10-position switch. Seaflash 150D has a casual "film TTL" electric input for the classical TTL control by sync cord, It has circular tube and power 150w, so the TTL-curve shape should be set onboard the same as Ikelite DS160 TTL-curve type position (switch position "5"). TTL will be fine. Circular tube allows much more wide and more accurate TTL lighting than linear tubes.

    11031-bottom-680px.jpg

    11031-top-680px.jpg

    Edited by Pavel Kolpakov
  15. Hi,

    sounds good. So I can use the 150d s with electrical connection and if I buy Retra in future I can use these via optical connection with your board as well. I  should get my used Nauticam NA D850 tommorow and have look at it. Will then revert back Do you have any idea on delivery time from Taiwan to Germany?? Br Markus

  16. 1 hour ago, muellema said:

    ... delivery time from Taiwan to Germany??

    Usually 1 week.

    Edited by Pavel Kolpakov
  17. Hi  all,

    bought and installed the board on NA-D850 and tested it at home with my 2 Seacam 150D via electrical connection for couple of flashes.

    Now I"m on the Philippines and realized on first dive that UWT system has mailfunction/is not working proper.

    When I set the onboard rotary 10-position switch to  TTL position 5 suitible to Seacam as announced by UWT the flash will work a couple of times (1 up to might be 10-12). Then the flash stop flashing. Camera on/off didnt help underwater.  After dive I checked and removed the electrical bulkhead from camera. After several times of replacement of the bulkhead this happens again. Flashes have same mailfunction on all TTL setting of the board and only in Position 0 (manual mode) of onboard rotary 10-position switch the flashes are working continous on next dives. Someone has any idea?

    Br Markus

  18. 5 hours ago, muellema said:

    Now I"m on the Philippines and realized on first dive .....

    Did you test the system on the table before the dive trips?

    As i remember, you refused to install S-6 bulkheads which were specially developed by UWT for such TTL boards. But you decided to re-solder any other (used) bulkheads with different pinout. Do you remember I warned that something would not work in this case? That's exactly what happened. You assembled the system by yourself, so the other problems also can exist.

    But anyway, i can try to help with the setup step by step, of course if it is available online for such case. Let's try. Contact me by the messenger, or by e-mail.


    Edited by Pavel Kolpakov
  19. Hello,

    thanks for very quick reply. I test my housing & strobes every morning after charching batteries overnight & reassembling but only for one or two release . After the incident I also checked my S6 connectors and the 4pin connectors from s6 socket to UWT board. I disconnected all hardwired connection and made visual inspection.

    The interesting aspect is that flashes after incident fired approx 100+++ shots in Position 0 but as soon as I turn  onboard rotary 10-position switch to TTL Position 1+ the flashes stop again working after a few shots. During change from manual to ttl I did`nt touch any hardwired connection.

    One more question from my side? Both electrical outputs onboard are independent. So if there is a wire problem where does it may come from?

    Br Markus


  20. If you are sure that your system is totally assembled properly, Ok.  Then, check the battery holder first, improve the contact and change batteries. This is important for such case. So, make the following steps: 1)deinstall the TTL board from the housing, 2) delete both batteries, 3) bend down the central metal tongue of battery holder by any tool, to improve contact, 4) install both new batteries CR1632, 5) Test the TTL board on the table, before the installation.

    Batteries can also can have bad quality, so you should change batteries to new before the next test.

    After the procedure, if the malfunction still exists, send me a video. I will check your system details.

    Edited by Pavel Kolpakov

Account

Navigation

Search

Search

Configure browser push notifications

Chrome (Android)
  1. Tap the lock icon next to the address bar.
  2. Tap Permissions → Notifications.
  3. Adjust your preference.
Chrome (Desktop)
  1. Click the padlock icon in the address bar.
  2. Select Site settings.
  3. Find Notifications and adjust your preference.