Everything posted by bghazzal
-
Yes, I was mentioning it because it was brought up - it's more in the upper mid-range, but still quite good value compared to Light & Motion or Keldans for instance. The main reason I didn't save a chunk of money by getting something like a Thrustfire was that if was getting something as heavy as a set of light, I would rather have something with a longer lifeline than the Chinese cheapies (most users rate them at 100 dives before having problems for the better ones - but YMMV, some are much more reliable) And also importantly with constant output (rare but important feature for video) and more trustable CRI / lumen ratings and battery packs. Weight underwater was also a deciding factor, as I like my kit to be close to neutral and the Chinese cheapies really are bricks. Price difference is massive, and I totally understand why you would go for something more disposable instead, but I feel that the extra money invested gives me something more stable to really work with on the long run. It would even be truer with a set of Keldan if you have the budget. Massive investment, but one that you can keep 10 years or so, and offering great light quality in a reliable, well designed products. But the prices now are really out of reach for a lot of users... A pair of Kraken was already painful enough 😝
-
I have just bought the Kraken Hydra 8000 WRGBU - it's a solid product other than the WRGBU button ergonomics which are a slightly ridiculous (3 presses on max power triggers a "select your colour" disco mode - guess what happens when you increase light power a too little quickly underwater.... 😄) Waiting on the remote which should solve the issue. Great otherwise, light quality, constant output (when it stops, it stops!)
-
speaking of Fuvahmulah https://www.theguardian.com/environment/article/2024/aug/27/could-these-maldives-tiger-sharks-help-solve-the-holy-grail-of-shark-research
-
Very nice! Running your pic in google, it's been spotted a few times in Komodo and other places. I couldn't find a precise ID, but the Japanese refer to it as a type of Komodo tsumeika damashi コビトツメイカダマシ属 (which referes to the Onykia genus) and there is an 1981 article by Takashi OKUTANI on this species, which he first ID'ed in the tropical Indian Ocean. Two New Species of the Squid Genus Onykia from the Tropical Indian Ocean (Cephalopoda, Onychoteuthidae) From what I gathered it's a juvenile from the Onykia squid genus, possibly Onykia indica which was ID'ed by Okutani in 1981
-
Thanks Tim! I did find some Toslink 2.2mm cables but only in 1m length - there are quite a few options out there (just not multicore) One I currently have my eyes on is this one It's 3mm NS2 G657A2 (single mode fibre) designed for outdoor use, so G657A2 core and HDPE + LSZH jacket. G657.A2 is described in this ressource as having a 7.5mm bending radius, smaller radius being preferable if I understood correctly? Would this be a good option?
-
I'm a complete fiber-optic cable noob, but have to cross that line for a remote for my Kraken video lights. Kraken has informed me that the cables use a standard "sea and sea" style plug (I guess it's something like this) Before I spend hundreds of euros on two cables, any idea if I can build my own for the remote using this technique? I like the idea of straight cables and they only sell curly ones. Being in Indonesia choice is limited, but I did find these online - what would be best for a remote to light cables, is there anything to look out for? Also I'm not sure how I would get the plugs though (or what to look for actually when it comes to "sea and sea type plugs") Thanks a bunch!
-
Welcome onboard!
-
Yes of course, these 3 bags go in the hold with our dive gear, wet suits, clothing, cooking ustensils and the like - wife and I have been fully nomadic (as in no home-base to come back to) for over 8 years now, so while we do stay as minimalist we do have 3x 23kg checked-in bags. Fragile things like electronics, lenses are kept in cabin luggage, using utility jackets with multiple pockets to pass the dreaded 11 to 7 kg cabin luggage weigh-in. For this it's backpacks and an ultralight 2 wheel roller-case (which is the one most likely to get weight-checked.
-
on a related note, here's an article on planton: https://www.theguardian.com/news/article/2024/aug/20/strange-and-wondrous-creatures-plankton-and-the-origins-of-life-on-earth
-
Yes, it's ambient light with a filter works best in places / depth where you have enough ambient light to work with. Even in the tropics, 20/25m is generally the limit, so testing beyond 25m in the Med was very ambitious 😅 Beyond 25m, it's probably best to use no filter to try to scrounge as much remaining ambient light as you can and just make do with a colour cast or, more classically for wrecks and deep shots go for artificial lighting in the 25-50m+ zone.... Generally with good ambient light (and also remembering to shoot with the sun to your back, which is very important for ambient) and favourable conditions, you get nice, workeable results between 5-20m, the sweet spot usually being 10-15m zone. In my experience, in this depth range the results you can get with a flat profile + filter combination in terms of colour balance far outweigh the -1.5 stop of light you'll lose with the filter... Lastly one thing to look out when using filter is actual water colour - the Med. is generally greener, meaning underwater colour balance / filtration of the ambient light spectrum is quite different than in blue water. Typically, filters designed for greener waters tend to be more magenta than reddish, to help rebalance the spectrum better (whereas typical "red" filters are designed for cyan / blue waters). This is a subject which hasn't been looked into enough - mostly because strobe-lit underwater photography is leading the underwater imaging game, and ambient light videography in green waters is quite niche - and would need more hands on testing. UR-Pro had more magenta green water filter btw. I've been looking into filters themselves a bit lately (and plan to do some testing with some gels that a generous soul took the trouble of meticulously wrapping and sending over here 🙏), and based on this my current hunch is that there two ways to approach the ambient light + filter question: - aim for colour accuracy, and try to rebalance the ambient light spectrum at depth to get accurate colours. This is what Keldan Spectrum filters aim to do for instance - logical, but tricky, as this is both dependent on depth (Keldan is looking at depth range, and basically correcting the spectrum to simulate a shallower depth), and more importantly, conditions and water quality, over which we have no control - aim for aesthetically pleasing results - basically offer a less accurate filter but one which will shift hues in an aesthetically pleasing result. This is what the legendary UR-Pro Cyan was doing for instance, and why it worked so well in blue water. Beyond filters, my theory is that this is also what is going with so-called "Canon colours" , ambient light manually white-balanced at depth. If you look closely at underwater ambient light footage shot on manually white-balanced on Canon cameras, the WB itself isn't necessarily super accurate, generally a little warm and yellow - actually somewhat similar to what the UR-Pro filter is doing - but it's very pleasing to watch. Just lovely. With the extra advantage is that there is no light / definition loss from extra material in front of the lens. I suspect that more than actual WB accuracy, Canon ambient light manual white balance at depth (deeper than what the camera can accurately compensate) works best by shifting greens to warmer yellows like a filter. It would be interesting to test this with ungraded footage ambient Canon and a colour checker. (there is a actually a a third way when it comes to filters, which is to not think about too much and just sell any bit of reddish looking material looking like other filters as a "red filter" because it can't do no harm - this more common that you'd think but let's not get into that 😁)
-
it was a tough choice beleive me 😅 After a lot of tossing and turning through what I could buy in Indonesia, I finally got the new Kraken Hydras 8000 V2 - lighter than the previous at -290g underwater, and they're constant output with 40 minutes at 8000lm and 60 at 6000lm. Only one test so far, but light quality out-of-box is really better than the MW4300 (which I am keeping), a higher CRI does make a difference and I really don't understand why Backscatter went for a CRI 0f 70. Ergonomics are so-so because of the RGBU mode - for useability it would be better if it could be locked away somewhere so you won't risk activating it when shooting with standard lighting. Dealing with 4 power buttons is complicated enough for me in the field, and unfortunately a quick double press on high power activates a cycling RGB mode, which is not a good design choice at all, because guess what happens when you quickly increase the power to the max... disco-time! I'm hoping the remote will solve these issues 😄
-
Thanks! After a lot of tossing and turning, I've just had major light upgrade, and while there's a lot to do get back cruising speed in terms of trim and buoyancy I hope to work on these blue water subjects in the coming weeks if they're around. First tests with the new lights today were quite promising. Pretty interesting stuff going on in there, especially when it comes to planktonic hitchhikers 😉 cheers b
-
You mean like that expensive AOI UH-GPx that came out a few months back and some devotees have just invested in? 😅 It definitely looks like a heavy housing upgrade is unavoidable, so let's see how this is handled... Seriously, even with the best R&D department in the world, there's no way a reasonable company can keep churning out well-designed models at such a yearly rate... Call me grumpy, but it's ridiculous, and feels like it's more aimed at getting notification pings on social marketing media and surfing on FOMO than anything serious... DJI is more quiet (and a little slower on the update front), and importantly seems to be digging a little deeper on the technical side (as in potentially more useful features than gimmicks?) with its new line of products, which is slightly more reassuring. I wish someone would drop the "action" side together and just provide a small rugged waterproof camera with manual white-balancing options and basic focal adjustment options. Or just bring revive the compacts with a little waterproofing 😉
-
I'm sure the GoPro 14 will be better anyway 😁
-
I would definitely recommend DaVinci Resolve as well. It's really the most complete for colour grading, and accessible as the entry-level version is free IIRC. I use Final Cut Pro X, which is great, and allows me to do what I want, as it's more integrated than DaVinci on a mac - being nomadic at the moment I edit on an old macbook air, and can run FCPX on an external SSD hard-drive, with enough power/speed to edit 4K clips (using proxies for certain codecs). Unfortunately I can't get fluid playback on DaVinci, having tried everything including proxies, the CPU/RAM integration doesn't work on my underpowered system, so sticking to FinalCut for now. I can export a finished clip for grading in DaVinci, but it's too much work and I'm happy with what I can do with FinalCut. But in the future, I will switch to DaVinci when I get the chance. So DaVinci Resolve would be my first recommendation, for performance, flexibility and pricing, but if you're on mac OS, software like iMovie are limited but very accessible, and also a good introduction to FinalCut once you've outgrown limitations. FinalCut is also more user friendly than DaVinici, and really good as well, but for really advanced grading DaVinci is the way forward. The other major contender is Adobe Premiere, but I really don't like Adobe product workflows and subscription-based pricing systems, so wouldn't recommended it.
-
This one's nice, thanks for sharing - big fan of Decathlon 120L/100L trekking bags as well here, but nice to see new products that would do the job! The ones we have now are the 2x 120L FORCLAZ bags Lightweight, and built like a tank, and worth successors of the Quechua 120L trekking bags which we'd bought in 2014 (we still have one 100L), which have on small dinghies in remote areas of Indonesia, the works. It does have backpack straps, but with 23 to 32kg in there trying to carry it on your back is not a good idea... Last time I did that was from Sorong's old airport to the main drag to catch our early morning ride to the harbour, lesson learned, never again... 😅 Unfortunately, the new products in Decathon's Forclaz range are nowhere as good, so happy to see this Subea bag pop up as an alternative !
-
Hi there - I've been shooting with a (good - UR-Pro Cyan) red filter since the GoPro 4, and what works best for me are the following ProTune settings: ev: -0.5 white balance: native iso max: 1600, or if I can get away with it 800 color: GoPro color auto ISO (with max set), auto shutter the -0.5 ev helps avoid clipping when shooting up (say a manta passing overhead in the shallows). On the ISO front, an iso over 1600 is generally too noisy to work with. 800 iso is best, but this might be too dark at depth, especially with a filter, depending on conditions. As a side note, setting to auto ISO (clocked to a max ISO) and auto shutter is fine. For shutter speed, in theory you should follow the 180° rule of shutter and set the shutter value to double the frame rate, but in practice on action cams this doesn't really make any difference. Having tested both, I've found camera struggles more when following the 180° rule of shutter - footage exposure is stable with auto-shutter, and slightly higher shutter speeds will also help with particules, giving GoPro footage that magical viz-cleaning effect, where it looks better than what you'd experienced underwater 😉 The most important setting is to set the white balance to native . Ths is because you can't manually white-balance at depth with action cams, and uw auto white balance is a hit-and-miss, and there will likely be unwanted fluctuations during the shooting. Setting WB to native, you can then set/adjust the white balance in post which gives results almost as good as having manually white balanced at depth. The other crucial setting is GoPro color, which is basically flat - you can't trust an action cam to magically sort out underwater colorimetry. Sure, you might get ok results snorkeling or in the shallows, where water's spectrum filtration is limited, but at depth, especially with a filter and wb set to native, not letting the camera try to adjust colors is a must. And working with other colour modes, trying to adjust in post color info which has been baked-in by the camera is a nightmare.. These ProTune setting give you the equivalent of a flat profile, which is perfect for grading Gopro footage. Yes, you will need to adjust WB in post (which is almost like magic with a filter!), and tweak the colours, but for underwater video this is a must. I've actually developed this idea and shared experience and examples on this specific subject in this thread, if you haven't read it yet: https://waterpixels.net/forums/topic/1380-shooting-action-cams-with-a-red-filter-in-flat-profile-and-manually-white-balancing-in-post-production/ Despite what you might read about "gopros no longer needing filters underwater", beyond the shallows, this does not live up to reality - just compare results at depth between footage shot in a flat profile with a (good) filter to see the difference. You can get much better colour balance by shooting in a flat profile with a good filter than without. - With two video lights, you'll be shooting in an artificial-light dominant scenario, so you shouldn't use the filter (so closeups, night dives and deep dives for instance) Keep exactly the same ProTune settings, but this time set the white balance to the kelvin value of your lights (5000 to 6500K in general) - this is the only change to make. hope this helps! cheers ben
-
The AOI UWL-03-BLK wide lens has an optional threaded mounts in the following sizes: M55, M52 & M46. If there are any filter options for the Isota housing's square port, you could use one of these adapters (housing > filter adapter > AOI M55 or M52 adapter > lens) , but keep in mind that the lens is heavy, so the housing filter mount would need to be sturdy to hold the weight of the lens...
-
Yeah, it's pretty low-maintenance compared to other gear. Unless it's changed with recent upgrades, for previous models GoPro asked used to avoid lubricating the o-rings, and just clean then with fresh water (which i suspect is probably intended to avoid users using the wrong lubricant on the material)
-
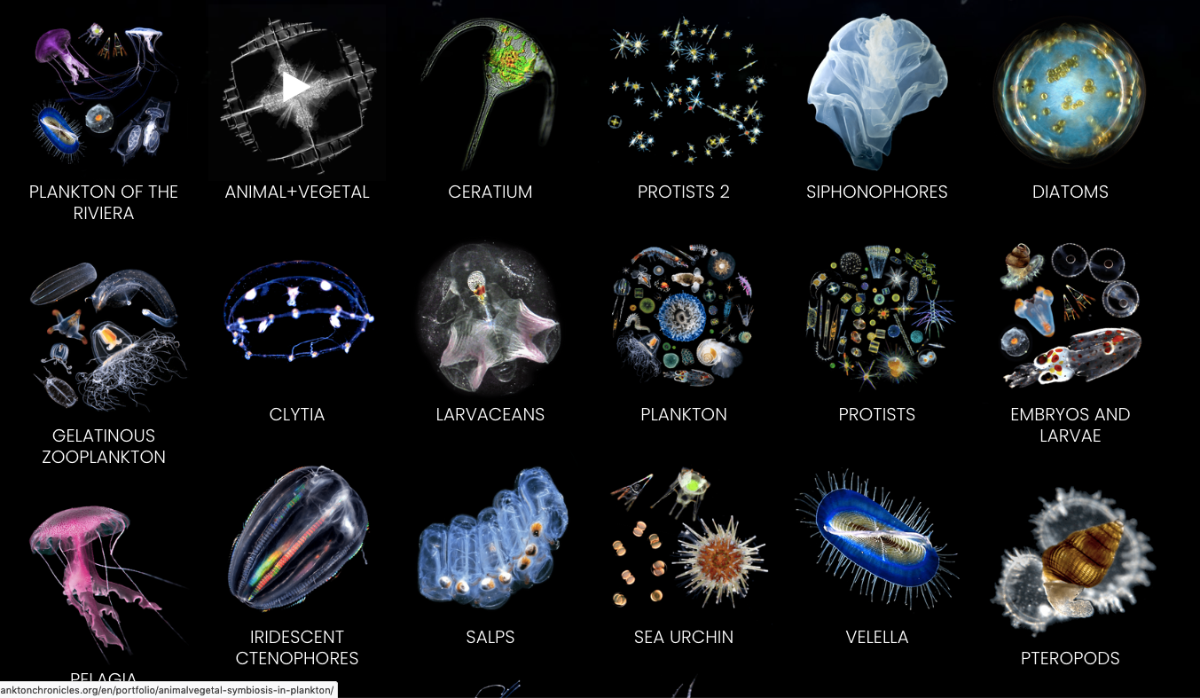
Following my growing interest in all things larval and planktonic, I stumbled upon this pretty amazing site / project / ressource on plankton, created by researcher Christian Sardet: The Plankton Chronicles This is the website of the Plankton Chronicles Project, self-described as follows: The Plankton Chronicles Project is a series of short videos combining art and science. They reveal the beauty and diversity of organisms adrift in the currents. The « Plankton Chronicles » project was started in the context of the Tara Oceans Expedition and the Institut de la Mer de Villefranche-sur-Mer (IMEV). Christian Sardet, Research Director with the CNRS at Villefranche-sur-Mer conceived the first 4 episodes of the series with Véronique Kleiner and Catherine Balladur from CNRS Images (Meudon). All other episodes were produced by Christian Sardet (IMEV & CNRS Côte-d'Azur) with Noe Sardet and Sharif Mirshak, Parafilms, Montreal. The project and site are sponsored by CNRS, Sorbonne Université and the Ville de Nice. The Plankton Chronicles website offers very interesting info, including short video episodes on different categories of plankton, accessible here: https://planktonchronicles.org/en/episodes/ Christian Sardet also published a book (probably be a good companion to the one presented here), which was awarded «Best Underwater World Publication» by the World Festival of Underwater Images (Marseille 2014) https://planktonchronicles.org/en/the-book/ Quoting from the website: DIVE INTO THE HEART OF BIODIVERSITY AND EVOLUTION Through hundreds of photographs, Plankton transports readers into the currents, where jeweled chains hang next to phosphorescent chandeliers, spidery claws jut out from sinuous bodies, and gelatinous barrels protect microscopic hearts. The creatures’ vibrant colors pop out against the black pages, allowing readers to examine every eye and follow every tentacle. Jellyfish, tadpoles, and bacteria all find a place in the book, representing the broad scope of organisms dependent on drifting currents.Christian Sardet’s enlightening text explains the biological underpinnings of each species while connecting them to the larger living world. He begins with plankton’s origins and history, then dives into each group, covering ctenophores and cnidarians, crustaceans and mollusks, worms and tadpoles. He also demonstrates the indisputable impact of plankton in our lives.

-
I've been looking into lights recently, and these new generation of cheap lights are an interesting option. Basically, they do the job, but the main issue is that they are almost guaranteed to fail much sooner than higher quality lights due to design and components used. So it's a choice. For more intensive usage, replacing them will be a hassle and might end up costing more on the long run. Also, there is no real quality control, so one might be fine and the other dodgy, and beyond durability, having no guarantee as to what you're really getting in terms of specs (actual lumen output, CRI, beam angle...) is a heavy concession to make. The other issue is that they are not constant output and that the battery / battery packs included are notoriously bad... But if you just want light and not ready to invest more and ok with more disposable purchases, they will do the job. I've heard good things about the Leton L12 and the Thrustfire D50, with the following specs (to be taken with a Salt-Bae elbowful of salt...) - Leton L12 COB “5000 lumen” (or is that 8000?) 600g on land with battery, sold for 115 euros in Indonesia - Thrustfire D50, "6500 lumen", 300g on land without battery, 100 euros in Indonesia My neighbour uses a D50 and is happy for now. Despite being on a tight budget at the moment, after a lot of tossing and turning, I've decided to rule these out and buy something in higher-mid range, for something more durable and with specs I rely on, and this will be something I will be holding onto even as my kit evolves. let us know how it goes! cheers ben
-
Very good question - unfortunately there's no option of mounting red filters with the AOI - the only way would be to get their 52mm lens mount, then do GoPro housing > filter > 52mm adapter > AOI lens. But this will like cause a lot of problems (lens is heavy, so not great, and the added distance between GoPro and wet lens will cause optical issues) However, since AFAIK the mounts are compatible, you can use the AOI lens with a Bacscatter mount - The Backscatter mount is slightly raised and has a slot into. which you can slide their proprietary rectangular filters - if you're happy with using Backscatter filters, that is. What I'm looking into is using red-filter gels inside the GoPro housing, as I'm a little particular about filter composition and a great fan of the UR-Pro Cyan for grading GoPro footage (more on this here and here )
-
-140g underwater ? Wow! How come they are so light compared to the 5000 to 7000 lumen lights I am seeing which weigh more than double? Is it the battery pack, or the +buoyancy of the reflector? A little difficult to find specs for these now, but looks like they're around 900g on land from what I found, which is pretty impressive (700g+ positive compensation?). The lights I'm looking at are on the 700g on land / -350g to -430g buoyancy in water range...
-
Thanks Craig! My bright red focus peaking is a lifeline, just get it as red as possible and try to keep it that way 😄 cheers b
-
Thanks for the clarification Chris - this is what I had initially understood as well, which is why Big Blue's and Orcatorch's answers to my enquiries seemed a little off... Totally agree for the cheap lights, they are cheap for a reason, and have a very short lifespan due to poor design and components... But just to be precise, non-constant output light are not limited to such disposable, non-branded semi-direct imports sold on aliexpress/alibaba/amazon/ebay plateforms. Non-constant output lights are also the most common in the mid-range, including commonly found video light brands sold by reputable retailers such as: - BigBlue - SUPE / Scubalamp / Fotocore / Divevolk These are widely-used mid-range products - not exactly falling in the cheap light category - and are also not constant output lights - as are models by many other light common brands of variable reputation ( Orcatorch, Archon, Nitescuba, Xtar, Tovatec, XLight...) It would be interesting to know if Backscatter's video lights, such as the one included in the Backscatter Hybrid Flash or the MW4300 have the circuitry required to provide constant output or not - I couldn't find test data. The MW4300 - which I use - is a well designed light, with nice features and a tight 85° beam in wide mode, but also some surprising design choices such as low CRI LED modules (CRI of 71.1 in wide and 70.3 in spot mode), so it's not very clear what to expect in this respect...