


-
With Canon RF camera bodies you can have an almost exact focal length display activated as an overlay in your EVF and LCD screen. This is also why I know what focal lengths (zoom range) works. Coming back to this Aquista135D: really curious about the first results. Has anybody shot it so far and can post some sample images?
-
Dear Yiheng,.. I think I reported back on the 15mm + 20mm a while ago, beeing slightly sharper, but that was with the Canon EF 8-15mm not to confuse with the new 7-14mm fisheye. About the RF35mm - yes it works great and there has been a forum post about it. You will be able to enhance its AF performance by using a diopter behind the small 140mm marelux dome.
-
Hi, just for curiosity: what about the Minimum Focussing distance (MFD) of the lens? With the very small domes positioned on the entrance pupil, the positioning problem is solved; but not the focussing distance of the virtual image, I think. So it’s very likely these macros cannot utilize their full focus range, or do they? Did you guys add any diopters to the lens to solve that?
-
Hi @Alex_Mustard and @MatthewSullivan , I remember seeing a post somewhere where you were asking for ideas for future episode topics for the Underwater Photography Show ( #UWPS ) on YouTube. I can't remember where it was, but it reminded me of something I'd genuinely love to see discussed on the show. I recently watched your "Nauticam Optics Primer" episode, which I really enjoyed. It covers a great range of Nauticam optics, and of course the EMWL earned its own dedicated episode. However, it left me wondering: was there a particular reason why the Nauticam MWL-1 wasn't mentioned at all? Was it and I just cannot remember? I've always found the concept behind such a lens fascinating, converting back from macro to true wide angle on a dive. There is also a review by Matthew, about its main (or so far only) competitor, the Kraken KRL-09S: Testing the Kraken KRL-09S Macro Wide-Angle Conversion Lens which makes him highly qualified to show some test images and discuss the pros and cons of such a lens. It would be really interesting to hear both of your opinions on this whole category of optics. The MWL-1 never really seemed to gain widespread adoption, and I've often wondered why. Was it image quality? Sharpness? Handling? Cost? Or was the concept itself simply too niche? I know if was mainly developed for the Nikon AF-S 60mm, but seem also to work on some Canon and Sony Macro 90-100mm lenses with less AOV as a result. I'd especially be interested to hear how you think the MWL-1 compares today with more recent water-contact optics such as the Nauticam MFO-1, MFO-3, and now the Marelux MacroView MV-60. These products seem to point towards an interesting philosophy: instead of owning separate dedicated wide-angle and macro systems, perhaps photographers could build a very flexible setup around a single 90–100 mm macro lens (Canon, Sony, Nikon, etc.) and then simply swap between one or two wet optics during a dive depending on the subjects they encounter. Do you think this concept has a future, or do the compromises still outweigh the advantages? Has this category quietly evolved, or was it ultimately a technological dead end? I'd love to hear your thoughts in a future episode. AND MOST IMPORTANT: see some you your excellent sample images discussed in such an episode! Furthermore everybody is invited to discuss experience and photos with these lenses in this thread on waterpixels.
-
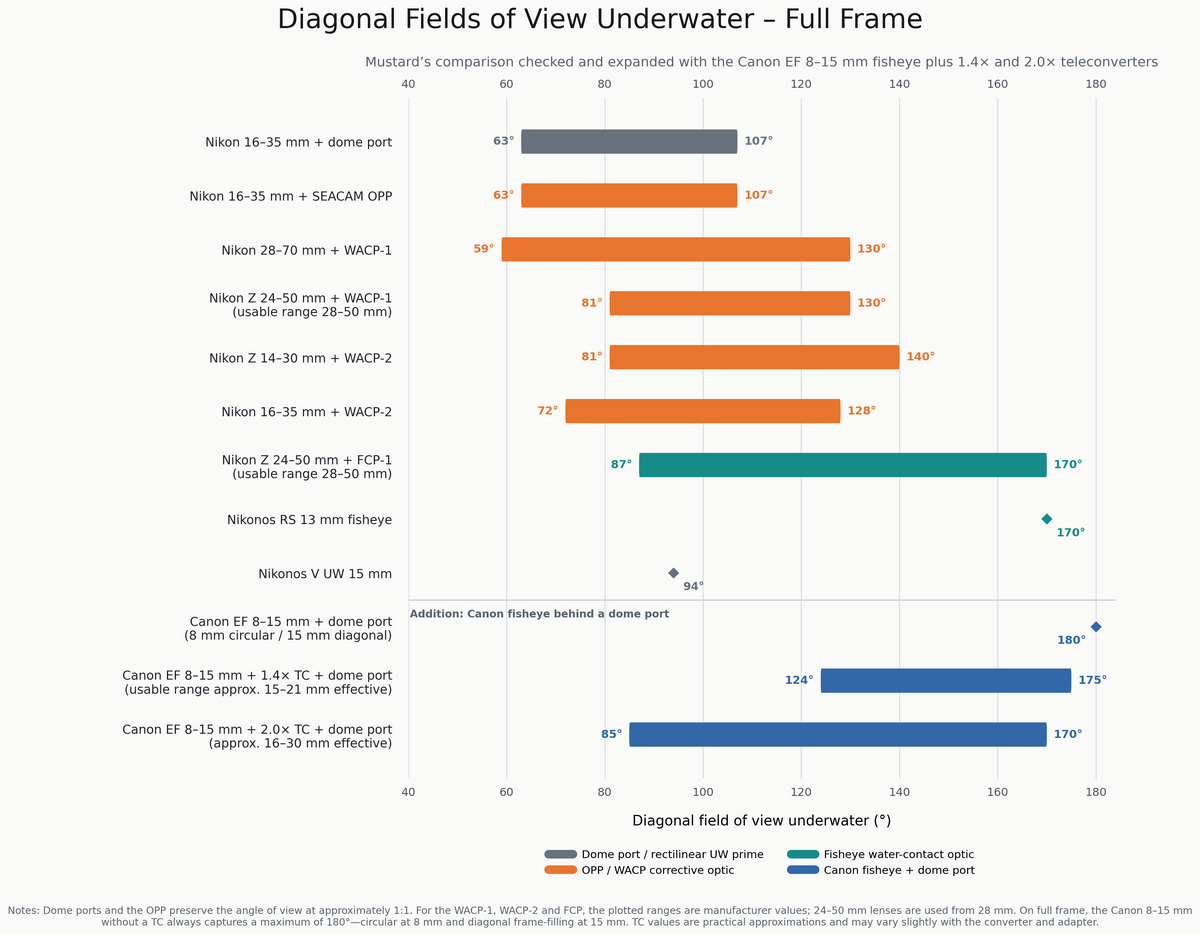
@Alex_Mustard has published an excellent review of his OPP test drive in Raja Ampat on his homepage, which can be found here: https://www.amustard.com/seacam_opp/ What I especially liked and found very helpful to sort all the optical choices is the AOV graph he provided as a slide in this review. It especially emphasizes the range of the FCP that jumps right into your face when viewing the graph. I personally wondered how the popular Canon EF 8-15mm fisheye with teleconverter solutions would fit into that scale and created this refined graph:
-
I like the crab shot. But did you really have to go for F22 ? Wouldn’t F16 Have been sufficient ? And I am asking myself if F22 is the EXIF Aperture in the file or manually computed by you ( F16 * 1.4x converter = F22 ) ?
-
Also have a look if you can fit the RF28MM pancake prime behind your WACP.
-
So you insist on shooting f2.8 for low light underwater and that’s you goal ? Congratulations… expect dismal performance of your high $$$ gear! Cranking up the ISO a few stops will give you better results then spending tons of $$$ on one more camera or lens. If you are desperately in search for an F2.8 candidate try to get that Canon RF 28-70mm F2.8 IS STM running behind your WACP and maybe live with a slightly limited zoom range on the Tele end.
-
True. But I think also mainly due to the fact that companies such as Nauticam and their dealers are not willing to deal with smart-ass customers who will complain about vignetting in online reviews. As in this forum you will not find the average Joe I would like to offer you a more geeky take on this problem and a viable solution: As Canon RF shooters we have various optics that use digital lens corrections which are heavily debated online. This results in quite a few RF lenses that will not project a full image circle on a full frame sensor at their widest focal length, such as the RF 24-50 STM, but also highly-priced L lenses , such as the RF 14-35 F4 L and RF 20-50 F4 L. (sony with the 28-60 has the problem too, but nobody seems to talk about it) What can you do about this? 1.) Look beyond Canons zoom range values and get a WACP/Aquista lens candidate that starts at 24 or 20mm instead of 28mm, as these will usually project a full image circle on sensor when zoomed in. 2.) don’t get an L lens with a wide opened front glas, get the more lightweight grey non-L version of a RF lens instead, to avoid having issues peeking through a tight porthole. Here the best example is choosing the RF24-105 STM over the more expensive USM L version. You will not need / shoot the more wide open aperture when shooting underwater. 3.) be okay with not using the full zoom range, so the RF24-105 STM will not extend too much and not move the entrance pupil dramatically when zoomed from 24-70mm. Various land-based reviews of the Canon 24-105mm STM validate it as an ultra-sharp competitor and point out that it‘s worthwhile saving $1000 when choosing it over the constant more open aperture L version. On my Ivanoff Corrector Port I can use it up to 90mm, which makes it even more flexible. It has proven to be one of the sharpest underwater knives in my toolbox and I highly recommend it to underwater photographers and videographers. However it’s not listed in any of the manufacturers portcharts, probably for the above mentioned reasons. I encourage everyone to give it a go. The zoom gear that you purchase for an RF15-30 with your housing brand will also fit the RF 24-105 STM.
-
Does the camera allow you to turn off lens corrections (in-camera) or is this one of those Canon lenses where lens correction is forced in camera? @JayceeB thanks for sharing the images. I think, the marelux 180 glass dome or their 210 acrylic will not add much volume or load and dramatically improve lens performance. I assume the freshly introduced Marelux Aquista 135D - which is Marelux‘s take on Nauticam‘s WACP lineup - will give you the highest image quality with that lens, @JayceeB . @WhoTippedMyCoW it was said that mx is launching that lens with adapters for various other housing brands, too. Worthwile watching that progression.
-
Christopher Frost says in this video at 7:10 timecode that the black corners disappear at 24mm focal length:
-
Looking at the MFD data of that lens the 140mm should be too small,… did you add a diopter to the front of the lens to compensate for it? I think the 180mm MX dome or the giant MX fisheye dome will perform better concerning corner sharpness. Also the new MARELUX Aquista 135D and this lens look like they will magic. @JayceeB could you upload a lens image taken of a white wall (land-use), with deactivated lens corrections in Lightroom to see if there is a full image projection to the corners or if they are black @ 20mm focal length ? Also if without lens correction you have black corners, at what focal length will they disappear? ( 22m , 24mm , 26mm , 28 mm)
-
Whow that’s strange! Does this happen when you turn lens corrections in Lightroom ON or OFF ?
-
That’s great compact looking news. Looks like 2026 is the year in which the high-end underwater optics monopoly is finally broken up. I took a quick glance at the Aquista 135D port chart and the Canon selection of lenses is still very limited. „Must-have Candidates“ that I would love to see listed: Canon RF 20-50mm F4L IS USM PZ most important new candidate! Canon RF 24-105mm f4-7,1 IS STM (will need a zoom limiter, but Marelux RF15-30 STM zoom gear fits this lens) Canon EF 28-70mm f/3.5-4.5 II (the historically best Canon Zoom lens recommended for use with the Nauticam WACP-1, costs just approx $70 in the used market and needs a Canon RF-EF Adapter to work) Canon RF 24-50mm f4,5-6,3 IS (dismal lens, but the noobs love it, so MARELUX gotta list it for completeness; as it will very likely work) Canon RF 28-70mm F2.8 IS STM (very likely to work)
-
The Canon EF-S 60mm Macro is a very affordable and pretty much underestimated macro lens. The above, written by Chris is true for Canon Mirrorless full frame bodies, as the Canon MILC will auto-switch to 1.6x Crop mode. There is a work-around for this, by setting your desired aperture first and then slightly unrotating the lens from the bayonet. This will trick your Canon to consider it as a manual focussing third party lens. Surprisingly it will only exhibit very little vignetting on a full frame sensor. But you have to live with using it as a fully manual focus + fixed aperture lens throwing the very fast and silent AF of this lens over-board. Sony, MFT and Nikon users can adapt this lens with full AF features and will have it working as a full frame lens with slight vignetting in some focus positions. Ahh,.. and if you intend to use it for video the 16:9 aspect crop will also help to get rid of the dark corners on a full frame body.


Important Information
Terms of Use Privacy Policy Guidelines We have placed cookies on your device to help make this website better. You can adjust your cookie settings, otherwise we'll assume you're okay to continue.