


Everything posted by Nando Diver
-
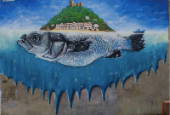
Anyone already dive in Dhiffushi, Maldives Any good dive center there ? Any chances for big pelagic fish, Shark, Mantas etc etc.
-
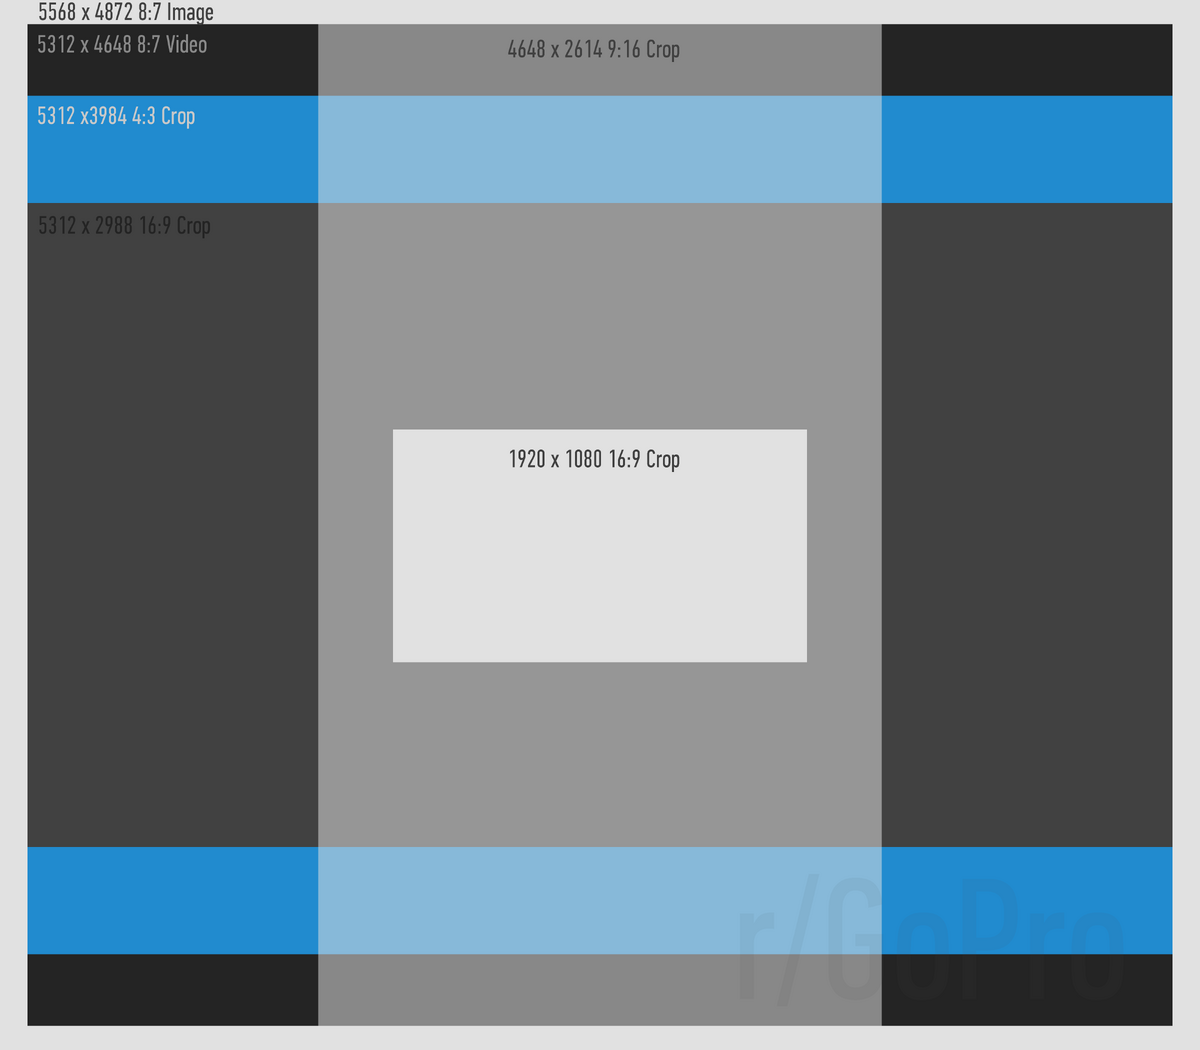
8:7 gives you more flexibility to crop to 16:9 or 9:16 without quality loss
-
excellent, 2 or 3 clips are a little too much warm, you could have slow down the video one the Smalltooth Emperor fish clip...but in General TOP Video, i would never guess that the video was made with Gopro 11
-
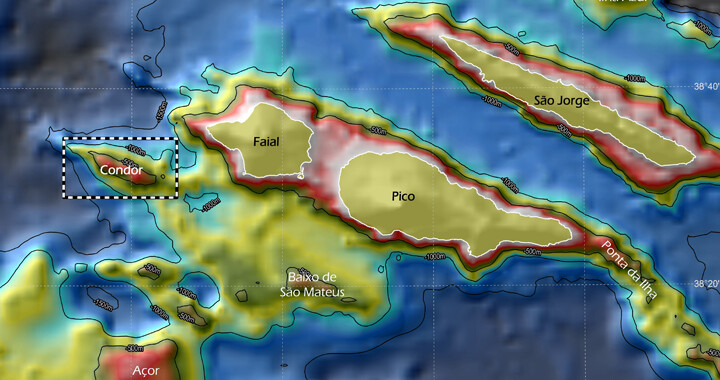
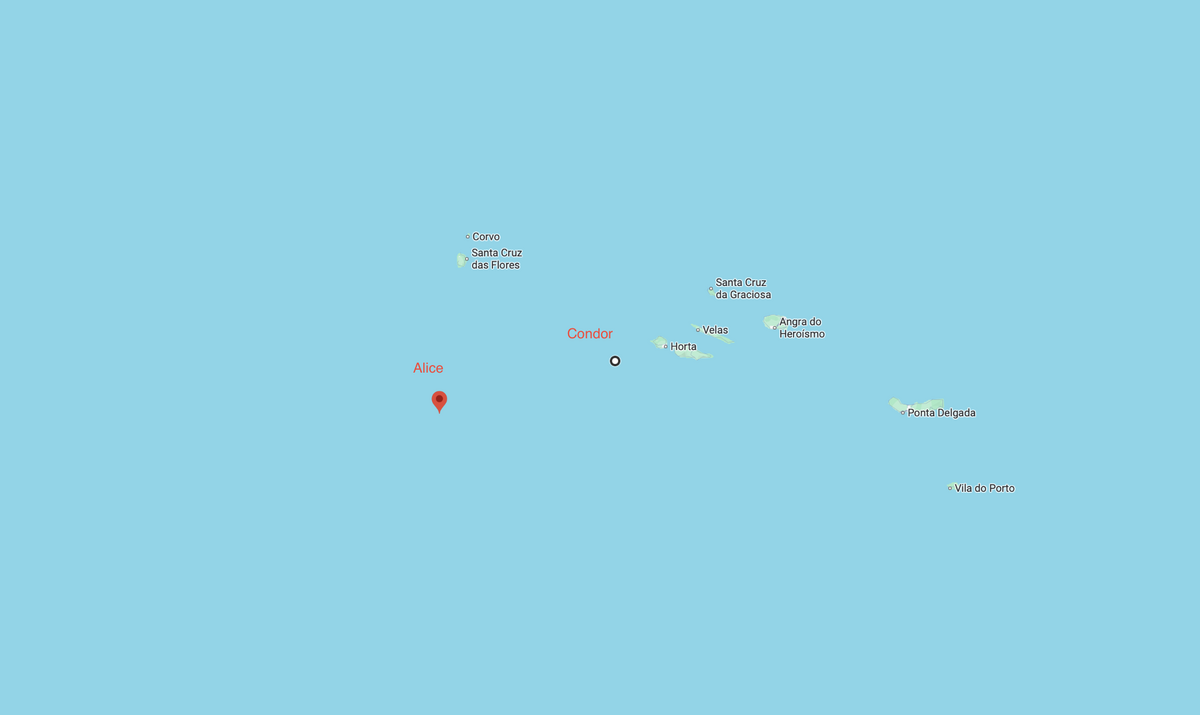
Nice video. Looks like Condor bank near Faial island about 2 hours away from the Island. @fruehaufsteher2 I was in Pico 2 years ago, try to book princess alice (4 hours from shore) but the weather was not favourable. Its requirement to make pre-dive so they see your skills underwater, the currents can be strong sometimes. The condor is shallow dive, theres no anchor line (the reef is about 180m) The princess Alice bank is about 32m they launch anchor line but if the place is too crowded the last boats will be anchored at the edge of the reef, and the last thing you want is to get your boat adrift while you are secured and line with sharks getting their bait at the end of the line. Both places are very weather dependent I recommend Haliotis dive center for this type of dives, its open sea, make sure the boat is not a small zodiac or is too crowded https://www.discoverfaial.com/experencias/mergulho-com-tubaroes/ ps: Santa Maria is another spectacular Island of azores, especially at whale shark season (august to October)
-
Anti-Fog Mask from SEAC at Salon International de la Plongée Sous-Marine 2026
-
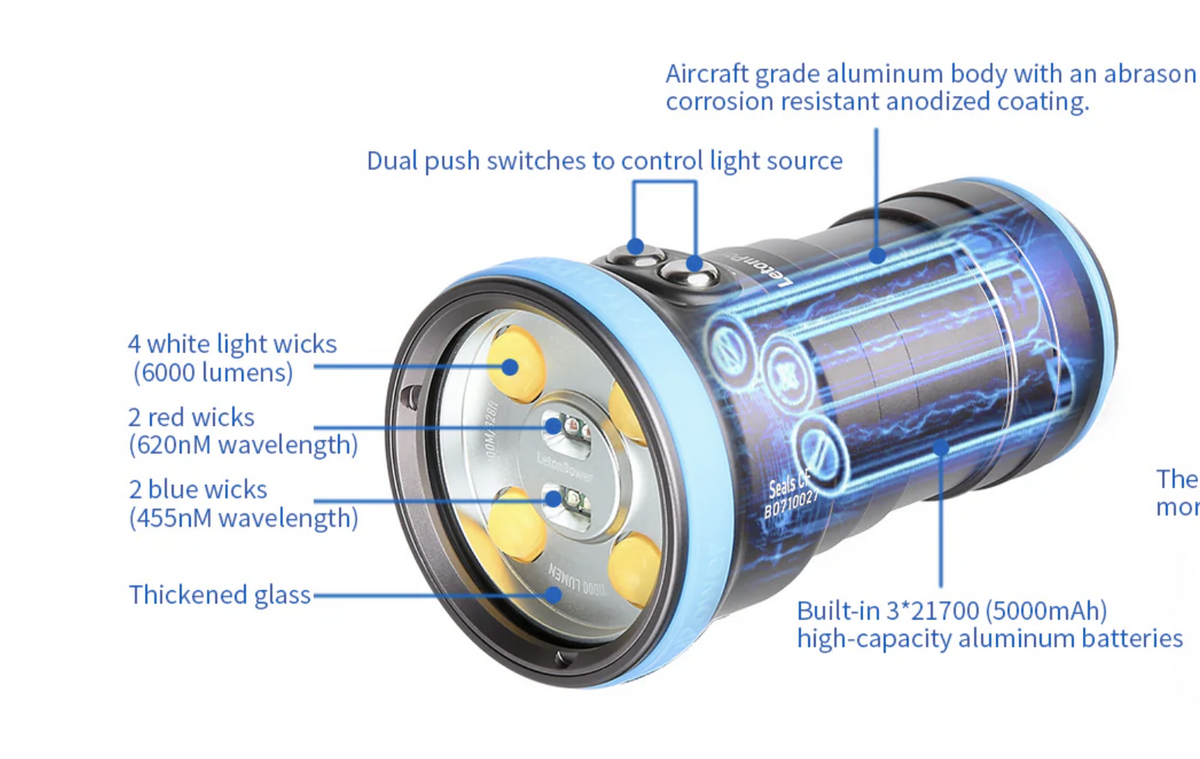
see the video above from Sean Elliot, 21700 its the battery chemistry/format. The SEAL model batteries looks like are built-in Type-C charging: 1: Unscrew the cover and charge the flashlight with the charging from an appropriate USB source, the switch indicator light is red;When the battery is full, the switch LED turns blue. 2: Before diving, please check whether the charging port is tightened to prevent water ingress. https://www.letondive.com/pages/download-product-manual?srsltid=AfmBOopyKZo5nsHQrTU25WJdebJy8Ne0rYXs7oq-0HrnwnjhJwAd-xi_
-
@Nikolausz How do you trigger/use the strobes with gopro ? They have continuous light source ? Do you use it for photo or video ? Edit: they aren't strobes, its Smart Focus 7000 Video Light 🙂
-
The seal CF6000 (219$ ) Offers 6000 lumens of 5500K white, blue, red light, 96 CRI, 120° irradiation angle for large area has 3 batteries 21700 of 5000mAh
-
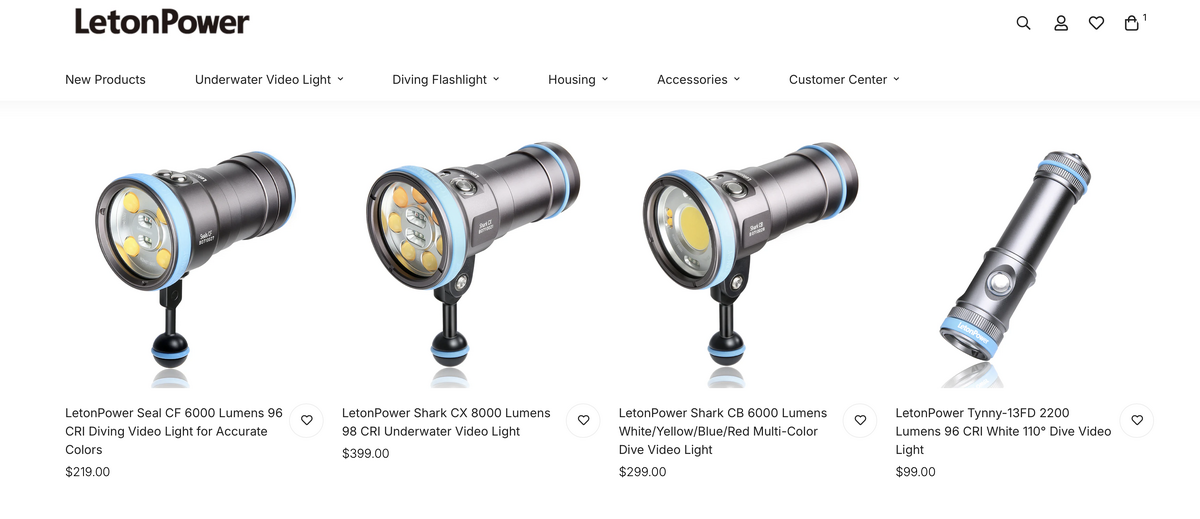
The new letonpower dive lights have CRI specs
-
At CES 2026 HOVERair reveals is Aqua Drone Zero Zero Robotics announced the launch of HOVERAir AQUA, the world's first fully waterproof, self-flying camera engineered for life on water. Built for creators, athletes, and innovators, AQUA represents a category-defining leap in aerial imaging: no remote, no piloting, no compromise. Whether stand-up paddling, kayaking, wakeboarding, jetskiing, fishing, or boating, HOVERAir AQUA captures stunning third-person shots - hands-free and hassle-free. A Say goodbye to static POVs and manual drones. AQUA redefines content creation with AI-powered tracking, waterproof design, and palm-sized portability - all hands-free, all on water. Building on the success of PROMAX, the world's No. 1 self-flying camera, Zero Zero Robotics expanded its portfolio from skiing and biking into water sports. AQUA goes further with faster flight speed, longer flight time, real-time video, and IP-67 water resistance paired with neutral buoyancy. It follows users automatically over and around the water, delivering smooth, breathtaking shots from entirely new angles and opening the door for water-sport lovers everywhere. It floats. It follows. It films - anywhere on water. Equipped with a 4K/100 fps slow-motion camera, a 1/1.28" CMOS sensor, and a hydrophobic lens, AQUA ensures stunning image quality. With more than 15 automated flight modes such as snorkel mode and gimbal mode, as well as Level 7 wind resistance up to 33 knots, a lightweight design under 249g requiring no FAA registration, 23 minutes of flight time, and a maximum tracking speed of 55 km/h (34 mph), HOVERAir AQUA is ready to capture every adventure, hands-free and from entirely new perspectives.
-
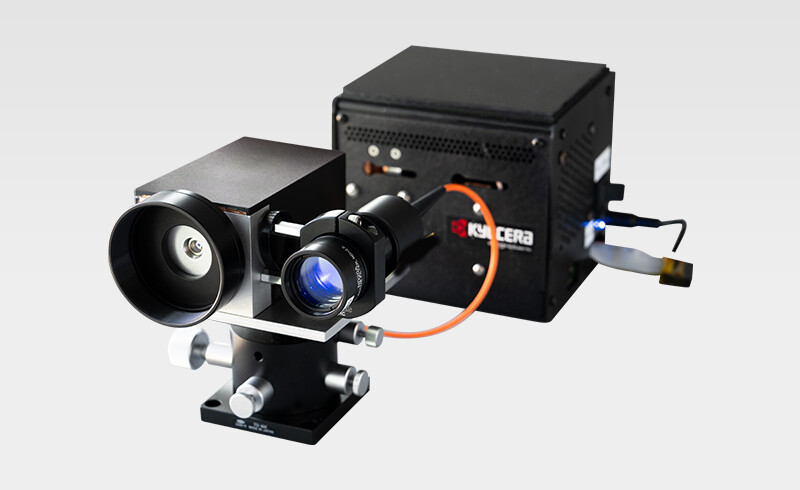
Kyocera’s Underwater Wireless Optical Communication (UWOC) is a next-generation marine ICT technology that enables high-speed, high-capacity data transmission by minimizing underwater optical attenuation. This solution provides stable, real-time transmission of high-definition video and sensor data, enhancing the efficiency of marine surveys with Autonomous Underwater Vehicles (AUVs), improving the accuracy of structural inspections, and accelerating scientific discoveries during marine research. Additionally, Kyocera will demonstrate world-leading 5Gbps transmission capacity that will help advance UWOC and underwater IoT.
-
Go South (Marsa Alam) June to August (more crowded but good weather ) Caution: if you go in winter and the wind is above +30km/h they close the port (Hurgada) for security reasons and no sailing aloud. Last couple years theres was lots of liveaboard accidents, and in 2024/25 the government implemented lots of restrictions to prevent more accidents, 2 motor engineers on board now is mandatory and they ban night sailing. The liveabaords are refurbish old yachts made of wood, and their bottom is flat.. meaning not made to break the waves. Sometimes the boat operator add extra deck to accommodate more passengers, messing with boat stability due being taller, get a windy day and the thing shakes a lot (flat bottom remember). The times ive went ( emperor ) the captain told us, he had inherited their boat license from his father, fisherman, 40 years at sea, at sea since age of 10, very experience, know the tides, currents, cross winds, but there's no navigation charts, everything is done visually avoiding surface corals + with a smartphone with GPS.. In November 2024 we booked a chart (20 divers) and before we leave the port, the captain refused to make the south route due the weather conditions, he made an ultimate, or north or we won't leave, and until today im glad the captain took that decision, because 2 days later, other boat that leave same day has us, the Sea Story sank capsize...killing 11 people onboard. Ive worked 15 years at sea, weekly drills, fire fighting training, sea rescue, etc, etc, some stuff what ive seen in Egypt shock me, other has pleased me. Staying at Sharm el-Sheikh resort can also be good option (safer) .. theres dive centers booking daily to SS Thistlegorm or Ras Muhammad National Park. Need to return one day to go to Rosalie Muller & Salem express (liveaboard)
-
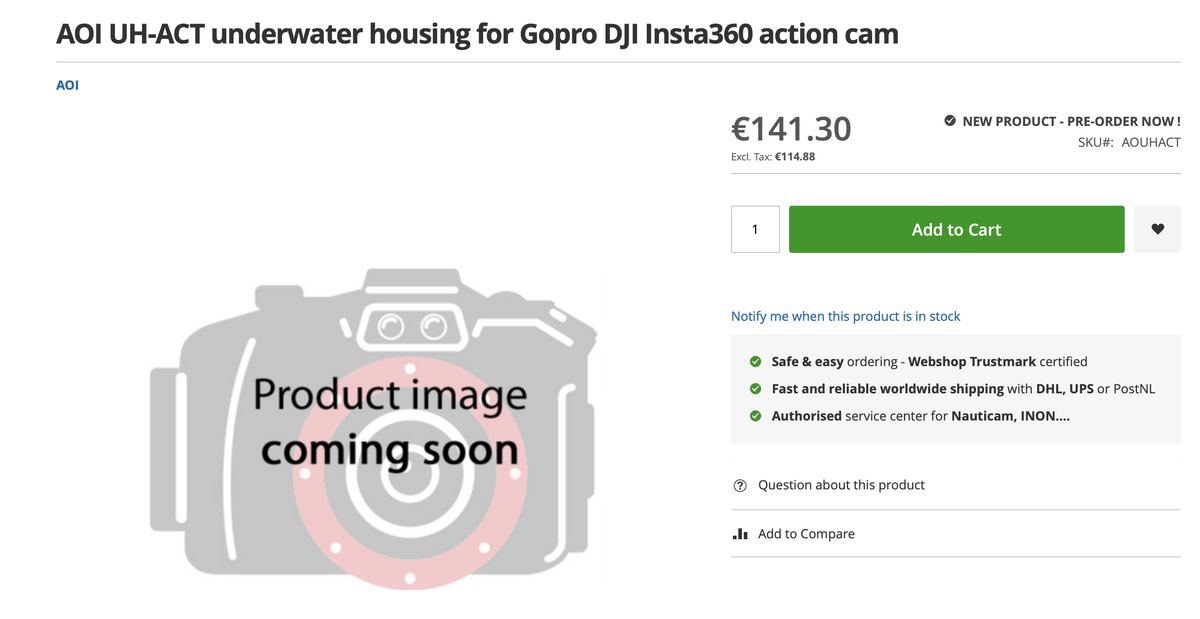
Price 140€ dont seems bad.
-
AOI UH-ACT + UMG-01 Magnifier lcd viewfinder 已經開始預售了!運動相機共享防水殼昨天開賣含廣角鏡套裝已經達到3位數訂單!感謝大家的支持台灣首發將於1月底2月初開始發放也是全球第一批首發預售連結 AOI 水下光學攝影器材-台….mp4
-
apparently
-
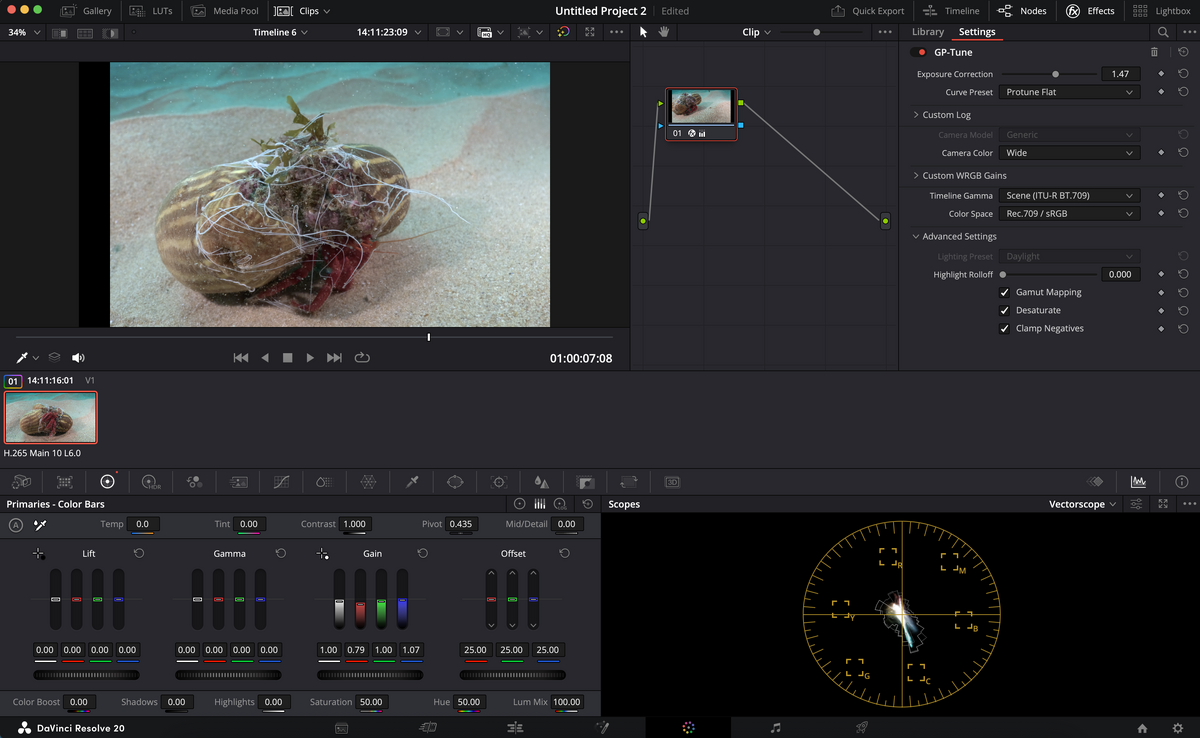
Filmed was done without tripod second time doing macro with gopro + UCL-03 lens Subject was too big for close up.... Subject was not static and its not slow has a nudibranch or shrimp (focus is 4-to 8cm) Filmed 5.3k 30fps, instead of 4K60 to slow down in post. Its trial and error thing
-
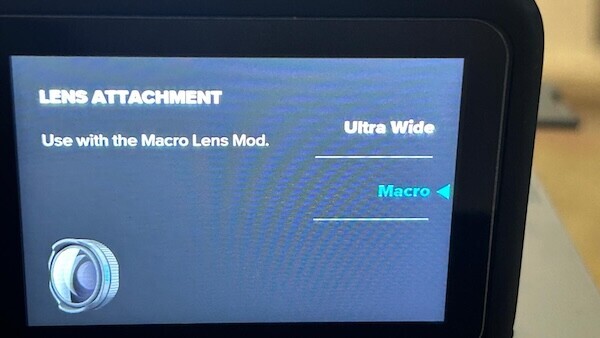
Gopro 13 Main Menu > Lens attachment (bottom right) > select macro > go to preset > settings > Protune > focus peaking
.jpeg.3d28a30e1a3946561e28ae2514e45658.jpeg)
-
Wide wet lens have being more common in action cams. With small m67 adapter they can be used in full sensor cameras or smartphone cases. They have being so popular that AOI and INON recently released their Pro models lens for action cams (ZD)
-
Im leaving some links for anyone interested in Gopro WB parameters from diferent models. https://colour.readthedocs.io/en/v0.3.10/colour.models.rgb.dataset.gopro.html GitHubDifference between Open-Source and Commerical Transforms...What is the difference between these open source Protune Transforms and the commercial GP-Tune Transform? For reference and clarity, the open-source transforms are based off the NATIVE to sRGB colo... Important: Whilst all GoPros appear to use the same Color Matrices, the raw gains applied for Native White Balance are different between the various imaging sensors and even within the models using the same sensors. The resulting XYZ Matrix will be different for each GoPro model. There will be slight color variations when the "Native" color transforms (based off the IMX117 sensor & HERO5 Black) are used across the different GoPro iterations. The Rec.709 Gamut based transforms should work across all variations regardless. GitHubGitHub - xtremestuff/protune-transforms: GoPro Protune Fl...GoPro Protune Flat & LogB ACES IDTs and YRGB Transforms for DaVinci Resolve (Based off HERO5 Black) - xtremestuff/protune-transforms
-
I also have being in 2 underwater video & photo competitions, in Porto santo 2024 & Madeira islands 2025, this last one CMAS World cup with +80 participants and didn’t see anyone using filters. @bghazzal Your filters approach seems the correct one balance the RGB/White balance for later correct in post. But I dont agree about the part about gopro labs. Theres option at gopro labs software that can replace traditional ways of improve underwater challenges in action cams Example: Corner Distortion - DIVE=1 native WB - WIDE=1 Red filters - WARM=x Noise reduction control - NR01=x Its just a matter of testing them like you did 20 years ago with filters. The mathematic algorithm on gopro on native WB has evolved over the years and is different from model to model. The smart guys at xtremestuff mention that in their blog post. https://xtremestuff.net/introducing-the-gp-tune-transform-for-gopro-footage/ again thanks for your tutorial about filters/RGB.
-
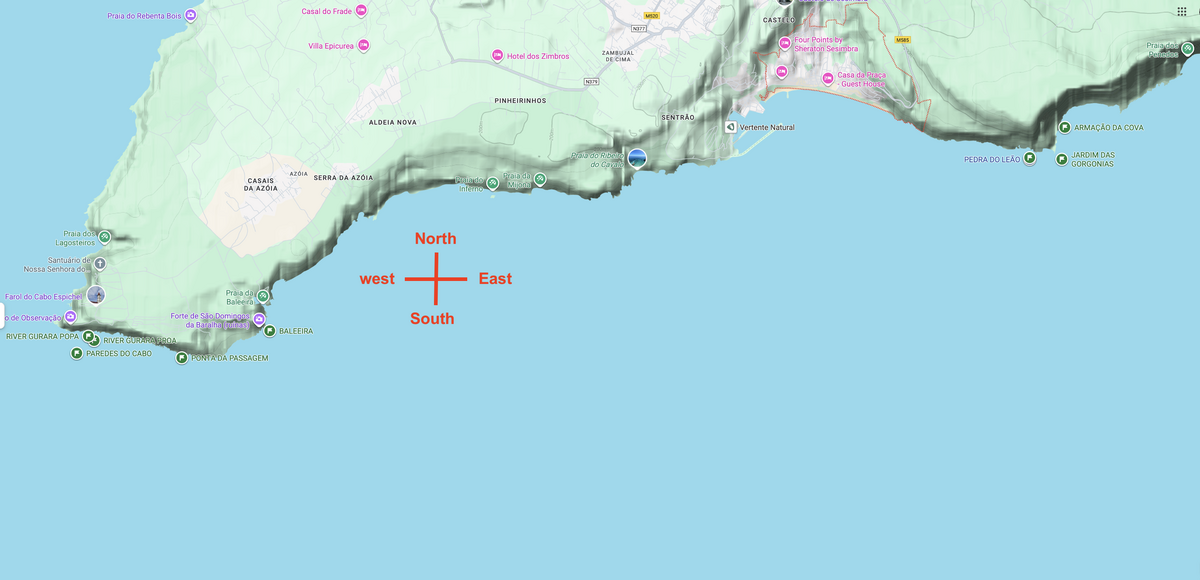
thanks for the explanation about the filters Heres a map where i learn to scuba dive, South of Lisbon, city cost named Sesimbra, theres about 10 dive centres, on weekends theres about 300 to 400 divers across all diving schools, in the summer its a lot more. Its a Marine park with dedicated diving spots for scuba diving boats only Cold green water all year round, diving spots are from 10m to 43m, average visibility is 5-10m in murky water. Compass, Buoys, and dive lights are mandatory. Theres no big pelagics, other marine life and macro are abundant between 15m and 25m. Shallow dive spots are sand or soft corals, flora and rocks with little marine life. We can get 30m visibility in November and half month of December. This is not the Red Sea, Mexico, Florida, Indonesia, Osaka, Raja Ampat, Sipadan, where the water is warm and crystalline with excellent visibility where you can make use of the filters for underwater landscapes. General rule over here (Sesimbra) : Its rare to see an underwater photographer or Videographer with filters, 99.9% use dive lights Anyone that today ask me advice what gear should get for starter kit for underwater (video/photo) with efective results i would say: Divevolk + iphone 13 pro or above + uwacam app (had color correction built-in ) its a good starting point that fits hundreds of divers needs, later its up to each individual pursuit their evolution in underwater photography or video. Not everyone is looking for the holy grain of the perfect color correction, perfect picture, perfect video.
-
Heres example of the Focus Peaking showing in the live view. ps: The use of focus peaking without dive lights is very unreliable or useless.

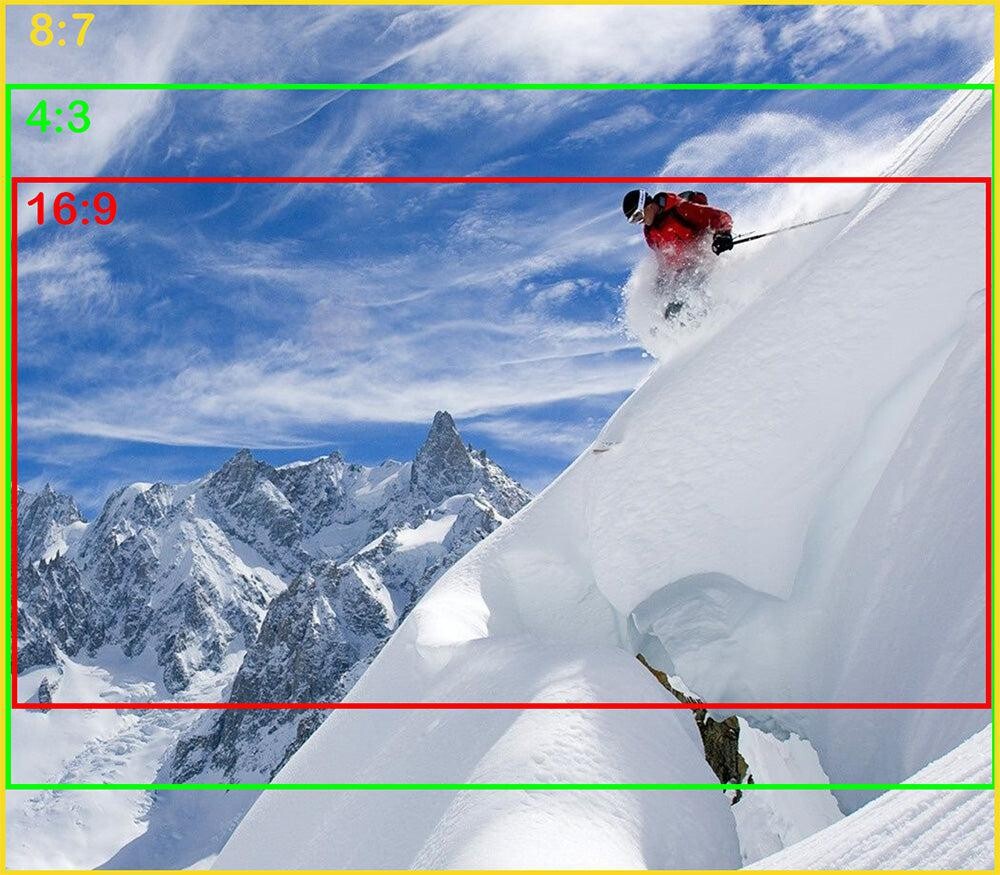
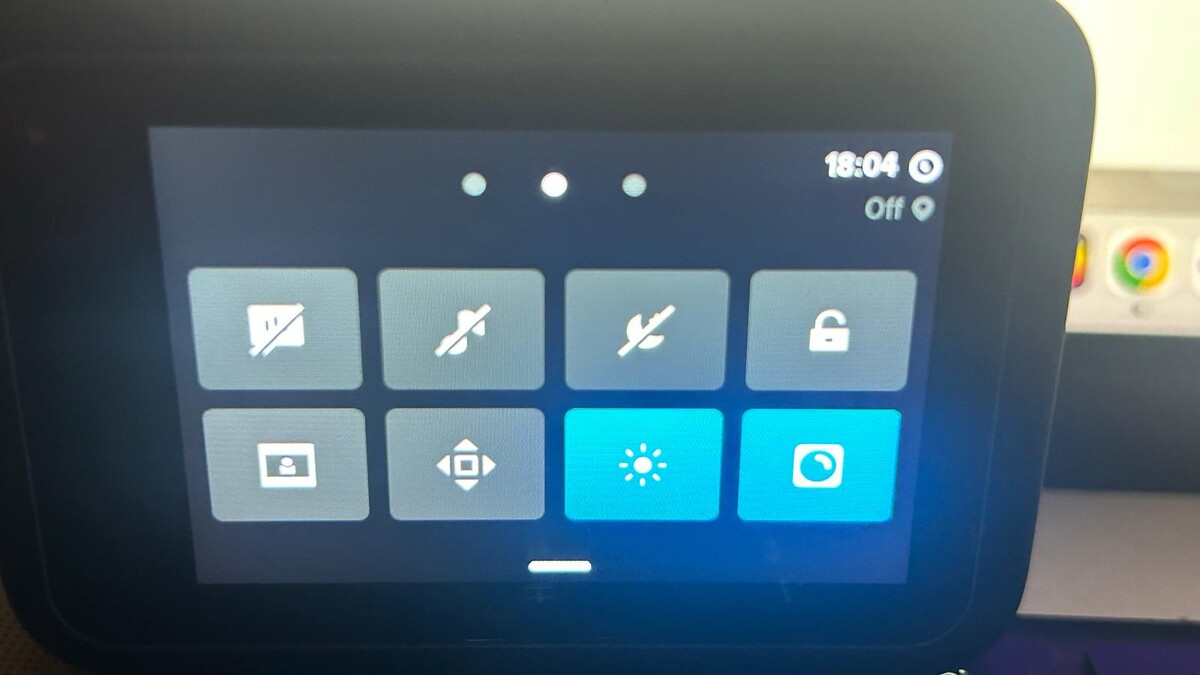
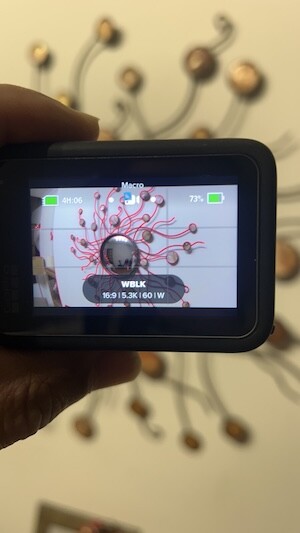 Today activate Macro Mod manually to be able to access Focus Peaking ( highlights sharp edges in your Live View with a bright color) It can help a bit while doing Close-up or Macro Mode, its not 100% but its something, especially if you use color red and high sensitivity For example in the video below theres no way i can see if the eyes of the Hermit Crab are getting out of focus, 1 cm to far and the video is ruined. Also activating Macro Mod the 8:7, HDR or Zoom no longer will be available If the small screen is already a challenge, sometimes will be harder to get nice content for macro/close up with Gopro due the lack of super macro capabilities, sea life moves a tad faster than Nudibranch 😉 Ps: From my testing having Macro Mod ON, its seems it doesn't affect the use of wide angle lens, the Focus Peaking can also be extra help while doing close-up with wide angle lens. In gopro labs forum it was mention the Macro Mode might affect Hypersmooth. Regarding the lens AOI UCL-03 its a keeper, on the times if managed to get focus, the image was stunning especially in the details. Davinci resolve free Version GP-TUNE Plugin AOI UCL-03 lens Gopro Labs Firmare Wide=1 Wide color Gamut Bitr=190Mbps Bitrate *Dive=1 optimized for water refraction (No corner distortion) 5.3K 16:9 60Fps WIDE HYPERSMOOTH ON 10 BIT BIT RATE HIGH SHUTTER AUTO EV COMP -05 WB AUTO ISO 100 - 800 SHARPNESS LOW DENOISE LOW COLOR FLAT FOCUS PEAKING RED COLOR (sensitive High)The problem was the subject behind the camera 😄. It was first time i did macro or close-up on gopro with this lens ucl-03 Its hard to tell if what we filming is in focus. No issues with aoi uwl-03


Important Information
Terms of Use Privacy Policy Guidelines We have placed cookies on your device to help make this website better. You can adjust your cookie settings, otherwise we'll assume you're okay to continue.