



Skip to content

Lights, Strobes, and Lighting Technique / Archived topic

Strobe Arm/s length ?

Started by AndyC ·

  • 40Posts
  • 40Replies

Read-only discussion

Strobe Arm/s length ?

40 posts
  1. I really like the loc-line idea Karl, but not sure if it would hold up my heavy YS-250's.


    Mike


    You might be suprised at how strong they are - are mate of mine uses the 1/2" loc-line to hold his two Inon strobes (not sure of the model No), on land the loc-line arms wont support the weight but underwater they do the job perfectly.


    I am using the 3/4" loc-line because I was advised that they would take the weight of most strobes when under water so that when the time to upgrade my strobes I could keep the arms.


    It is also a cheap option (which I like) in total the cost for both arms was approx $100 Aust - with the most expensive pieces being the YS Loc-line adaptors.


    Anyway it's food for thought and an option for someone looking for a different system to just the standard arms.


    Karl
  2. I am using the 3/4" loc-line because I was advised that they would take the weight of most strobes when under water so that when the time to upgrade my strobes I could keep the arms.


    It is also a cheap option (which I like) in total the cost for both arms was approx $100 Aust - with the most expensive pieces being the YS Loc-line adaptors.


    Anyway it's food for thought and an option for someone looking for a different system to just the standard arms.


    Karl
     

    I've found this product in the UK.


    http://www.mscjlindustrial.co.uk/


    Gonna give them a call and check this out.


    Cheers Andy.

  3. You have excellent shots here!! I especially like the tonality and composition of _DSC0112.


    Tom, Thanks for your kind words and feedback.


    Andy

  4. Hi again Andy,


    There is a bunch of info on this here, but if his third edition is anything to go by, there will be a lot of great information on lighting in it.


    Well worth it!


    Adam


    PS. I've sent you an invite to the Wetpixel Flickr group!

  5. Hi again Andy,


    There is a bunch of info on this here, but if his third edition is anything to go by, there will be a lot of great information on lighting in it.


    Well worth it!


    Adam


    PS. I've sent you an invite to the Wetpixel Flickr group!


    Hi Adam,


    Thanks very much for the invite.


    It seems Santa got it wrong when he brought me the third edition. In the words of Homer Simpson "Doh!!"


    I think its gonna eat away at me, so I'm off down to WH smiths to order the Fourth!!


    I've joined the groups.... looking forward to it!


    Andy.

  6. Andy,


    In regards to arms, I would suggest you consider using buoyancy arms to make you rig neutral or just negative using a combination of 5" and 8" or just 8" arms. The negative weight of a DSLR will compromise your diving making it difficult to hold still to take photos.


    Elmer

  7. Andy,


    In regards to arms, I would suggest you consider using buoyancy arms to make you rig neutral or just negative using a combination of 5" and 8" or just 8" arms. The negative weight of a DSLR will compromise your diving making it difficult to hold still to take photos.


    Elmer


    Thanks Elmer,


    adamdiveruk also suggested this and I've been having a look at these. I've also noticed that attachment buoyancy aids are available which can be used in one of the accessory screw fittings provided on housings?


    Do you find these present problems with their bulky size? or their weight perhaps when traveling?


    Andy.

  8. Andy,


    I now use two 9" StiX buoyancy arms for each strobe. These arms are with the medium size floats and with this brand you have the advantage of being able to adjust your buoyancy with three different size floats (http://stores.4gdphoto.com/StoreFront.bok). Another plus for StiX is that they are light for travel. The only disadvantage is that their ball ends are somewhat slippery allowing arm movement as you carry your rig on land, but are not a problem underwater. I would avoid attaching anything extra to your rig, just more crap to get tangled up.


    Elmer

    Edited by eyu
  9. Andy,


    I now use two 9" StiX buoyancy arms for each strobe. These arms are with the medium size floats and with this brand you have the advantage of being able to adjust your buoyancy with three different size floats (http://stores.4gdphoto.com/StoreFront.bok). Another plus for StiX is that they are light for travel. The only disadvantage is that their ball ends are somewhat slippery allowing arm movement as you carry your rig on land, but are not a problem underwater. I would avoid attaching anything extra to your rig, just more crap to get tangled up.


    Elmer


    Thanks for the link Elmer, I'll check them out.


    Andy

  10. Hey guys


    The bespoke buoyancy arms - like the ULCS ones - have always struck me as being very expensive. Stix certainly seem better value.


    Another option is very high density foam which slides over ULCS-style arms. I bought some recently off Ryan at Reef Photos. It's excellent and at around $20 for 2x 5" arms, much better value. I've had the arms down to 30m regularly and no compression of the foam. Its obviously very light weight and not too bulky for air travel. It's working very well on my system even with the chunky, heavy Nikon 105VR.

  11. i think the Stix system is the only practical way to get buoyancy really trimmed. it's cheaper because you don't have to buy a new arm with different floatation to get your rig trimmed or whenever you change your rig


    if you already have ULCS skeleton arms, the add-on floats from 4th Generation are a good way to go -- these floats can also be forced on to the ULCS small dia buoyancy arms


    i've also cut the Stix floats to tie-wrap directly to my Inon flash and FIX focus light - with the individual lights trimmed the moment of the rig doesn't change when the lights are moved around - this is particularly important if you're going to use long arms


    4th generation also makes double ball adapters. i've combined one of these with a single ball on the left handle of my Aquatica so i can add an extra Stix arm as a "3rd hand" which lets me pretty easily shoot one-handed

  12. i think the Stix system is the only practical way to get buoyancy really trimmed. it's cheaper because you don't have to buy a new arm with different floatation to get your rig trimmed or whenever you change your rig


    if you already have ULCS skeleton arms, the add-on floats from 4th Generation are a good way to go -- these floats can also be forced on to the ULCS small dia buoyancy arms


    i've also cut the Stix floats to tie-wrap directly to my Inon flash and FIX focus light - with the individual lights trimmed the moment of the rig doesn't change when the lights are moved around - this is particularly important if you're going to use long arms


    4th generation also makes double ball adapters. i've combined one of these with a single ball on the left handle of my Aquatica so i can add an extra Stix arm as a "3rd hand" which lets me pretty easily shoot one-handed


    Hi Stever,


    Have you got any photos of your rig set up?

    I'm trying to visualise and a picture speaks a thousand words, so they say.

    Is your rig near neutrally buoyant? and does it change much with depth, given its foam?


    Cheers Andy.

  13. i've set up the rig so that it's 6 or 8 ounces negative biased to the right grip so that i'm supporting the rig with my right hand and it doesn't want to twist sideways or fore and aft -- this also took a couple small floats on the macro port and a pound or so of lead on bottom of the dome port


    the foam supplied by 4th Gen is about 8#/cu ft -- pretty dense as foam goes and does not seem to be available in reasonable quantities that i've been able to find. i've not noticed any compression at depth


    when i get a few minutes i'll dig up some images

  14. i've set up the rig so that it's 6 or 8 ounces negative biased to the right grip so that i'm supporting the rig with my right hand and it doesn't want to twist sideways or fore and aft -- this also took a couple small floats on the macro port and a pound or so of lead on bottom of the dome port


    the foam supplied by 4th Gen is about 8#/cu ft -- pretty dense as foam goes and does not seem to be available in reasonable quantities that i've been able to find. i've not noticed any compression at depth


    when i get a few minutes i'll dig up some images


    Appreciate that! thanks

  15. Let me go over the method for adjusting buoyancy - my philosophy is to get the camera and lens in the housing and port adjusted for total buoyancy, fore and aft and left and right - i've tried to set it up for about 1/2 pound negative as supported by the right grip only. then make the strobes and arms neutral so that they can be placed in any position without changing the balance of the rig.


    1 i determined balance by hanging the right handle from a fish scale and the other from a fixed support on top of a tank (i used a very large garbage can) and added floats floats to a 4th Gen float belt on the Macro housing until it stoppedd tipping down (added lead weights under the dome to keep it from nosing up -- and noted the weight on the handle


    2 switched the scale to get the weight on the left handle and added floats to the Stix arm attached to the left handle until it was nearly neutral


    3 weighed each flash and the focus light underwater with the fish scale to find out how negative they were. to facilitate cutting weights to fit the lights, i noted the change in bouancy when a typical float was added then weighed the float on an electronic kitchen scale to get the ration of lift provided per ounce of float weight (which number i can't seem to find) -- the cut the floats as required close to the estimated weight for desired buoyancy


    4 added the arms and added buoyancy to the arms as required


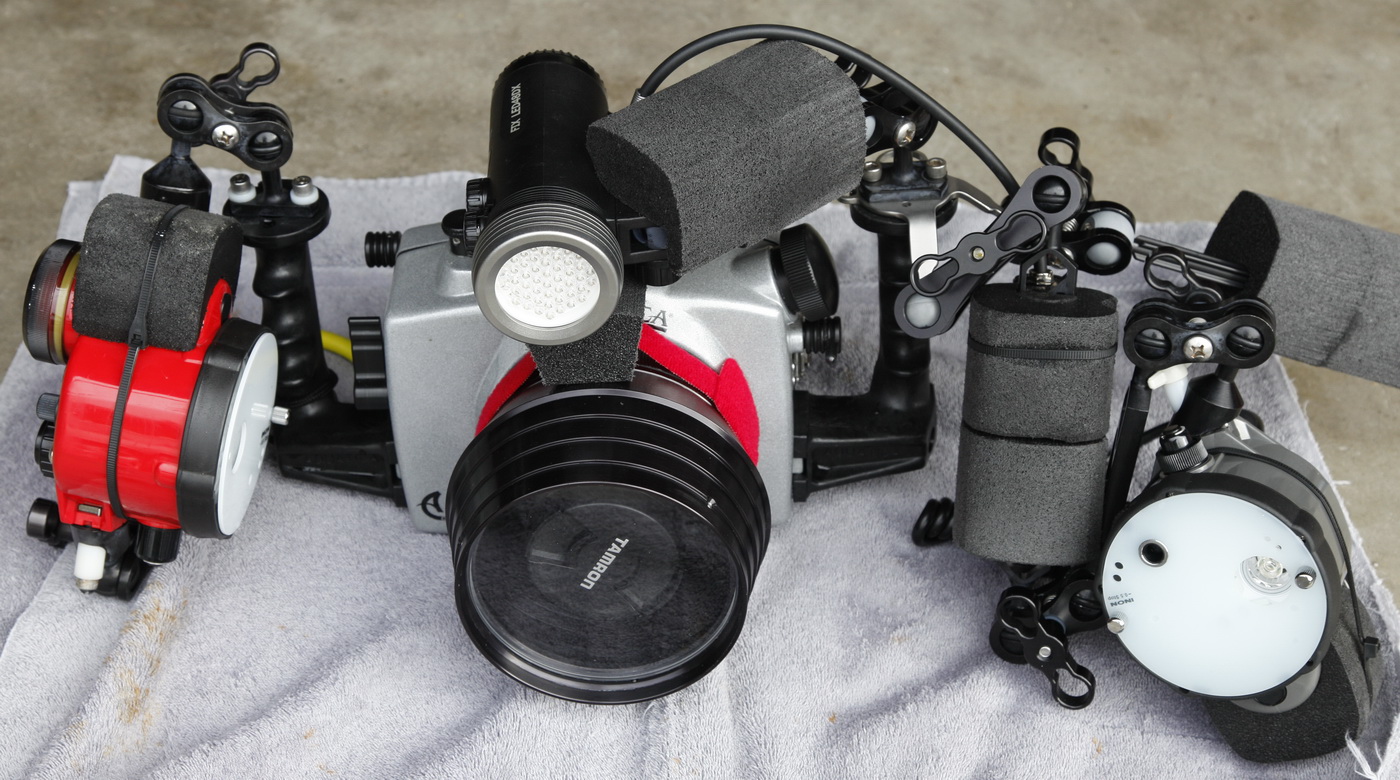
    post-5829-1262651291.jpg


    the modified floats art tie-wrapped to the flashes. John Weiss added the Stix arm with specially cut floats for the FIX lights to the 4th Gen catalog after we discussed the problem (i'm now using just the float closest to the light and two smaller floats tie-wrapped to the back for better fore-afts balance). The tie-wraps floats on the skeleton arm hold the H&W in groove in the floats (which you can't see in this view). The "third hand" is the Stix arm sticking out to the side with 2 floats (i think i can go from a 9 to a 6 inch arm which will be less in the way). The float belt is red with one float on top of the port). Since the rig is set up for buoyancy testing the lens cap is on and the fiber cable connecting the 2nd flash is missing . What a mess of stuff.

  16. Love the effort you've gone to Stever. What happens to the bouyancy when you go to portrait and shoot vertical?


    Steve

  17. now with the dome port


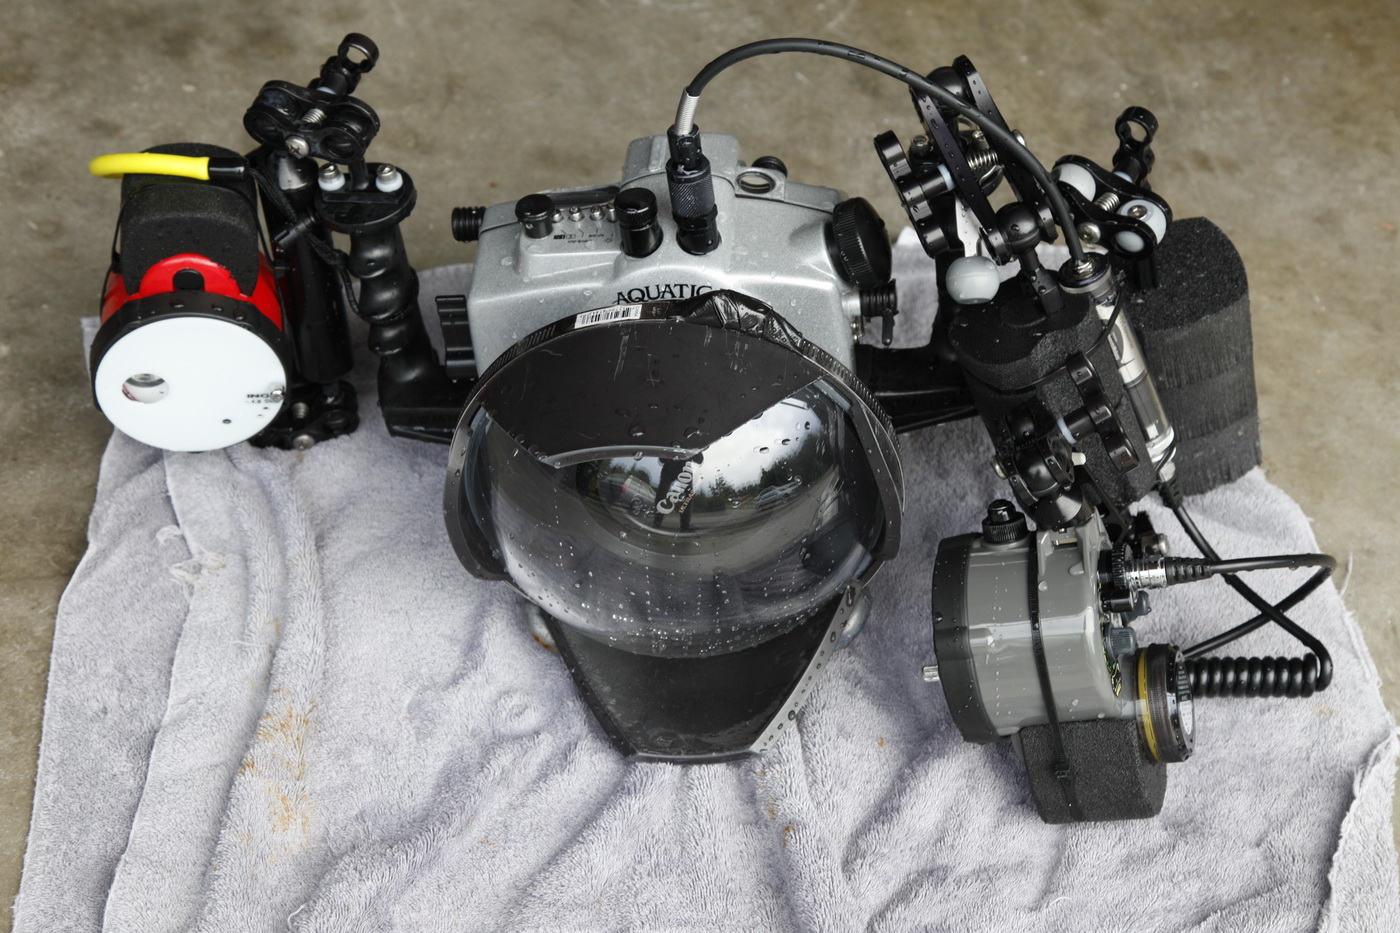
    post-5829-1262652190.jpg


    the weights are bolted to a couple large hose clamps (couldn't find a single one long enough) and you can just see the edge of the weights at the bottom of the dome hood. you can see the H&W in this view. looks like i used 3 floats on the "third hand" in the dome photo - plan to take a few extra floats on my trip to the Phillipines in 2 weeks for some fine tuning


    with long arms i think it's particularly important to get the lights neutral with floats directly on the lights or on the arms close to the lights - the Inons are pretty dense which can result in a consderable moment on the end of long arms. the nice thing about putting the floats on top of the Inons is that they're out of the way and don't interfere in folding up the arms.


    Now if we could just get the manufacturers to pay some attention to buoyancy or lack of same when they design this stuff!

  18. Sorry for the late entry...been traveling. I use a 5" and 8" ULCS arm on each side for each Z-240 on a Nexus housing.

    I put two XL Stix floats on each 8" arm and one L Stix float on each 5" arm. With the small 1017 port from Nexus for the tokina 10-17, this is slightly negative in salt water and well balanced.

    With the a 60mm AFS and port, its slightly more negative but still easy to handle.

    With the 105mm and its port, the front gets more postive than I like and is slightly positive overall and considering options for the correction - such as adding a spotting light extending over the port which might address the issues.

    I have an ancient 105 and it racks out quite a bit...which is why I have a longer port, resulting in the postive u/w wt.


    The foam does not change bouyancy at different depths.

    The arms, floats, clamps all pack nicely in a one gallon ziplock for tossing in checked luggage.

  19. I like to use the really cheap flotation tubes that kids use in the swimming pool. Its slightly compressible and I set it up such that the rig just floats on the surface. Useful for shore entry or if the hand down from the boat crew is less than perfect. By 15ft it becomes negative and remains comfortable at 90 ft.


    I was out in the garage over the weekend adding 6 oz of lead to the dome port shade, 3 on the top, 3 on the bottom to give it a change in portrait.


    I certainly agree that manufacturers should pay more attention to making their kit neutrally buoyant.

  20. Let me go over the method for adjusting buoyancy - my philosophy is to get the camera and lens in the housing and port adjusted for total buoyancy, fore and aft and left and right - i've tried to set it up for about 1/2 pound negative as supported by the right grip only. then make the strobes and arms neutral so that they can be placed in any position without changing the balance of the rig.


    1 i determined balance by hanging the right handle from a fish scale and the other from a fixed support on top of a tank (i used a very large garbage can) and added floats floats to a 4th Gen float belt on the Macro housing until it stoppedd tipping down (added lead weights under the dome to keep it from nosing up -- and noted the weight on the handle


    2 switched the scale to get the weight on the left handle and added floats to the Stix arm attached to the left handle until it was nearly neutral


    3 weighed each flash and the focus light underwater with the fish scale to find out how negative they were. to facilitate cutting weights to fit the lights, i noted the change in bouancy when a typical float was added then weighed the float on an electronic kitchen scale to get the ration of lift provided per ounce of float weight (which number i can't seem to find) -- the cut the floats as required close to the estimated weight for desired buoyancy


    4 added the arms and added buoyancy to the arms as required


    post-5829-1262651291.jpg


    the modified floats art tie-wrapped to the flashes. John Weiss added the Stix arm with specially cut floats for the FIX lights to the 4th Gen catalog after we discussed the problem (i'm now using just the float closest to the light and two smaller floats tie-wrapped to the back for better fore-afts balance). The tie-wraps floats on the skeleton arm hold the H&W in groove in the floats (which you can't see in this view). The "third hand" is the Stix arm sticking out to the side with 2 floats (i think i can go from a 9 to a 6 inch arm which will be less in the way). The float belt is red with one float on top of the port). Since the rig is set up for buoyancy testing the lens cap is on and the fiber cable connecting the 2nd flash is missing . What a mess of stuff.


    Thanks for sharing all that Steve, theres loads to think about there.


    really admire your determination to get it right.

Account

Navigation

Search

Search

Configure browser push notifications

Chrome (Android)
  1. Tap the lock icon next to the address bar.
  2. Tap Permissions → Notifications.
  3. Adjust your preference.
Chrome (Desktop)
  1. Click the padlock icon in the address bar.
  2. Select Site settings.
  3. Find Notifications and adjust your preference.

