


Shooting a Snoot
Underwater photography is an absorbing form of photography. For some, it’s a technical issue of capturing fish portraits. For others an art form about capturing the beauty and mystery of the underwater world.
Whichever you aim for, it presents unique challenges. Everything moves: you, the water, and the subject. Photography is all about capturing and controlling light. In the underwater world lighting and highlighting the subject is often impacted by either a too-busy background or particulate in the water.
One way of tackling these two issues is by using a snoot.
What is a Snoot?
A snoot is a specialized photographic accessory to control and direct the light. Look upon it as a spotlight. In underwater photography, a snoot is particularly valuable for focusing light on a specific subject and can create dramatic and captivating images.
How Does a Snoot Work?
A snoot essentially acts as a funnel for light. It fits over a strobe or flash, and, depending on the design, its opening can be adjusted to control the width of the beam of light emitted. By narrowing the beam, a snoot allows you to highlight specific areas or subjects in your underwater scene while leaving the surroundings in relative darkness.
Sounds simple? Keep reading……
Advantages of Using a Snoot
Selective Illumination: one of the primary benefits of using a snoot is the ability to illuminate a subject selectively. This can draw attention to specific details, textures, or creatures in your underwater composition – and avoid a distracting background or elements. In effect it helps create “neutral space” so that the subject is either enhanced by its background – or a distracting background can be made to disappear.
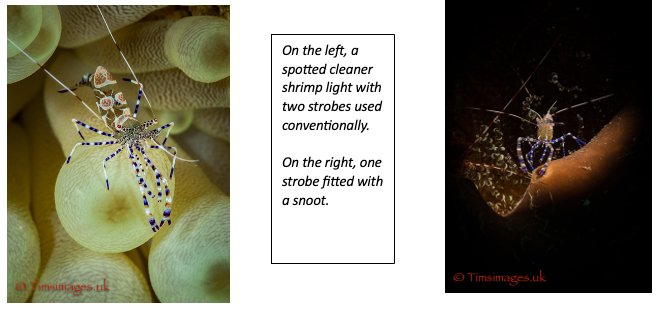
Reduced Backscatter: backscatter, caused by suspended particles in the water, is a common issue in underwater photography. By concentrating light with a snoot, you can minimize the spread of light and subsequently reduce backscatter, resulting in clearer and more vibrant images. A snoot makes an ideal companion when photographing in water with poor visibility.
Creative Lighting Effects: Snoots enable the photographer to experiment with unique and artistic lighting effects. By controlling the shape and intensity of the light beam, you can create striking shadows, highlights, and even produce silhouettes for a more dramatic visual impact. Down or back lighting with a snoot can produce amazing images.
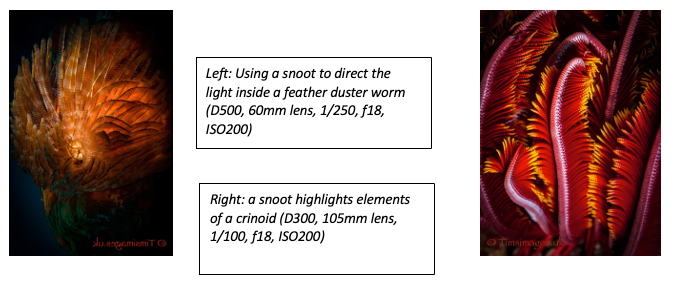
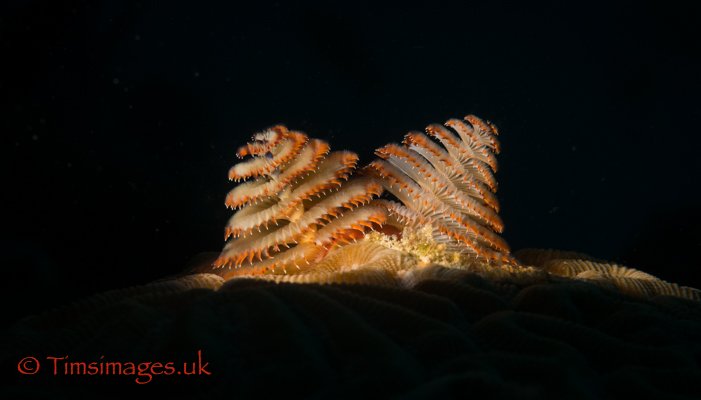
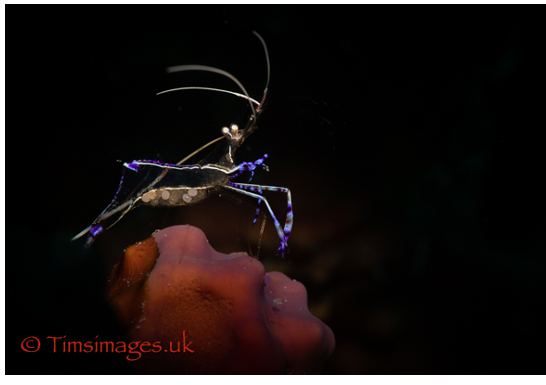
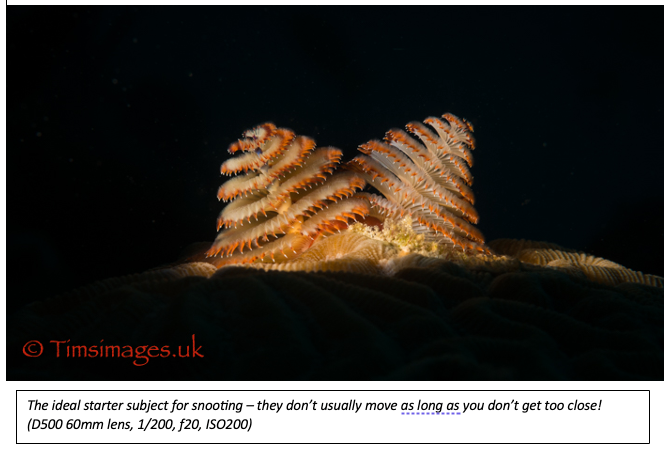
Enhanced Macro Photography: in macro photography, precision and control over lighting are paramount. A snoot is particularly useful for highlighting intricate details in small subjects like nudibranchs, seahorses, or tiny crustaceans.
Build Your Own Snoot
Because it seems such a simple device, many of us experiment by making a snoot using plumbing piping. Sadly this seldom works and, when it does, tends to be more through good luck than judgment.
The main problem derives from the difficulty of ensuring the output from the snoot really is lighting the required area. If your strobe has a focussing light you can try having this switched on and see if the light beam will travel down the home-made snoot and illuminate the subject. If it does, great, but this does not guarantee that when the strobe is fired it will illuminate the same space. Odd though it may seem, the positioning of the strobe tube(s) in relation to the focussing light can have quite an impact on snoot accuracy.
Home-made snoots, whilst a fun construction project, can be incredibly frustrating in use.
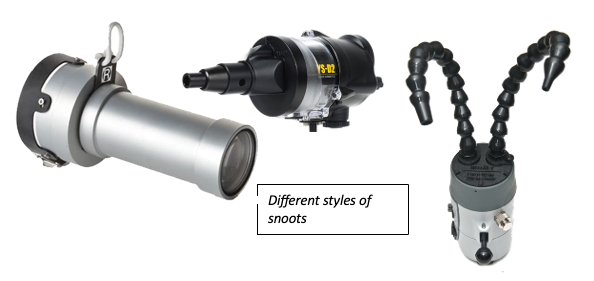
Buying a Snoot
When the balance of a homemade snoot tips from being fun to intensely annoying, it could be time to invest in a manufactured one. There are a good few on the market ranging from the simple (about $90), to the complex and expensive (about $500).
A current (Oct 2023) Google search reveals a number of options:
· 10Bar Snoot
· DivePro M10 SuperMacro Snoot Light and MP30 Snoot Light
· Inon Snoot Set (possibly the simplest)
· Kraken Sports Hydra Optical Snoot
· Marelux SOFT (possibly the most sophisticated)
· Retra LSD
· Reefnet Fibre Optic Snoot
· Sea&Sea Snoot
Many of them have the means to alter the snoot’s “aperture” – so narrowing the light beam to a smaller and smaller diameter. The Marelux SOFT uses a sophisticated variable aperture system; the Retra LSD uses a simple mask system which slots into the snoot.
But the Problem is Not Quite Solved
As I set out earlier, the shape and positioning of the strobe flash tubes in relation to the aiming light can result in the two light sources not necessarily illuminating the same area. This can remain the case even with a factory-built snoot. Generally, the best results come from a strobe with a circular flash tube (rather than straight tubes) with the aiming light in the middle.
From my own experience, a combination of an Inon Z240 and the Retra LSD had maybe a 20% success rate. Switching to a Retra Pro strobe with its circular flash tube and central aiming light and the LSD had me well into the 90%.
Setup
If your housing is setup – as most are – with the main controls and shutter release on your right hand, attach the snoot to the strobe on the left ideally with two strobe arms to maximize flexibility. Once in the water and preparing to shoot, slacken off slightly the clamps so that the strobe/snoot can be moved easily with your left hand but is not floppy.
A snoot will affect exposure and usually requires more strobe light than perhaps you might expect. The narrower the beam, the more light you need to illuminate the subject. I’d suggest 1-2 stops. If you are getting lots of black images, try boosting the exposure either by increasing the strobe output or by increasing the ISO. Assuming there is little movement in the subject, with my DX-based D500 and a 60mm or 105mm lens I usually shoot at about 1/125, f16 and ISO 200. If that doesn’t work, do check that your strobe/snoot is actually lighting the subject!
Tips for Using a Snoot in Underwater Photography
Learning to use a snoot takes time and patience – not unusual for any aspect of underwater photography.
1. Practice in Controlled Environments: Before venturing into the open water, spend time experimenting with your snoot in a pool or controlled underwater setting. This will help you become familiar with its operation and understand how it affects your shots.
2. Master Beam Control: Learn how to adjust the snoot's opening to control the size and shape of the light beam. This skill is crucial for achieving the desired lighting effects.
3. Positioning is Key: Proper placement of the snoot relative to your subject is essential. Experiment with different angles and distances to find the optimal position for highlighting your subject.
4. Combine with Other Lighting Techniques: Don't rely solely on the snoot. Combine it with other lighting techniques, such as ambient light, to create dynamic and visually engaging compositions.
5. Be Patient and Persistent: Achieving the perfect shot with a snoot may require time and persistence. Take multiple shots, adjusting the snoot's settings as needed, until you capture the desired result.
Finally
Incorporating a snoot into your underwater photography toolkit can have a dramatic effect on your images, allowing you to control and manipulate light creatively and with impact. With practice and experimentation, you'll unlock a new realm of artistic possibilities beneath the waves. Happy snooting!

-
 3
3

Recommended Comments