-
If you venture toward Olympus, you will likely end up reading some reviews written by Robin Wang. He uses the term „shutter therapy“ - I like that a lot. I own a Nikon APS-C, the D3300 bottom-feeder model. Bought it new as my re-entry into photography (shot 35 mm Film when I was young, nothing when our kids were young) and loved it - humble kit lens and the 50-200 for reach. Then, I bought the pre-owned Olympus housing + Epl system for UW. I thought I should get the Epl out on land to learn the Olympus menu system & controls. I literally haven‘t touched the Nikon since. M43 is great because the lenses are really small and very lightweight. The bodies are almost too small for my hands (also have a 1st gen OM5 now), but the lenses are really nice to lug around. I have both Olympus 14-42 kit lenses (fine) but my favorite combination top-side are the Panny 12-32 and the 35-100 (the slow one, tiny) in a pocket. UW, with the housing, strobes etc the size &weight difference to APS-C may be less pronounced - but if you also use the camera top-side I can say that the system is very attractive. Corner sharpness, contrast, fringes: Not an issue for me at all but AI can anyways straighten that out for you.
-
Dear Tim, I‘m glad to read all this from your own writing and not as an obituary. I will be pondering this for a while. It‘s an expensive hobby with equipment, travel and diving costs - I would be very, very tempted to go and grab the stuff (in particular the memory cards!). One tends to forget that the most important Megapixel is a beating heart. Glad you showed us a good example. That said, have you already thought about the new gear? Mirrorless after all?
-
Sorry to diverge but I‘d like to add an issue that I have with splits - viewfinder? I have more or less a compact setup so only the lcd on the back. It is not only too dim but also „split level“ with half of it above &below the surface.I can‘t even see where the waterline is in the real frame. Any solutions for that other than spray and pray?
-
Looks like the „gangway“ is about in the middle of the frame. In that case, a fisheye would not have distorted the lines much. The distortion is really only very visible towards the „corners“, but interpret the term generously. You can get images that look as if they were taken with a rectilinear, but your composition is limited if that is your goal.
-
I think we‘re already at that point more or less (and getting closer even to the optical limits), but then we like to crop… A new car will also only get me from A to B, but it does feel a lot better. From a buyer’s perspective: I have so far mostly bought used equipment (and really rather old) for probably 10% of the original price or less. But lower-end models, and those loose value more than the pro stuff.
-
Just add strobes and WATER to what you already have…. It‘s the water that will make your pictures better, not the rig. I spend 50 weeks per year on eBay etc. and sadly only 1-2 weeks diving. If it were the other way round, I might have won a couple of awards without changing my rig.
-
Finning definitely will. It‘s impossible to judge what the best compromise is unless one is really familiar with the local situation. I will not participate in these dives, but I understand that they may shave positive effects as well. Not a simple question!
-
Keep cool & save some money for the diving! No use having a perfect setup but staying dry for lack of funds. Have you tried boosting the TG6 images with software in post? Can save you a lot of money & leads to more time spent in the Calanques. Which is, after all, what you wanted to do - right? TG6, nice strobes, maybe a wetlens or two and then get it wet as much as you can! There will be plenty of occasions to upgrade later & keep many of the accessories.
-
I guess that there‘s a contest for everyone out there. Non-processed is not „morally superior“ to AI-sharpened - it‘s a matter of budget (mostly) and taste. But if you enter a contest, you want the judges to make sure that everyone adheres to the SAME set of rules. And in the end, it should be the most pleasing pictures that win, not the most perfectioned ones (my opinion).
-
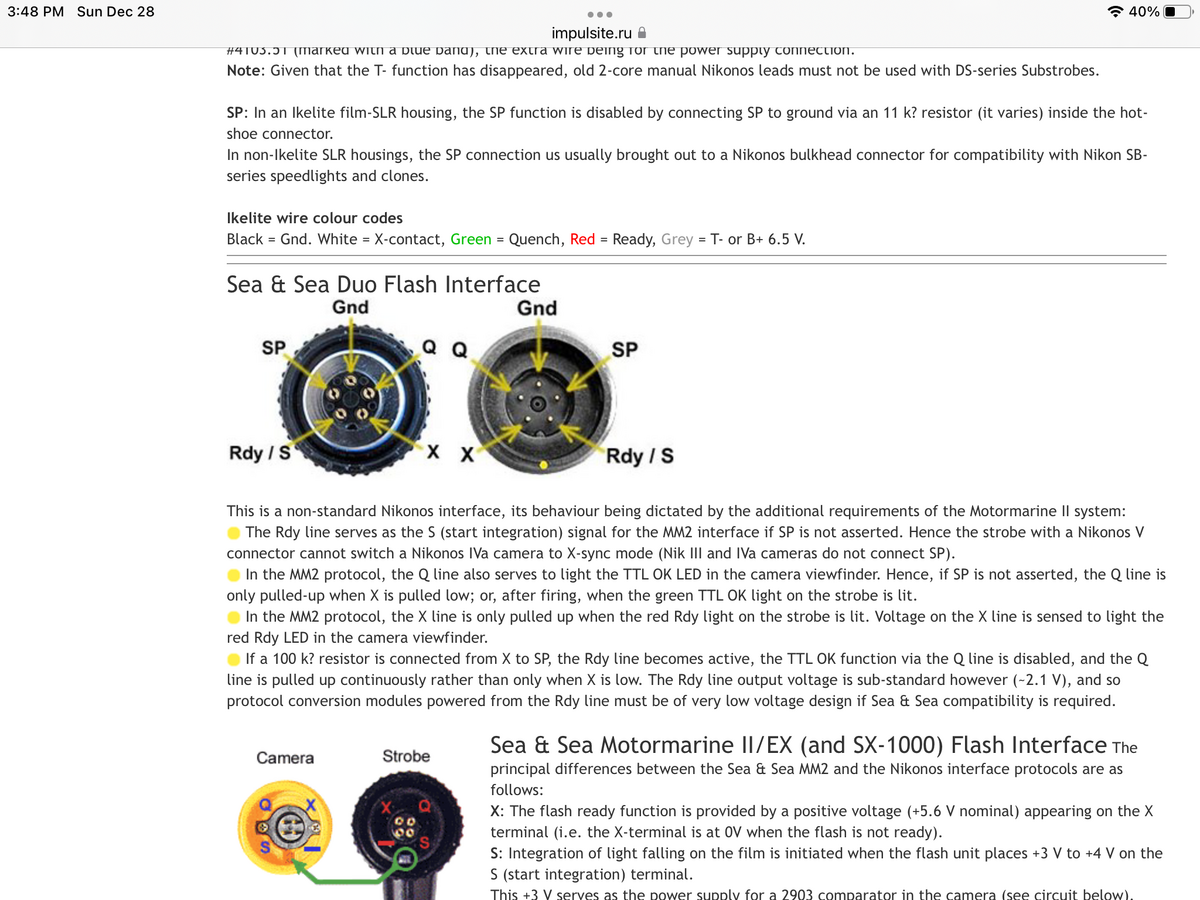
The link above also shows the connectors for other systems, but only follow it if you really need to. It‘s more to cite my source than to invite you to click it.
-
Last resort is to trigger the strobe directly on the 5-pin connector. You connect X with Gnd. I found this info on an obscure site: https://impulsite.ru/viewtopic.php?t=1245
-
I think I pointed this out on a couple of occasions already: current ai-based image processing algorithms (de-noise and sharpening) can improve the IQ substantially „offline“. I own both the 14-42 RII and the ez pancake (Oly) - both deliver results that are certainly ok and can be further improved via ai. I don‘t think that this is a limiting factor in any non-professional setting; but not everyone likes all the post-processing work. Perhaps more important is that the pancake zoom has a reputation of breaking easy, I.e. the ribbon cable wears off by all this automatic extending in and out. The RII is also collapsing, but manually And I just keep it extended pretty much all the time. The AOI PC housing for the OM10 has a port for the pancake zoom, which ist slightly shorter than the manual RII. It may be wise to search the classifieds for a good second hand copy of the pancake zoom in time, or one of the older Olympus pen housings that have a port for the RII. These should fit on the AOI housing, but won‘t match its „style“. I have different wet lenses for wide-angle and cannot comment on the AOI or WWL-1. If a fisheye is what your buddy wants, then the manual Saamyang/Rokinon/Walimex/ etc. 7.5 mm Fisheye is another option. All manual (compromise) but excellent IQ and dirt cheap second hand. Works was a drop-in replacement for the Panny 8mm.
-
Seems you struck a nerve in this community. You can declare in the first question whether you STARTED diving at 50+ or not - even if you choose „No“, you can still fill out the rest of the questionnaire (I was 48). Looks to me like they are doing a survey and compiling arguments to promote our diving hobby among those who are likely able to spare the money. It‘s true after all, our kids (well, young adults) take the greatest pleasure when diving with us because … we invite them. 😉
-
I can understand that you preference fish alive, but that is a kind of luxury that the locals can‘t afford. Fish is one of the few commodities for which Cabo Verde is self-sufficient. They don‘t have their own fleet of trawlers, „fortunately“ the EU as well as China are helping out for this. Google up the details if you are interested. I prefer the work performed by the locals and the intent of the pictures was to convey the „vibes“ you can experience in Tarrafal. I‘m sorry if this offended you.
-
I normally only look at the Waterpixels site on my computer screen, because of the nice images. But I just realized that the Triptychs are very "vertical" and indeed better to display on a smartphone screen (or a rotated IPad).