-Edit.jpg.0739718b849caea17a4f73bb93954a2a.jpg)

Everything posted by Dave_Hicks
-
I don't really see an issue with some minor dropping of corner sharpness in an image like this. If you don't like the look, you can try a smaller aperture next time, or crop in a little tighter clipping off the edges. I personally like an 8x10 or 1x1 ratio for a lot of my photos. I do a lot of large format prints and find these to be the best options for display.
-
Is there a problem with the hosting service? I've gotten quite a few instances when the site won't load and times out.
-
It is tough to do better than good old ULCS aluminum grid arms with Stix Jumbo float blocks. They cost less than the Nauticam float arms and they WILL last a lifetime. They are pretty much indestructible. I am still using ULCS arms that I bought 20 years ago. Change the o-rings every decade or so, and you'll be set.
-
December 1st
-
I just got a shipping notice today for my Atom.
-
If you are not using a focus light, you need to get one. Image enhancement can only go so far, you need light to see detail in dim light. Assuming you have the viewfinder set to Ease/Auto, this is your problem.
-
From the Z8 Nikon PDF Manual: pg 595 d8: View Mode (Photo Lv) Two modes: [Show effects of settings] [Adjust for ease of viewing] Most of the time you want "Adjust for ease of viewing". This is basically night vision, you can see in the dark, but does NOT represent what the image will look like. The other setting "Show effects of settings" is good for ambient light photography, like in the shallows. You see a representation of what the photograph will look like with the current camera settings, but obviously not the impact of FLASH. It's a good way to expose for the background colors, etc. You say you have ease of viewing enabled, but there are more customizations that perhaps you tinkered with. Change it to Ease of Viewing / AUTO and the viewfinder boosts exposure of what you see in the eyepiece. [Adjust for ease of viewing] The effects of changes to settings such as white balance, Picture Controls, and exposure compensation are not visible in the shooting display. Pressing C when [Adjust for ease of viewing] is highlighted displays [Auto] and [Custom] options. . [Auto]: Color, brightness, and other settings are adjusted for ease of viewing during prolonged periods of use. . [Custom]: Press @ to make individual adjustments to [White balance], [Set Picture Control], and [Brighten shadows]. - [White balance]: Choose from [Preview current setting], [Auto], and [Choose color temperature]. Select [Choose color temperature] to choose the color temperature for the shooting display. - [Set Picture Control]: Choose from [Preview current setting] and [Adjust for ease of viewing]. - [Brighten shadows]: Choose whether or by how much the camera brightens shadows (dark areas) in the display; the available options are [Off], [+1], [+2], and [+3]. The higher the value, the greater the effect. . ME will appear in the shooting display.
-
Information from Deoxit Gold product sheet. Very interesting and relevant to this discussion. https://acct113328.app.netsuite.com/core/media/media.nl?id=793&c=ACCT113328&h=cf9f74b54878595f50b4&_xt=.pdf Also, some Copilot AI research of the topic. TLDR; Even a little oxidation/resistance can make a big drop of voltage at these power levels. When a 3.7 V battery capable of 20 A current is used in high-powered electronic devices (e.g., advanced LED arrays, portable amplifiers, or hobbyist drones), battery contact degradation due to oxidation or corrosion is a significant concern. The mechanisms and implications for performance in such devices can be analyzed systematically. 1. Electrochemical BasisMetal Oxidation at Contacts Contacts are often made of copper, brass, nickel, or tin-plated alloys. Exposure to moisture, oxygen, and trace electrolyte can initiate the formation of oxides: Cu+12O2→CuOorNi+O2→NiOCu+21O2→CuOorNi+O2→NiO In high-current scenarios, oxidation is accelerated due to local potential differences generated at microscopic imperfections. Localized Electrolytic Effects Even in dry conditions, leakage currents or minute electrolyte residues create micro-electrochemical cells, further catalyzing oxidation. High amperage increases the rate of these redox reactions proportionally (Faraday’s law of electrolysis). 2. Thermal and Electrical FactorsJoule Heating Power dissipated at a contact: P=I2RP=I2R, where I=20 AI=20 A and RR is the contact resistance (~milliohms). Even low voltage (3.7 V) produces: P=(20)2×R≈400R WP=(20)2×R≈400RW Local temperature rises accelerate oxidation and plating degradation, creating microcracks that exacerbate corrosion. Voltage Drop and Contact Resistance Oxidation increases resistance at the interface. Voltage drop across contacts: Vdrop=I⋅RoxideVdrop=I⋅Roxide In high-power devices, even 0.01 Ω can cause noticeable voltage loss: Vdrop=20 A×0.01 Ω=0.2 V(∼5% of 3.7 V)Vdrop=20A×0.01Ω=0.2V(∼5% of 3.7 V)
-
A black hair wrapped around an oring could only happen if the oring was removed. That is not likely from wiping and lubing in place.
-
I have seen many divers yanking on their orings luke they were pulling taffee while applying lube. Stretching them out horribly. It's not necessary to remove orings most of the time, so just don't unless it looks like a day at the beach!
-
The Kraken must be used with a 60mm lens. The Nikon af-s 60mm in my case on a Z8. The corners and overall quality is inferior to the WWL-C that I use. However, it is a great tool some conditions. The shark pictures above were taken in crappy summer visibility conditions. The dive plan was 90 feet for 30 minutes looking for Sixgills. Then up to the shallows in to shoot small macro creatures with the 60mm and a diopter. You are able to combine true wide angle with true macro. This is a lot more range and flexibility than what some people are trying to do with the MFO-3 these days. Nikon Z8 w/Nikon 60mm lens, Kraken KRL09 WA, f14@1/200s iso200
(Topaz).jpg.38e4421f3f4a0bc7734d9642f53801f2.jpg)
-
Here are a couple of more at f8: Nikon Z8 w/Nikon 60mm lens, Kraken KRL09 WA, f8@1/50s iso800 Eight-foot long Sixgill shark on a very dark and murky summer night, range of inches.
.jpg.92577c25bad0e9811b28ec7f13704be4.jpg)
.jpg.de8c4db728d81ba813a3ec4e40167ff8.jpg)
-
Yeah, don't remove those small orings. Very lightly lube them with each battery change.
-
Did you build a sand castle around your housing?! 😀
-
I don't really care a lot about corners. I crop many/most photos anyway. Here are a couple of images shot at f10 with the Kraken krl-09s. These are CFWA, taken from inches away from the subject.
(Topaz).jpg.aee11fda4a11d5e7feadfaac5f3d7c01.jpg)
(Topaz).jpg.4ef9570a54b43b24966b6119fb039b82.jpg)
-
I am a member of the "hands off the orings" club. 95% of the time if just lightly wipe off and lube the visible surfaces with the orings in place. Only if there is lot of grit visible do i remove them. My Nauticam housing back oring never gets lubrication, but i remove and rinse it in the sink fairly often as it collects fine grit from shore diving. The groove gets wiped out with a qtip. Every Jan 1st I will do a big maintenance pass of most of my gear. This is a good opportunity to clean out the oring groove on strobes, lights, housing.
-
This was not a common problem with AA powered devices. It does appear to be an issue with higher powered lithium devices.
-
Really nice!
-
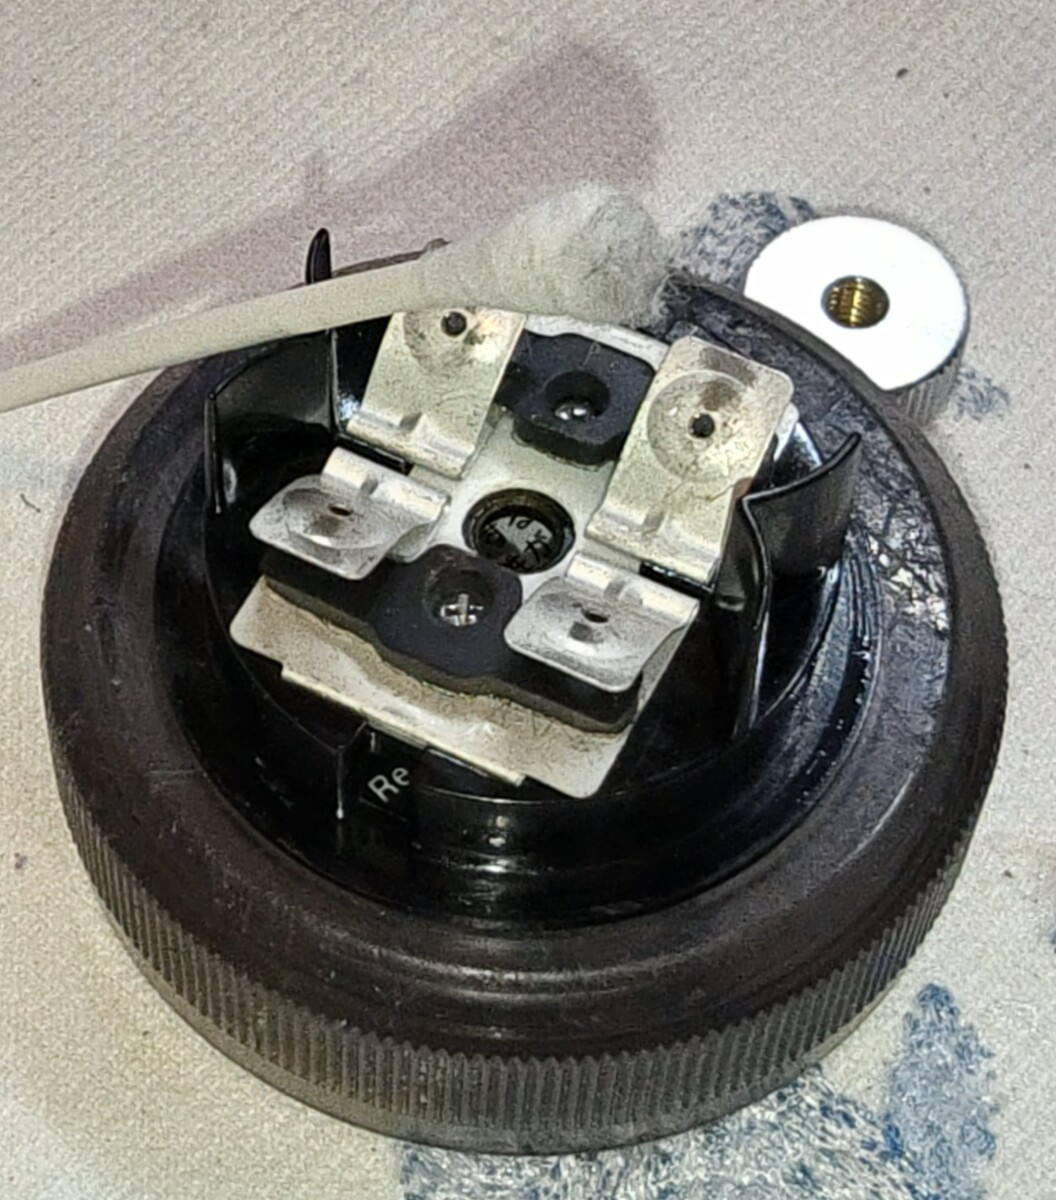
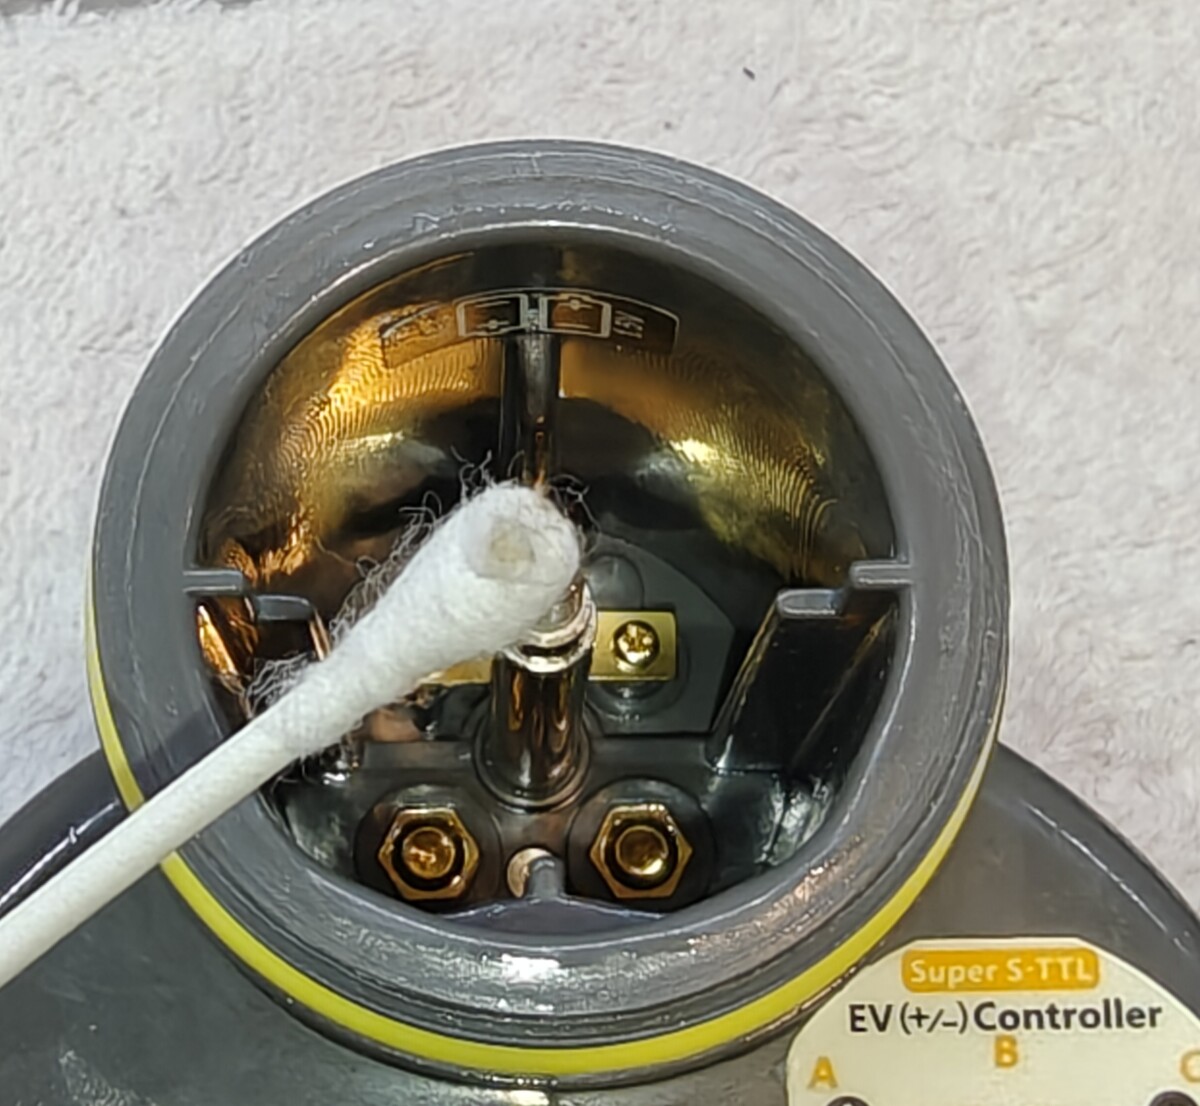
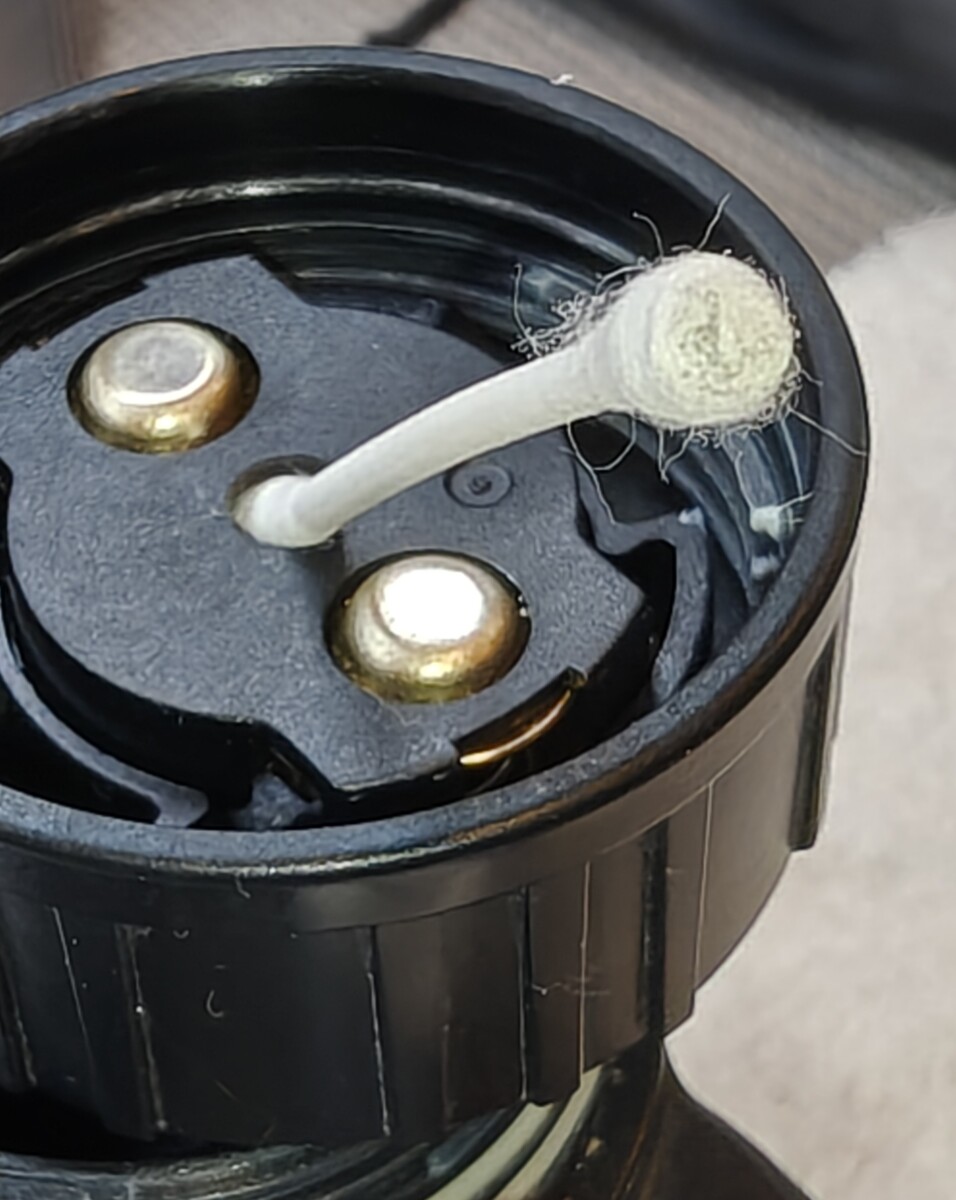
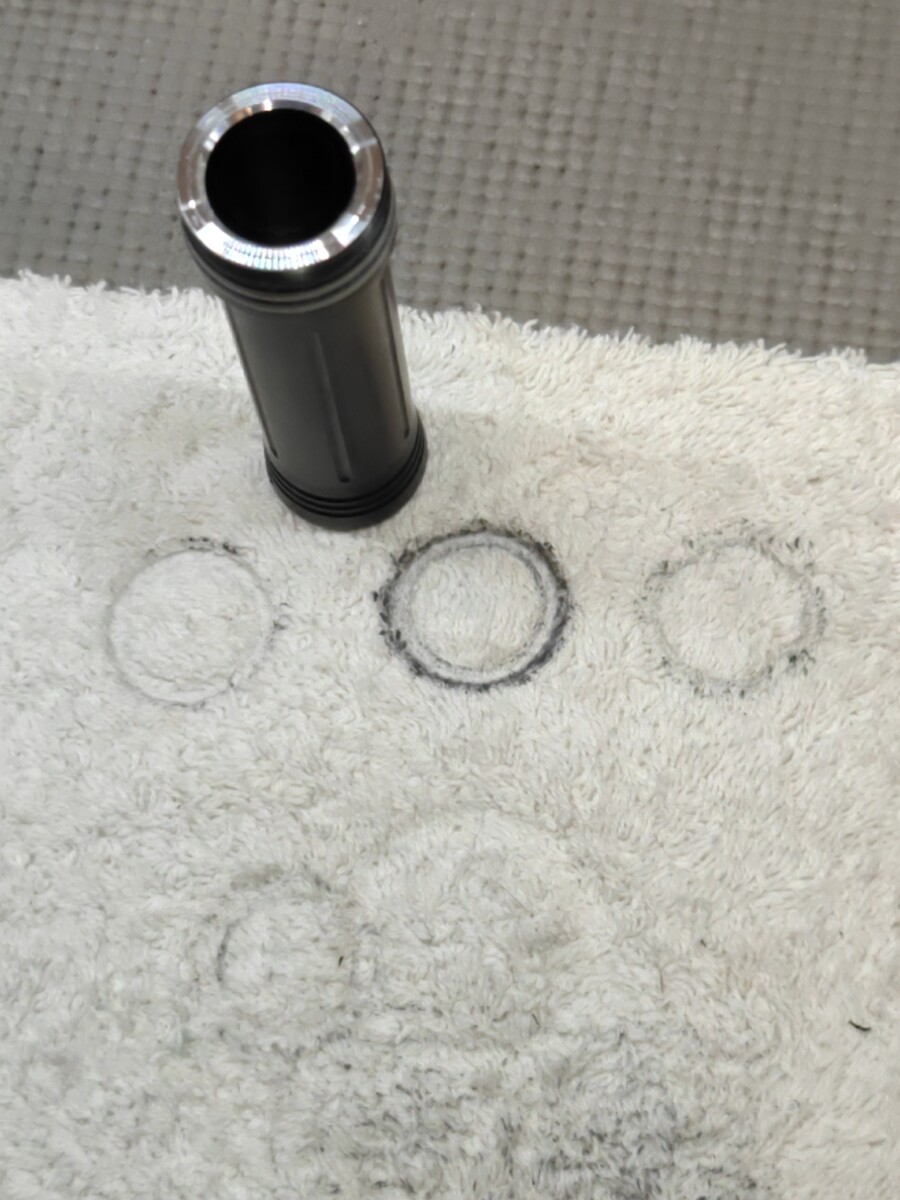
Here is a collection of cotton tip swaps sprayed with a bit of contact cleaner and 30 seconds of rubbing. None of these ever flooded or got even a little bit wet. My camera room humidity is typically about 40-45%. Inon 330: Backscatter HF-1: OrcaTorch v710v and Backscatter MF-1 (Rub/spin the battery housing contact surface on a towel): My suggestion it to do some preventative maintenance on all of your strobe and light electrical contact surfaces to avoid problem. Don't forget to clean the contact surface of the batteries too. I rub the batteries contacts on a scrap towel on occasion, when I happen to about it.
-
Don't be afraid of F-mount lenses in your Z camera. They work great. The 8-15 is one you will want for sure. With the 60 you can use the KRL-09s from kraken. Much more approachable than the MWL. I use this when I want to combine true macro and wide angle on the same dive.
-
I am wondering if the greater energy draw and resulting heat of lithium batteries results in more galvanic corrosion than AA powered devices. I have seem more of these "poor electric contact" problems on lithium ion powered lights and strobes than i was use to on AA cell devices. Maybe we really do need gold plating. More frequent cleaning of contact surfaces seems to be required.
-
You overstate the need for moisture to cause corrosion. All if takes is a little humidity which is everywhere, especially after you dip a camera in the ocean. And I would not call copper an inferior material. For what it's worth, i have had plenty of corrosion issues with my Inon z330s requiring the whole sandpaper treatment. I borrowed a buddies Retra strobe a few weeks ago and the battery contacts were a wreck. Sanded those clean too. And don't get me started on the external charging contacts of the Sola lights! What a mess!
-
Chopstick and sandpaper. Wrap a bit of fine grit sandpaper on the fat end of a wooden chopstick and secure it with a rubber band. Lightly sand the contacts at the bottom of the battery compartment. Maybe spray on some contact cleaner or isopropyl alcohol. Clean it up with a fine microfiber glasses cleaning cloth on a chopstick with more alcohol. Do the same on the cap contacts AND the battery contacts themselves. Dissimilar metal oxidation is the root of many non-flood electric problems. I see it in all of my strobes and lights over time. Copper on the device and aluminum on the battery in most of them. This is why lots of electronics products use gold platted contacts. I wish i could pay an extra fee to gold plate all of my strobe products! It probably only costs pennies to do this in bulk.
-
I snapped up a second one a few months ago myself! I use one for my 140mm dome with 8-15mm and the other on a 60+20 macro port. I didn't want to have to move the 20mm extension back and forth.
-
Have you seen what Nauticam is charging for these nowadays? ☹️