


-Edit.jpg.0739718b849caea17a4f73bb93954a2a.jpg)
Everything posted by Dave_Hicks
-
 The WWL ports are pretty big compared to the MWL. Typically you put a mount on your camera arm if you want to remove the WWL during a dive.
 -
Get some Sugru
-
I saw one where the wires inside the hotshoe were frayed creating a short. Open the hotshoe connector to inspect. First look for loose solder connections on the circuit board, hotshoe wire bundle, and battery.
-
I put a lite lanyard on my WWL-C. The original rubber grip got cut on rocks and fell off. I printed a replacement that has lanyard loops on it. Some knotted fishing fishing line and a micro clip to the handle ensure it does drop if i fumble the burb. 😧 https://makerworld.com/models/637896
-
Let's see some photos of your additions!
-
I use the WWL-C and occasionally fisheye up there. I tend to shoot macro for the 3rd dive of the day when the light is fading. The visibility is what it is, sometimes excellent occasionally less so. You can control the particulate with careful lighting in an conditions.
-
I have a buddy that likes to use some exotic manual focus lenses from LensBaby. I think 56mm and 24mm. He used them with out a focus ring for a while, but then i got a 3d printer and made a few zoom rings for myself. Pretty soon i was able to make focus rings for his lenses. There are none made or sold for these lenses, so it's the only way to go.
-
I found that with the Arm floats stix foam is hard to beat. The dry weight vs buoyancy ratio of jumbo stix is superior. Its just cleaner and more durable. Port floats work a bit more in favor of printing as you can get really snug, clean, and maximize volume.
-
I should go into business. I could sell a float collar for $50 and still make a $40 profit. Turns out my hourly rate is $0/hour since I retired. Obsolete and unemployable!
-
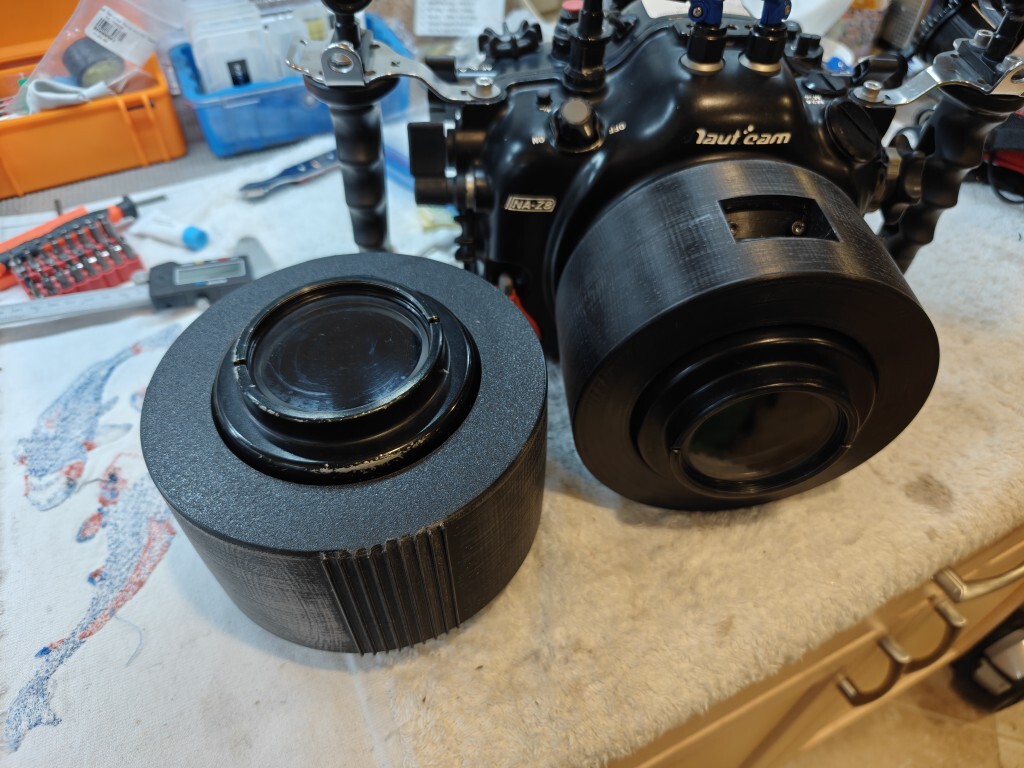
The port floats are big jobs, about 12 hours prints and use 1/3 of a KG spool. But once tested out, they are pretty easy to reproduce. So far, I just have designs for the 3 macro port configs I listed. I don't have a WWL-1 to measure.
-
I've been experimenting with 3D printed buoyancy solutions for a while now. I've created a few iterations of a form fitting collar that snuggly fit over a 105mm macro port and add about 250 to 350 grams of buoyancy. It's a lot cleaner looking than a foam belt too. My first versions relied on painting with epoxy resin to seal it, but I've since been able to make versions without added sealants that stay watertight to 100feet over multiple dives. I want to keep iterating to reduce the dry weight and wall thickness a bit more before sharing. I've made prototypes for the Port60, Port87, and Port60+20mm extension. These have been especially useful to counter the added front weighting of a Dual Flip adapter with a couple of diopters attached. It should be very possible to design one of these for the WWL-1. I have a WWL-C, but it includes a built-in aluminum buoyancy collar.
-
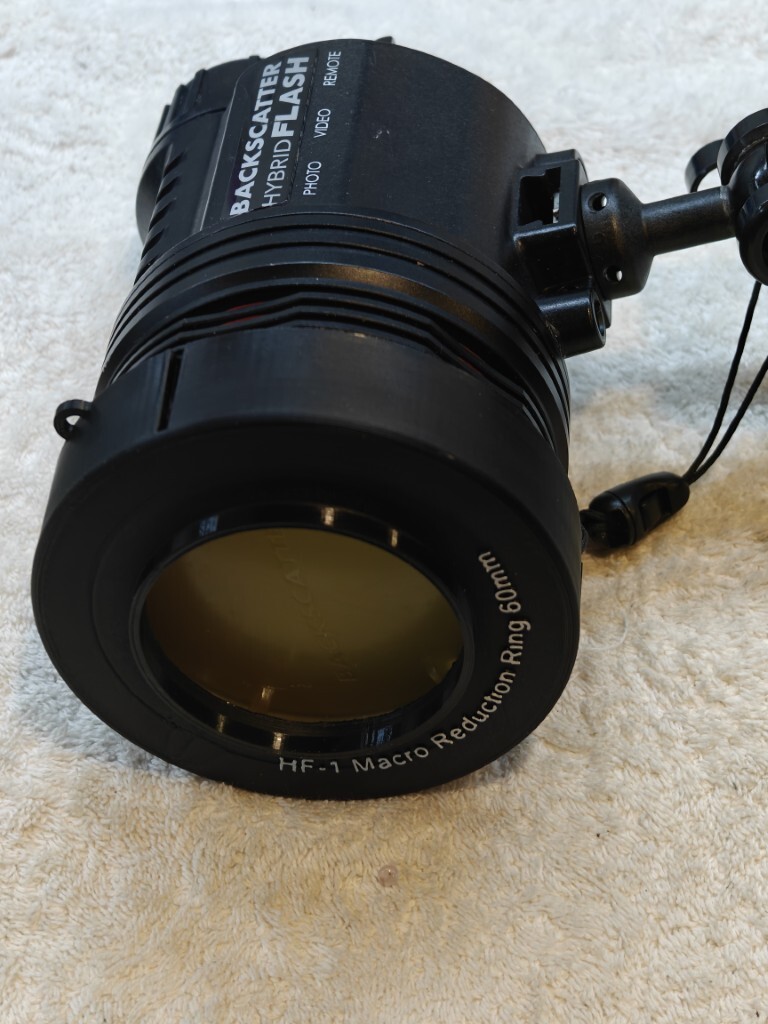
My HF-1 beam restrictors, which can sit on top of a diffuser : 60mm With 38mm option: 3D print shared at: https://makerworld.com/models/865305
.jpg.7e0d0e858a79a29fdeb102babd5521c3.jpg)
-
Please include photos, not links.
-
It doesn't look like the hood is removable, which would be a problem in a dome port. And it's still rectilinear not fisheye. Perhaps it could be made to work, but I'm guessing it would need a larger dome port such as the 8.5".
-
The Backscatter HF-1 strobes are great, but it's also nice to have a spare strobe or two. I'd hang on to your Inons, or at least one of them. I use the Nauticam Nikon manual trigger. I don't need TTL. The nice thing about this trigger is that it's fast and the battery lasts basically forever. I change them each January and reuse them in the vacuum circuit. (which chews through batteries)
-
Try to polish it gently with a microfiber towel. It might not be a scratch, but a deposit of metal. Scratches tend to flare in bright light, not leave black dots. Failing that contact Nauticam.
-
The WWL-C and 24-50z lens are a fantastic combo. Honestly the best reason to move from a Nikon DSLR to Mirrorless Z body.
-
Then change lenses and do another dive! But i think this was made for camera systems that don't have great lenses options. Which one could that be??
-
Totally different product. It magically turns a 90mm lens into a 60mm. 🤔
-
I am still waiting for Generative Expand in the crop tool. This is super useful if you crop and rotate and the corner goes outside the frame. Photoshop has had this feature forever and its one of the reasons I ever need to use it.
-
If you are looking to get a Nikon/Nauticam setup the cost of the camera body is really not the biggest expense you are looking at. The housing costs nearly twice what the camera body does. Strobes are $1000 each or more. So, the difference between a Z6 and Z8 is a pretty small fraction of the purchase. With an investment like this you are usually wise to by the best, most advanced option. Especially if you plan to keep it for years to come. You can buy used bodies and lenses from reputable sites like KEH or B&H Photo. Unfortunately, a used Z8 only saves you about $300 but you can really save big on lenses sometimes.
-
Agreed on all of that, except the last point. At least with the Nikon Z cameras, you can change a setting to reduce (slightly) the size of the EVF. This makes the older Nauticam 45deg viewfinder perfectly usable with my Z8.
-
Get the viewfinder. They usually have a diopter adjustment, so you never need to worry about vision. Focus to your liking! The amazing superpower of mirrorless cameras (at least the current generation with excellent EVF) is that you can shoot and review in the EVF. No moving the camera or your head to see the screen. For me this was a great benefit.
-
TPU is usually not hard to print. Just dry it well and print slow. I usually do 75mm/s.
-
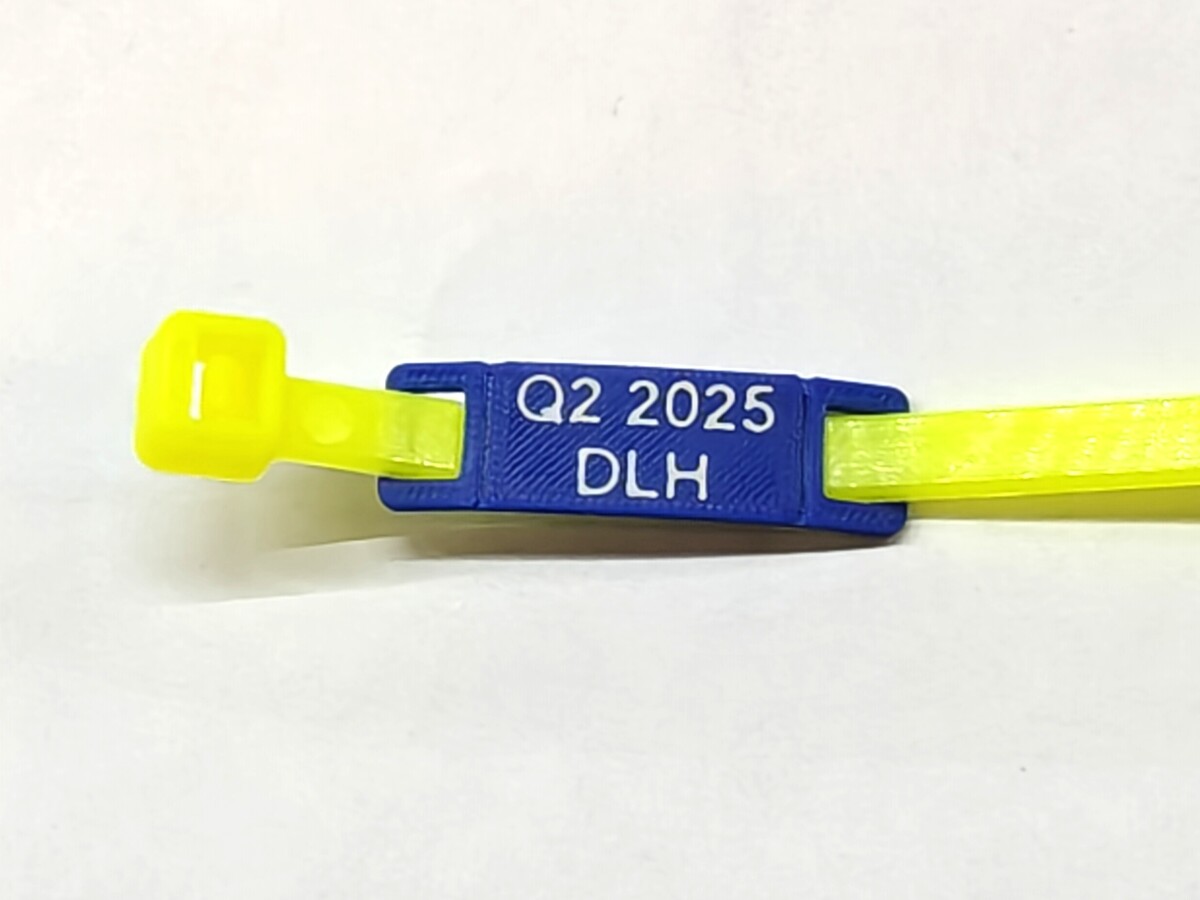
Zip Tie Gear Labels This simple design is a solution to a problem I often face. Scuba gear needs to be serviced at regular intervals, and I need to keep track. I use an Excel spreadsheet for much of this, but some of the gear is very generic and not easily distinguished from other similar items. For example, Tank Valves and 1st Stage regulators. So, I wanted to come up with an easy way to label the gear directly. I use a standard thermal label printer all the time and that works for some items. But often there is no space or flat surface that you can stick a label to. I also wanted it to be very small and not likely to snag or get ripped off the gear. I recently serviced 6 of my tank valves and 4 1st stages and this provided the opportunity to solve the problem. I decided that a label that could be attached flush with a zip tie was a perfect solution. The labels are holding up well after a number of dives, but time will tell if this is robust enough. I'll iterate on the design if it needs to be tougher. For my uses I printed the Date and my Initials. For example, “Q2 2025” & “DLH”. I kept the text area small with space for two lines. I also created a longer version with enough room for a full name and phone number. https://makerworld.com/en/models/1510306-ziptie-gear-labels#profileId-1581210
.jpg.616deebebfd8643f77a107eed825f9bd.jpg)
.jpg.460ecb45ade01b6c335b6d0845fef86b.jpg)
.jpg.616deebebfd8643f77a107eed825f9bd.jpg.95f4c5bb7da15a9578727f38fedb5a69.jpg)


