Everything posted by Chris Ross
-
Hi Deemoo, I would first say that a TG-7 without a housing will be OK for a couple of years then the seals will fail and the camera will die. The seals under the top panel controls are a membrane seal that the buttons work through and eventually the membrane fails. I always recommend a housing even if it's the OM housing which works fine. Once you add a tray to allow you to add arms to hold your strobe the compactness advantage of the TG-7 without a housing is lost. In the manual the fine print says you should have the seals changed once a year. The housing has the facility to plug in fibre optic cables to trigger your strobes. then you just attach them to your strobes and you are ready to go. As for choice of strobe it's hard to go past the little INON S-220, it's small and compact and has a good beam as well as being quite powerful. If you still want to use the bare camera you can get little stick on ports for fibre optic cables you can place over the flash. If you use manual strobes you can set the flash to low power manual on the camera and any light leakage will be minor and unlikely to cause problems.
-
Welcome Steve, hope you enjoy being part of the community.
-
Tim has covered the basics of the case for m43. I would add that particularly in Australia also include Isotta in the mix, they are quite popular here and will be cheaper, how much depends on what model you are looking at. You can also opt for the OM-5 and the housing will be somewhat cheaper still, but the battery is smaller. My OM-1 is good for 3 x 1 hour dives on its battery and still has some charge left. Another option is second hand with an EM-1 MkII or MkIII which has most of the features of the OM-1 and you will save quite a bit on the housing. I wouldn't get too worried about whether a OM-1 III is in the works or not, it needs to be announced, then released then the housing manufacturers need to decide to support it and release the housing. I wouldn't expect night and day improvements, most cameras these days in spite of all the hype are incremental improvements. Regarding strobes, no matter who you pick service will likely be sent off overseas somehwere, better to go with a brand with good reliability reputation. on the OM-1 housing - it is 307mm across - noting the handles are adjustable in and out. The Isotta housing is slightly smaller.
-
So you could see if you buy the viewfinder collar adapter to attach to your viewfinder this converts a 33205 into a 33203. Link is provided above. It's Nauticam 90156.
-
The 10-22 is 16mm equivalent while the Nikonos 15mm I understand has the field of view of a 20mm lens. If you want small these days for WA a fisheye is hard to beat, the Canon 8-15 will work very well in a 140mm dome. You can use the m43 fisheye lenses in the tiny Zen 100mm dome. You can also use the Canon 8-15 in the little Zen dome at the cost of a little corner performance. I use an Olympus OM-1 mated with an adapted Canon 8-15. Very flexible setup providing a full frame 180° diagonal fisheye with a 14-28 full frame equivalent zoom in one package. You can compare fields of view on a post I made using my setup here: I previously used an EM-1 MkII in Nauticam, haven't sold the setup yet but thinking about it. It's still a very nice setup and being mirrorless you can see the review in the viewfinder without taking your eye from the viewfinder. Very useful with macro.
-
Cameras have gotten progressively better over time, the 7D is old old now coming out in 2009. I think these days the much more compact m43 cameras like the Olympus EM-1 MkII can beat it and the lenses and domes are much smaller. You could pick up a Nauticam EM-1 MkII housing for about $1200 these days add on a fisheye and macro lens and you have a versatile little package. The other issue is the 230mm dome is a big beast to travel with and to push around in the water. Assume it's matched with either a 17-40 or a 18-55 lens or perhaps a 10-22mm? This gets into what you want to shoot with it is it macro? wide angle? a bit of everything? Do you need a rectilinear lens?
-
Alex Mustard did a video on the the choice between 32 and 40° versions. You should be able to find it on the underwater photography show channel. The short version is Alex thought he would prefer the higher magnification 32° version but ended up liking the wider 40° version as it was easier to see all of the information, search for the video to see the details. As Dave says you could also look for an old version 45° viewfinder and use the EVF shrink function to save some money the corners might be a bit soft in that but it's usable.
-
That one looks like the original 45° viewfinder, the difference between the two versions is the nosepiece that fits into the housing. This is the manual which shows the difference, one of which is the 32203 has alignment pins while the 32205 has a flat section cutout. Your looks ike a 32205: https://www.nauticam.cn/upload/portal/20190124/201901241132017209.pdf When you say it's too short what exactly do you mean? Does the nose go in the viewfinder hole far enough to fit the retaining o-ring? If not you need a different nosepiece. I believe this collar adapter is what you would need to turn your 32205 into a 32203: NauticamViewfinder Collar Adaptor for 32204 (from A153408) and 32...Allows for the 45/º viewfinders to be adapted from MIL to DSLR housings. Instruction Manual PDF DownloadAgain you would need to confirm this with Nauticam or a dealer. If someone can confirm they are using a 32203 on a Z8 housing this seems to be what you would need to adapt it.
-
The Canon is known for being a very sharp lens plus I had a chance to buy the $$$ N85-N120 adapter and the 8-15 lens locally second hand and also picked up the Metabones second hand. Plus I wasn't that keen on using the Metabones speed booster that is used with the 10-17 due to the optics involved though it is reported to work well. I would suggest it is much more straight forward to implement this with Isotta housings. Mainly because they use a larger B102 port compared to the small Nauticam N85 port. I haven't tried but I think you could mount the camera/lens from the back rather than needing to remove the port and lens to remove the camera, particularly if you remove the hood. It's quite the assembly task and I bought the USB-C bulkhead to charge the battery and download images when on a trip so I didn’t need to disassemble it all every day. It's also considerably cheaper (approx $2500 less based on Backscatter pricing) Also the 34.7mm N85-N120 adapter I use is discontinued, you could probably use a N85 - N120 50 or 47mm adapter with a 20mm extension, but I suspect the zoom knob would not mate up correctly and you would need to print the zoom gear I use, the design is listed on the forum. This post outlines the parts list for an 8-15 in Isotta:
-
Thanks, but I'm not a lightroom user.
-
The close focus of the Pentax lens is 450mm, meaning that it won't perform well and may not even focus UW with a small dome. The adapter with that big bump may also be an issue depedning on how much room is available inside the housing.
-
Hi Russell, welcome to the forums, good to have you here. Good seeing another Aussie joining up.
-
I've merged the other thread on this lens over in General Chat with this thread.
-
Thanks, did you order the material from the US?, or is there an Australian distributor? Looks like a a $US40 block of foam would cost $US35 to post.
-
Definitely agree quite a bit of torque to twist the camera to point up. I think a block of foam underneath with a portion of the buoyancy will help - probably want less than half of the buoyancy underneath, so the natural attitude is still for the arms to want to remain at the top
-
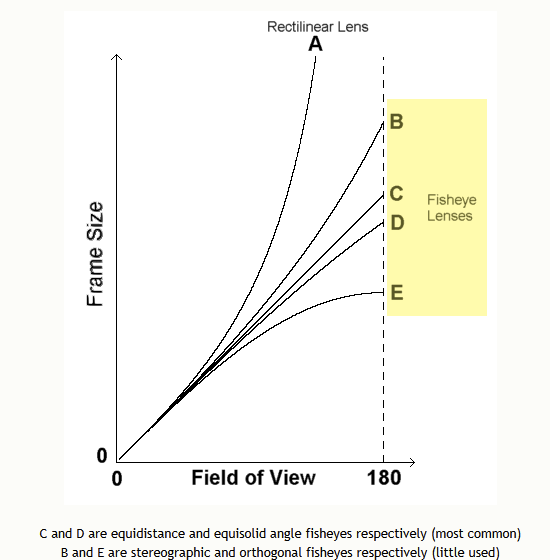
It appears this is a stereographic projection fisheye so it is part way between a typical equisolid projection fisheye and a rectilinear lens. This explains why it is a 10mm focal length. See this plot from Bob Atkins: Link to website: https://bobatkins.com/photography/technical/field_of_view.html I plugged the numbers into the formula for a stereographic fisheye and 10mm comes out as 188.8° diagonal field. This table shows the focal length needed to achieve an 180° and 185° in each projection. FL for 180° field 185° Field Equisolid 15.25 14.95 Stereographic 10.8 10.34 Eqidistant 13.75 13.38 If the 10mm focal length is correct, I think that means the projection is between lines A & B on the plot, lenses won't necessarily exactly match the formula for the projections. Note that the same focal length gives different fields of view as the projections change. What does this mean for the images produced? Basically you lose some of the fisheye "pop" that comes from the subject appearing larger in the centre of the frame compared to the edges - basically less barrel distortion. It also means that the addition of a 1.4x has less zooming effect as the subject is relatively smaller in the centre where the 1.4x crops to. The Canon 8-15 on the other hand is about half way between the Equidistant and equisolid projections and has a field of 175° at 15mm focal length. and has fairly strong fisheye pop. The WACP on the other hand appears to be also close to stereographic projection based upon that formula getting closest to the reported field of view at full zoom when tuned to calculate the 130° diagonal field at minimum zoom.
-
The main advantage of foam is price plus the ability to fine tune buoyancy.. How durable is the blue robotics foam? I'm thinking I'd like to use some to balance out my wide angle rig placing it under the housing to counter the float arms above. But sitting the housings on the rocks around shore dive entry sites I'm guessing may cause problems?
-
Exactly the same reason why they will recycle more slowly than eneloops. Internal resistance is everything for getting a good recycle time on your strobes. Eneloops still remain your best option I think.
-
It Depends, the float collars for WWL are polystyrene but are high density version of foam. Some average polystyrene you find in a craft store likely would not be as strong.
-
There's a comparison table that was put together a couple of years back in lighting forum here: You could probably add to that, there is a google docs spreadsheet you can edit. Be good to post results in that pinned thread.
-
Inaturalist does a pretty decent job and even is it doesn't get it right it points you in the right direction I have found. I recall another forum member was developing an application for marine creature ID, a while back setup to work with a lightroom catalogue. this is the post:
-
Keep in mind that for the Z5II with Nauticam you need the ($500+) Nauticam N120 FTZ adapter which has its own zoom knob which engages with the F mount zoom gears. You could avoid this and use the housing zoom control by making the zoom gear 25mm longer. You still need the extra extension though and Nauticam don't make a 45mm ring it seems but you may already have extensions to make up what is required. I know I had the adapter mounted knob for my rig using a Canon 8-15 and I didn't really like it. The zoom control gears on the FTZ look like an improvement on the older style adapter mounted knobs though.
-
Interesting that you can't use Isotta on S&S. I see S&S has a Macro port 15: https://www.seaandsea.jp/product/port/macroport.html It seems this might be short enough to work with the 24-50 which is reported to be 75mm long in working position. If you could borrow a 24-50 you could try it out with your extension rings. to see how far it projects beyond the edge of the ring. Typically the dimension of a port is from the flange of the port to the inside of the glass. All they would need to do is make an extension ring of the right length it seems and looking at other lenses it seems it might be a 25mm extension ring. I would add that in terms of viewfinders, the Nauticam are superior, the new models were designed to deal with larger viewfinders used on mirrorless cameras which require a a greater angle of view to work well. I have the original Nauticam 45° and the corners are blurry on my OM-1 viewfinder. Not clear if you have an INON currently, if you do performance is probably similar on Z7 vs Z8. You can get adapters to use Nauticam viewfinders on Isotta housings.
-
Hi Ratna, welcome to the forum, hope you enjoy!
-
This post seems quite relevant: Red/green it seems gave you a chance of avoiding scrutiny but now they seem to be going all out.