


-Edit.jpg.0739718b849caea17a4f73bb93954a2a.jpg)

Everything posted by Dave_Hicks
-
I'm not sure why you asked the questions since you have all the answers. Just read the Nauticam web site.
-
On viewfinders; you will want the 40deg version - SKU # 32214. But the older, less expensive, retired model will also work if you can find one used. The Z8 has an option to slightly shrink its EVF so the older viewfinders don't clip. You don't need a flip adapter for the WWL-C, and in fact there is essentially zero reason to ever take it off under water. The 24-50mm zoom allows the WWL-C to shoot standard wide angle all the way to near macro. So don't bother with a flip or bracket to hold the thing underwater. Be sure to check the used lens sites before purchasing the z24-50mm lens. It is usually available in excellent condition at about 1/2 retail cost. I've used KEH.Com to buy many of my lenses with great satisfaction.
-
I posted about my Curved Macro port project, and in the course of that I destructively removed the o-ring from a Zen port, and installed new o-rings in prototype ports about 6 times. I used 50 cent buna rubber o-rings from McMaster Carr and they work perfectly. I eventually got pretty quick with the installation using a dryglove plastic prybar and plastic credit card for pressing in the new o-rings.
-
They sell new port glass but its not exactly cheap. Surprise!
-
The WWL is probably not an ideal choice as you will be snorkeling a lot. Since you don't dive deep it can be a problem with bubbles between the port glass. They clear out if you dive past 3-4 meters but you will splash and shoot on the surface quite often. A fisheye with zoom ability is ideal in my opinion. I did very well with my 15mm fisheye in MagBay with humpbacks, but would have been nice to have more reach. If i get another chance i would add a 1.4tc to get more reach for when subjects are a bit further than point blank.
-
Welcome Nir! It was great to meet you at God's Pocket last year! I hope we can dive together again soon. Cheers, Dave
-
Protective Bumper for the Backscatter OS-3 Snoot https://makerworld.com/en/models/3098875-protective-bumper-for-backscatter-os-3-snoot#profileId-3492758 The OS-3 Snoot for the Backscatter HF-1 strobe looks great, shiny and smooth. Keep it looking sharp by protecting it from dings and scratches. The snoot is pretty long and it is definitely going to get knocked around over time. The end of the snoot and glass are most at risk. Adding this TPU rubber bumper is a quick and easy way to keep it protected and in good working order for the long term. Simply stretch the bumper over the end of the snoot. The ribbed end of the bumper should be oriented towards the base of the snoot. The bumper should slip over fairly easily but it takes some effort to get it off. It definitely won't be falling off in the water. If you do need to remove it or have trouble getting it installed, I suggest running it under hot water for a bit to soften it up before pulling it on or off. Print with flexible TPU 95a, 85a, or 90a for best results. It will not fit or work rigid materials like PLA or PETG. More 3D printed custom solutions: UW Photography: https://makerworld.com/collections/16165730 Scuba: https://makerworld.com/collections/16165676
.jpg.6fc7c3d25b0fbc33b08ce18e19a56232.jpg)
.jpg.f595c9d0435013c7c69c74debf7ce878.jpg)
-
Sure, message me and i can arrange to send you some gears.
-
Let me know if i can set you up with any gears and such.
-
The Z5-II and Z6-III housings use a newer, more compact, and less compatible design than other Nikon / Nauticam housings. They only have "native" gears for a handful of lenses at this point, and you really do need the FTZ Adapter thing to use most lenses and gears.
-
I was with you until this last point. Wrapping or twirling the cable has no impact at all. The bend radius of 613multicore fiber is 2mm before loss of signal will be a problem. Most vendors coil the cables more tightly than you are going to wrap your cables. As long as you don't tie it into knots it will work perfectly. Anyways, just use some Velcro straps to fix your strobe cables to the arms.
-
Great. Message me if you want me to get some to you for a reasonable price.
-
Try trigger the strobe without a cable. Just line up the strobe's optical port with the trigger directly to the flash trigger and housing bulkhead. Direct line of sight. I don't know about S&S, but most strobes I have used can even be triggered with a bright dive light or even phone flashlight. Just move the light right over the optical port from a couple inches/cm away. If line of sight does not generate a flash, then the strobe is defective. If it does flash, then your optical cables are not transmitting enough light. Could be due to bent, damaged, or low quality fiber.
-
Looks dodgy. One thought though. Some of my diopters included a M67 "spacer" ring. Perhaps something like that could be screwed on with some necessary force and then left in place to mount other items on the good spacer threads? Perhaps someone has an unused spacer they could donate? Example: https://reefphoto.com/products/nauticam-m67-spacer-ring-for-smc-cmc
-
That sounds great. 55m is more than enough for me. Do you have some end caps to seal the ends of n100 / n120 rings? Or should I provide something?
-
That is very generous! I will take you up on the offer, perhaps with two or three items if it's not too much trouble. An n100 and n120 extension ring. Ideally these can survive 100m. And perhaps a float? Like my HF-1 strobe float. I would be happy if that survived to 40 meters. I have dove these a bit over 30 meters. They are not as thick as the rings and ports, but they are no loss should they fail as well. I will message you for details. Cheers, Dave
-
I finally was able to borrow an n100 extension ring to get measurements and make prototypes of Nauticam n100 compatible parts. I can print out any size ring from 20mm on up. It all fits perfectly, but still needs to be tested in a vacuum sealed housing followed by a test dive. The basic design pattern and pressure resistance is well tested in the n120 versions I've been using for months. The person I borrowed the ring from is out of town for a few weeks, and I don't have a housing to test it, I need to find someone else to test it out. Any volunteers??
.jpg.991918ba01aa0a05fbab720e9021a702.jpg)
.jpg.aa786fd7685a4ed548db9d7341212c34.jpg)
.jpg.32c4fd2ff6445beef84197ca0b48eee7.jpg)
.jpg.d78a69a59dfa4f1b3738ee6d7faffe62.jpg)
-
Pricing & Availability: Sony E-mount: Released July 30, 2026, for $1,699 USD. Nikon Z-mount: Released August 27, 2026, for $1,799 USD.
-
Thanks for sharing! I will try adding another 20mm ring and do some pool tests with both 79mm and 59mm. (19 + 20 + 40)
-
What is the spherical diameter of your dome? You need that to figure out the optimal position of the dome. For my 100mm dome I calculated the base mount of the dome should be 59mm from the housing mount. So my dome port mount is actually a 19mm extension. This positions the inside surface of the dome at an optimal distance from the focal plane inside the 60mm lens. I'm not absolutely certain that is exactly correct, but it seems to be working out quite well. If I discover that it could be better positioned I can always adjust the base extension length. I can print a new extension ring overnight if needed, so it's not difficult to make adjustments.
-
Super. My cap is also rubber for the same reasons. The open mesh design makes it a lot easier to remove and install underwater and makes rinsing simpler.
-
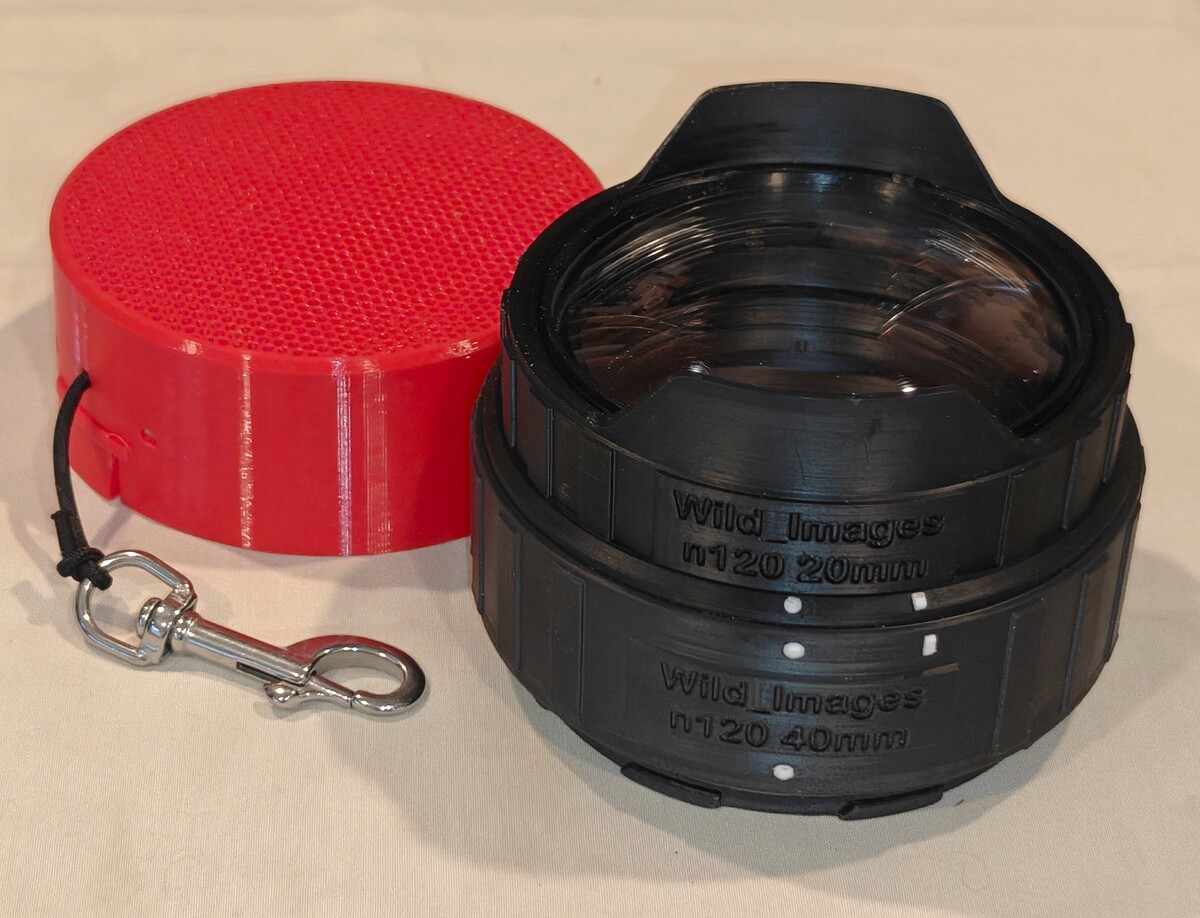
Very nice. I looked up that Inon part. Interesting modular dome available in glass or acrylic. It seems designed to mount on to various Inon base ports. How did you get it on an n120 ring? Did you make that part, or find something comercialy available? That acrylic version that you have is quite inexpensive at $135 usd and the glass is not a whole lot more. This could be a pretty good and easily available source of part for anyone that want to try a similar curved macro port. I've been using my 3d printed port and extensions for a couple of weeks now and have about 4-5 dives with is completed. It's been really fantastic. Here is an updated photo to the final product, configured with a 40mm printed extension ring and port cap.
-
Attaching a photo shot with the Kraken at F11 at near zero range from the subject. This was taken in pretty chunky water, but if you look at the lower left you can get an idea of corner sharpness. The upper right is much further away and not in the plane of focus, plus chunks...
(Ext)-2.jpg.2a205f80578c4f7d5fa22cf41026b408.jpg)
-
The Kraken got a lot less use once i got WWL-1 which is a great option for Wide-Macro shoots. Pretty wide to Near macro and high quality at all ranges. The Kraken has corner issues for sure, but it does not always matter. But i still pull it out for some scenarios. When I want true macro abilities with the 60mm and a diopter with wide options. The CFWA of the Kraken is better than WWL as it has something of a fisheye effect in accentuating the center subject. It is also even wider than the 130degs of the WWL/WACP so close up it works like a fisheye. I would not chose the Kraken for a reef shoot, my 8-15 FE is better for that. A good all rounder picks the WWL. But kraken still get in the rotation a few times every year. It has some real useful abilities.
-
Yes, i use that TC on the Z8. Everything works great.
.jpg.f9fc055f42281f73087bf6370f4cac33.jpg)


