


-Edit.jpg.0739718b849caea17a4f73bb93954a2a.jpg)

Everything posted by Dave_Hicks
-
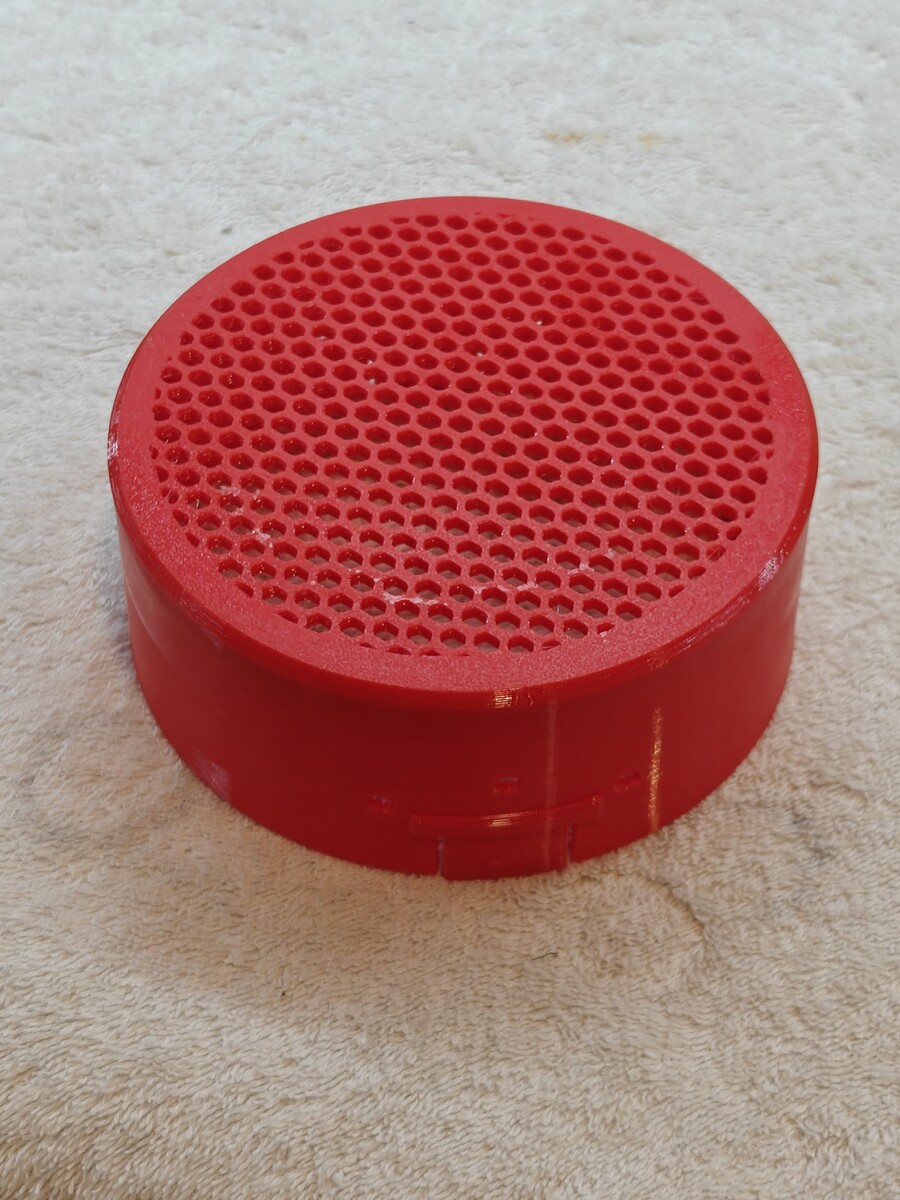
I have been using this TPU Dome port cover for a while now and it is working great. Several others trying it out are loving it as well. The general feedback is that it vastly superior to neoprene covers, easy to reinstall underwater, and makes it easier to rinse and blow dry your camera with the cover on. Another thing i love about it: taking test shots on a bench, beach, or boat with the cover still on! The open grid is super useful in many ways. Based on feedback and experience, i made a few changes. First off I made the hex grid a bit tighter, seen below. Second change is to using regular TPU95A instead of more rigid 68D TPU for AMS. I had some cracks form with than material after a few dozen dives. Regular TPU is more durable, won't crack, and still works great. Protection is still really good.
-
Action packed video of the caddy in action: https://1drv.ms/v/c/1c711f3a2eaafc5a/IQAXlNU9vIqtTb1Eg_MEw78eATOEenpQuzxApTfg41iHoNw
-
Backscatter Atom Strobe caddy for OS-2 Snoot Bracket and Clamp to store your OS-2 Snoot with the Backscatter Atom Strobe A snoot is a fantastic way to make creative macro shots with underwater photography. The Backscatter Atom strobe is one of the best strobes on the market for macro photography and tailor made to use a snoot. The OS-2 snoot accessory for the Atom strobe is very easy to use, add, or remove underwater. But where do you store it when not actively using it during a dive? A short tether with a mini-bolt snap can secure it to your camera or BCD, but it dangles and might get in your way. A cleaner alternative is to make and use this bespoke caddy system to attach it securely to the strobe itself. It's easy to add or remove as needed, and strong enough that it's not going to fall off. (I still recommend also using a short tether and mini-bolt snap to clip off to a zip-tied o-ring on the ball mount, as seen in the photo) This design will provide a simple and secure attachment bracket and clap to mount your OS-2 strobe. It's made of several parts: TPU rubber friction ring with key-bumps to align the ring. Slips over the ridges just in front of the optical port. This part can be left in place permanently and may provide some bump protection when the bracket is not installed. PETG bracket with inner grooves to align with the TPU ring. Reversable so the clamp can be place on the left or right side of the ball mount. It is secured with an M3x6mm screw and nut. PETG clamp that slips over the mounting point on the bracket. Can be with fixed to the bracket with either the Hinge-Clip or a pair of M3x12 screws and nuts. (Optional) Print in place Hinge-Clip. Using the Hinge-Clip makes is possible to remove the clamp without tools or loosing your screws and nuts between dives. This print in place hinge replaces the M3x12mm screws to mount the clamp that actually holds the snoot. The printed hinge-clip is very secure, but actual M3 screws and nuts are even more solid. Just less convenient if you wish the dive without the snoot or the clamp sticking out. The white dot on the Top Surface of the hinge needs to be aligned toward the body of the strobe to fit correctly. Filament Choice:I strongly suggest using the recommended TPU and PETG combination. Don't use PLA. It might work in the short term, but PLA does not wear well in the water and sun. It can also be too stiff and brittle to work well for this design. It might also break unexpectedly when exposed to the elements. The rubber friction ring must be some type of elastic TPU to slip over the strobe itself. The clamp, bracket, and hinge parts that actually hold the Snoot need to be flexible and resilient to bending over time. PETG is a good material for this purpose. ABS might work but could be too stiff. The print in place hinge-clamp might need a little encouragement to break free and allow movement. Just work it gentle and slowly to snap any minor adhesion Download from Makerworld:https://makerworld.com/en/models/2564103-backscatter-atom-strobe-caddy-for-os-2-snoot#profileId-2825583
.jpg.d3043e490e330b7f740143ecd4795653.jpg)
.jpg.e9548add8608a7e217750c0669ab9c8c.jpg)
.jpg.fb44dd2839b77ea0fc3ea5e76a516837.jpg)
-
How close can the WACP-C focus? The WWL-C can focus to the glass, so it works great for this scenario.
-
Demand that they hand your camera down, don't do negative entries.
-
About back rolls - I lost my prescription mask doing a back roll with a camera on a high current site. That was a rough hour in the panga fretting about the ruined trip. Fortunately, someone came up at the end of the dive with my lost mask! I carabiner-ed my mask to my wet suit pull strap for the rest of the trip! Don't make my mistake.
-
Some sites you will visit might not have stellar visibility, and smaller creatures will be available and photogenic. You will at least want to be able to take some Close Focus Wide Angle if not actually mid-macro (ex. 60mm). Seahorses 10cm, Red Lip Batfish, Iguanas, etc. A 100mm macro would not be my priority.
-
I suggest losing the infill. Instead increase walls and perimeters until there are no voids in the sliced model. Walls are far stronger than infill. Long lines of filament are also stronger than layers, so consider printing orientation vs the expected stresses.
-
Consider boosting the strength of a ball mount by including a long M3 bolt inside the shaft and with a nut and washer tightened at the far end. Leave an opening on top of the ball to tighten the screw head.
-
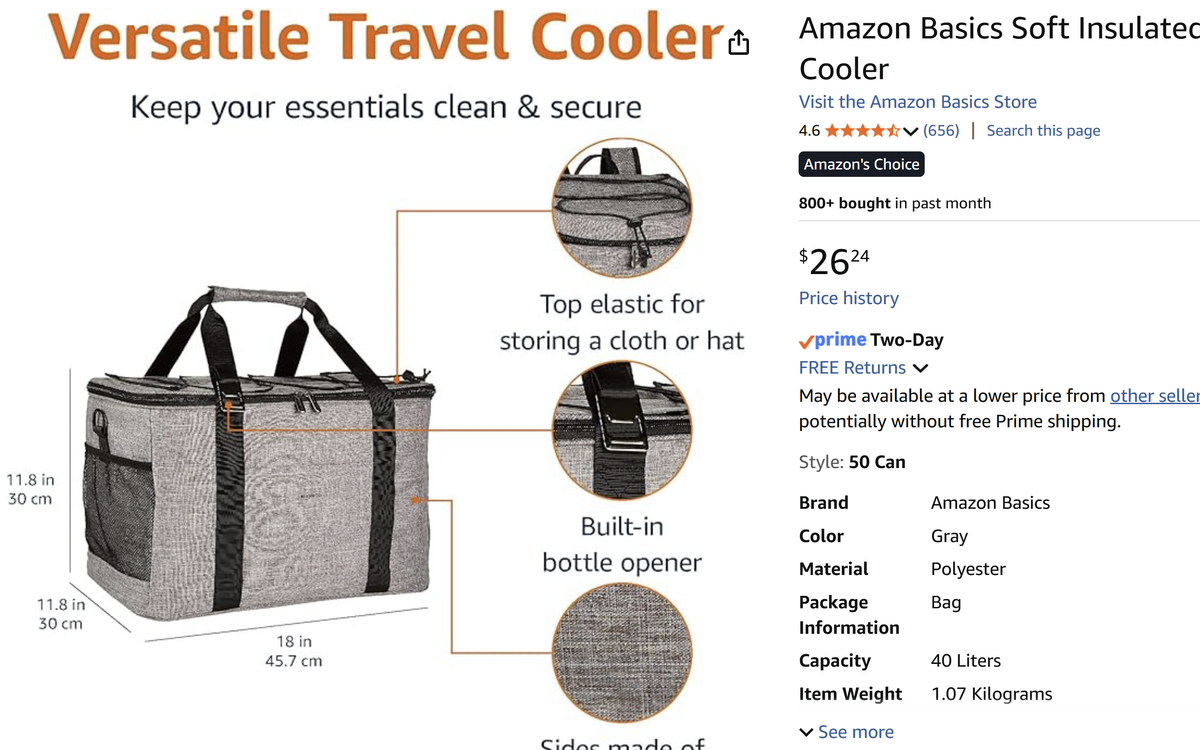
If you want a padded cooler, get a super cheap one like the one below from Amazon @ $26. I've used a pair of similar bags for many years for all my local shore diving and car transport. I've taken them on trips, filling them with scuba gear in my suitcase, but I don't find them so useful on a boat. You don't need to move your camera around much and they get in the way on a zodiac/panga and the crew won't like/allow it. If you want a personal rinse, sure that's a useful function. But realistically, you just need to dip your camera after each dive for a few seconds. Do a better, longer, button pressing rinse at the end of the trip or end of the day at most.
-
A padded cooler will not be very useful on a liveaboard. And the boat rinse tank is fine to use. Just remember the tank is for rinsing, not dumping your camera and leaving it in there unattended.
-
I suggest wide angle on most dives, perhaps shoot macro on the third dive of the day when the sun is low. The MFO-1 is great for most macro subjects, and the SMC-3 will depend on your preferences. There is always something cool and tiny if you look hard enough. There are no dive guides at God's Pocket, so critter spotting is your job.
-
My experience with both 5300 and 6000 Nitecore batteries in the HF-1 and Maxi is that you will not be able to exhaust the capacity of these cells shooting photos. Video Lights are another story, but can't realistically shoot enough photos in 3 or 4 dives to exhaust the battery.
-
I don't recommend transporting a housing on flights with the camera installed. It is a risk to bend, fold, and mangle the alignment of the tray and controls. Depressed buttons can damage the camera body. I usually put my well padded viewfinder and optical cables inside the housing when packed. I travel with the housing loaded by car but not if the housing in in a suitcase or roller bag.
-
Thanks! Maybe in a few weeks. I am in Raja Ampat for another couple weeks.
-
Look into a Bambu P1s with AMS as the best cost effective option. If you buy without an AMS you will end up buying it later once you realize how useful it is.
-
I've been using something similar for a couple of years. It is remarkably effective in drying off housings and ports. I think I've shared the Amazon link about a dozen times to people that see it and want to buy. I should get a referral credit!
-
I made an MFO-1 hood that also fits the SMC diopters. I have not laid hands on an MFO-3 yet to see if its appropriate. https://makerworld.com/@awkward_swine/collections/16165730?appSharePlatform=copy
-
No strobes or arms sticking out. I did attach a single 12 inch arm with jumbo stix floats as a crossbar over the top of the housing to make it near neutral. Nauticam Z8 with 140mm dome and 8-15mm. I think a 1.4tc would be an improvement over what i did. Shooting 15mm & near 180degs was great for point blank whales and baitballs, but some more reach would have help for 75% of the subjects. I did very little duck diving and was annoyed by the one over-eager dude on our trip who did. I had to "remove" him from a bunch of photos he didn't ruin out right.
-
I have had fantastic service from Backscatter, especially with the first run of the flaky MF-1 strobe. They also went above and beyond expectations dealing with some Nauticam flash trigger issues. Retra is also very responsive and easy to deal with based on experience of several friends. I had an Inon 330 repaired maybe 5 years ago, no problems. In the past Ikelite service was very good. Recently the experience was not as good.
-
I load my camera with a 512gb CFExpress card and a 128gd SDcard. I have 10 of the SDcards (numbered) and rotate in a new one everyday as I import to the PC. Its an easy backup with close to zero effort. So all photos are on 2 memory cards and the PC during a trip. I usually have a backup drive as well if i chose to use it.
-
Be sure to buy the Intel CPU version. ARM is great for everything but Adobe apps.
-
You are exactly describing the reasons for my position on this issue. 😉
-
Two months ago Ikelite service charged my friend money and returned a broken and improperly assembled housing. And they would not even replace the broken hotshoe cable without an additional charge. Ikelite used to have fantastic customer service, but this experience puts that very much in question.
-
A friend bought a used Ikelite D850 and sent it straight to Ikelite to be serviced. It came back with broken hotshoe wiring and improperly installed spring push buttons that depressed camera controls. Unusable. I fixed it all up, but the aperture control and power button were nearly impossible to engage. I had D70 and D300 housings from Ikelite that served me well. When i got a full frame D800 i found that their port system just didn't work for those WA lenses due to vingetteing. This experience left me very unimpressed and shocked at the poor quality and service of the Ikelite brand these days. Either their quality has fallen or my expectations have gone up. Probably both.


