


Afterhours Magic: An Ambient Light Video Workflow for Action Cams (and Other WB-Challenged Cameras)
INTRODUCTION
Getting good colours in underwater footage, especially when shooting in ambient light, has been a challenge since the early days of underwater cinematography, and action cameras are no exception.
As divers learn in their certification course, water absorbs light unevenly, with longer wavelengths like reds and oranges fading quickly as depth increases, leaving underwater scenes dominated by blues and greens unless corrected (here's a little video illustrating water's filtration effect at depth).
With action cam manufacturers releasing new models every six months, and online talking heads pitching each one as the miracle solution for underwater video, it might seem like the issue has long been solved by 2025.
Apps, mods, and camera software all promise one-button perfection: minimal effort, high reward, and content ready for instant sharing.
On recent action cameras, the most common approach is to leave white balance and colour corrections to the camera's software, to tweak settings and hope for the best...
Examples of typical results for ambient light footage shot at depth with auto-settings on recent action cameras and an iPhone16 :

(source)
But step off the marketing carousel for a moment and take a look at recent underwater clips, do the colours actually look... Good? Natural? Pleasing?
Those are very subjective words, of course, and the devil is in the details.
And yet some of us are not entirely convinced by what we’re seeing, despite all the technological advances, and started to question this in-camera, software-driven approach to the underwater colour problem, especially on action cameras, paradoxically the crown jewels of the one-button, auto-settings, shoot-and-forget philosophy.
Compare the above to Nick Hope's 2007 (!) almost "prehistoric" tests of underwater manual white-balance with a filter :
(note the cast on the auto WB test)
(source)
This is where this tutorial comes in.
It offers a user-based, more manual alternative to letting the camera try to solve the colour issue through automation, which we believe is really beneficial for action cams.
What follows is a simple, experience-based workflow for shooting underwater video in ambient light on action cameras – or any camera that struggles with manual white balance at depth.
The core idea is to take back control of white balance and colour processing by setting the white balance point manually in post-production, just as you would, at depth, with a camera that allows manual WB adjustment.
We believe that this manual approach, when done correctly, usually yields better, more flexible results than current in-camera software solutions, and helps you get the most out of your gear—especially older or less advanced models.
Capture from personal footage shot at roughly 10m on the GoPro 4 in a flat profile with a UR-Pro Cyan filter (Richelieu Rock, 2018)

Early personal raw clip shot at roughly 15m on a GoPro 4, in flat with a UR-Pro filter, rebalanced in post (2016, Mike's Point, Raja Ampat)
Other selected video clip examples shot in flat with a filter on various action cameras are visible here
WHO IS THIS WORKFLOW TUTORIAL FOR
Let’s be clear: this approach probably isn’t for everyone.
That’s not elitism, just practicality, especially given the phone-and-app-based social-media sharing ecosystem underwater video has evolved into.
This workflow is best suited for videographers who:
Work on their clips in post-production, including colour grading and editing
Use video editing software that allows manual white balance adjustment (some phone-based apps may not support this)
Shoot with cameras where in-camera processing can be limited or turned off, especially auto white-balance handling and colour corrections
THE IDEA BEHIND THIS UNDERWATER SHOOTING WORKFLOW
This approach is designed to help you get the best out of your footage by regaining some manual control over colour and white balance, which are set during post-production rather than left to in-camera software.
To be clear, this is not a method for getting the best results straight out of camera (SOOC).
It is not a software-driven workflow that delivers instantly shareable clips, which is often the focus of many action cam discussions today.
However, we believe that when used correctly and in the right conditions, this approach to ambient light video can produce better, more flexible results than in-camera correction, and help you get the most out of your gear.
It is especially effective on action cameras, and with older camera models that lack advanced colour correction or built-in underwater modes.
WHAT SHOOTING SITUATIONS DOES THIS WORKFLOW APPLY TO
This workflow applies to the following underwater video scenarios:
Full ambient light video, where you're shooting at depth using sunlight as the only light source. It also applies to mixed lighting setups, where natural sunlight is combined with artificial light that has been filtered to match the colour spectrum of sunlight at depth. This is often referred to as ambient-filtered mixed lighting.
Shooting in the ambient light "Goldilocks zone" – not too shallow and not too deep. This is the depth range where there is enough natural light to work with, while the colour loss from seawater remains manageable.
The exact range depends on local conditions, but in areas with strong sunlight it generally falls between 5 and 20 metres, with a sweet spot around 8 to 15 metres depth. In some cases it can extend a bit deeper, or be quite shallower. Using a filter on the camera lens also affects this workable range, as you lose 1 to 2.5 stops of light, and compensating with higher ISO has limited effectiveness on action cameras, as it quickly degrades the image and introduces noise.
Capture from GoPro7 footage, ambient light at 10m, flat profile with a filter, rebalanced and quickly graded in post (Okinawa, 2025)

AMBIENT LIGHT VIDEO SHOOTING WORKFLOW
CAMERA SETUP
1. Set your camera to shoot in a “flat” or flat-ish profile
The goal here is actually to limit what the camera does in terms of in-camera white balance and software colour correction.
This is an essential step for effectively rebalancing and grading your video footage later.
Shooting flat avoids the unnatural hues often introduced by "underwater modes" or automatic white balance settings, which typically boost the red channel in ways that degrade image quality and make post-production white point and colour balancing more difficult.
Another common issue is inconsistency in colour treatment within a sequence, especially when the camera is making adjustments on the fly. This isn't a problem for still images, but it is a major issue for video.
This will vary with camera brand (GoPro, DJI, Ace360, etc.), but the logic remains the same: limit what your camera does in terms of automatic white balance, colour, contrast and exposure adjustment at depth, and aim for a more neutral - yet information-rich - profile.
In our camera settings, rather than trusting the camera, we're aiming to record footage in a neutral, information-rich way, so we have the maximum flexibility for correcting white balance and colours.
Flat profiles, log, and similar settings all serve the same purpose: capturing the necessary information in a neutral form, with a wider dynamic range and more information, so you can work efficiently on the footage in post. The idea is similar to shooting RAW in still photography.
Be careful with ISO settings - using a filter on the camera lens means losing 1 to 2.5 stops of light - however, it's best to clock the max ISO on action cameras, as image quality typically degrades above 800 to 1600 ISO, depending on models, camera capacities and local conditions.
Example of basic GoPro camera settings:
Enable Protune
Set colour to Flat
Set white balance to Native
Set max ISO to 800 (or a little higher if your camera can handle it without too much noise)
Leave shutter speed on Auto (seems to work better than the 180° rule of shutter on action cams)
Typical GoPro 7 "flat" profile settings
2. Use a well-designed filter on the camera lens (if possible)
If you can, use a well-designed filter on your camera lens.
In blue water, a good filter helps correct the seawater’s colour distortion by cutting excessive cyans and greens while allowing deeper blues through.
This warms up the image hitting the sensor, helping the camera handle white balance more effectively -whether manually at depth or during post-production.
The goal is to restore a more natural colour balance by compensating for the way sunlight is filtered by the water column.
In green water, a different filter is needed, usually with more magenta tones, to account for the different spectral loss.
Keldan 7m compensation Spectrum Filter transmission data, blue water filter (left) and green water filter (right) 

(source)
Well-designed filters typically have a fluorofilter-like spectral curve.
Examples include the now-discontinued UR-Pro, Keldan Spectrum filters, and Magic Filters, or fluorofilter profiles (see the section below and this thread here for more detailed discussion on filters)
Be aware that many so-called "red" filters on the market are poorly engineered. Slapping red plastic on a lens doesn’t magically fix underwater colours. The filter must target specific wavelengths, not just “warm up” the image.
LEE 008 Dark Salmon filter gel, next to the UR-Pro Cyan filter on a GoPro SRP adapter 
If you're using a filter (and you should if possible), make sure to:
Compensate for the light loss by adjusting your exposure or EV settings
Stay within the filter’s optimal depth range
Avoid pushing ISO too high - action cams often get noisy above ISO 800 or 1600 underwater
When shooting in a mixed-lighting setup that combines ambient sunlight with artificial lights, make sure to use ambient filters on your lights, not just on your lens.
These filters adjust the colour temperature of your artificial light to match the filtered sunlight at depth, helping maintain consistent colour balance in your footage.
And let's not forget the most important point of this workflow: shoot in flat, and set your white-balance point manually.
Don't let the camera decide!
Captures from footage shot on a GoPro12 with a filter, but in auto settings.
This illustrates the importance of taking control and rebalancing the footage in post. While it's difficult to predict the exact outcome, the colour palette would likely appear more natural, with fewer “day-glo” hues and a milder cast if shot in flat and WB set in post

(source)
IN WATER
Shoot Within the Ambient Light “Goldilocks Zone”
When shooting in ambient light, make sure to stay within the optimal depth range where ambient light still works and colour can be recovered in post.
This "Goldilocks zone" is deep enough for water to filter sunlight and create colour loss, but not so deep that the camera struggles to capture usable information.
The exact range depends on location and conditions, but in strong sunlight areas like the tropics, it typically begins below 5 metres (shallower than that, there's not enough filtration for the technique to matter) and extends to around 20 metres. In very clear, well-lit water, it may stretch to 25 or even 30 metres. The sweet spot is usually between 8 and 15 metres.
Keep in mind that filters reduce light reaching the camera sensor by 1 to 2.5 stops. This is a significant tradeoff, but one that pays off if you stay within the right depth and lighting conditions.
Beyond 20 metres, results often begin to deteriorate due to reduced light (causing noise and loss of contrast) and stronger water filtration (reducing the colour information the sensor can capture).
Always adjust your shooting depth based on the day’s local light and visibility conditions.


(source)
IN POST-PRODUCTION
1. Start by resetting the white balance point in your footage
The first step with action-cam footage is to reset the white balance during post-production.
This mimics what you would do at depth when using a camera that supports manual white balance, and is the most important step in this workflow.
If using a filter (you should...) your footage will have a warm cast from the filter, which is actually desirable because it will help rebalance the image.
Since you shot with a flat profile and minimal in-camera adjustments, the footage will have little to no colour correction or white balance applied.
Which means using a filter and shooting flat on cameras without manual white balance is not a good way to get great results straight out of camera (SOOC).
You will need to rebalance the footage (set the white balance point) in post at the very minimum.
This differs from cameras that allow manual white balance at depth, where the SOOC result is already balanced and ready to use. With action cams, rebalancing in post is a crucial part of the workflow.
The good news is that your footage contains all the colour information needed, usually with a higher dynamic range, and will be far easier to grade than footage with in-camera software corrections baked in.
This is where the magic happens—you turn what looks like lead into gold.
Most video good editing software lets you set the white balance point either manually or automatically, which sometimes works fine.
Some reliable targets for white balance include sand, bleached or dead coral, divers’ tanks, exhaled bubbles, and marine life with clear white or grey areas.
Experiment with different targets and methods to see what works best for each clip.
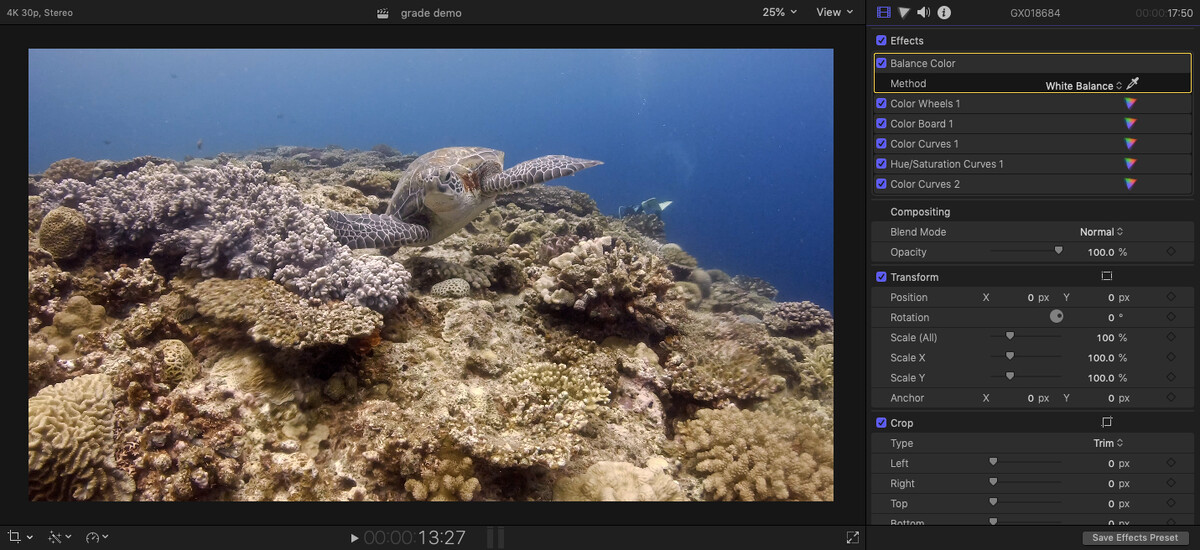
Setting the white-balance in Final Cut Pro X 
(source)
2. Grade and edit your footage to taste
You now have a well-balanced base to work with, offering good dynamic range and colour data since you shot with a flat(ish) profile.
Play with curves and saturation levels to see how much colour information has actually made it to your sensor.
This process will vary based on your editing software and personal preferences, but most major platforms (DaVinci Resolve, Final Cut ProX, Adobe Premiere, Sony Vegas...) can handle it very well. I’ve only worked with older-model action cams, and I’d love to see what data the new 10-bit colour models are capable of capturing!
On a related note, do check out Mark Thorpe's excellent tutorial showing a similar workflow, setting WB manually, but on a GoPro12's Log footage, after conversion to Rec.709 profile.
3. Example of my action-cam post-production workflow, in Final Cut Pro X (FCPX)
The following clips were shot in a flat profiles on a GoPro 7 with a filter gel on the lens, in Okinawa (blue water, average visibility, the center-left blur is caused by a water droplet on the wide angle lens)
Unbalanced footage shot at 10m depth in flat on the GoPro7, with a cast from the filter (in this case, a Lee fluorofilter gel), as imported
The same footage, rebalanced after manually setting the white-balance point with the dropper tool

Same footage, after a little colour grading
Unbalanced footage shot at 10m depth in flat on the GoPro7, with a cast from the filter (in this case, a Lee fluorofilter gel), as imported

The same footage, rebalanced after manually setting the white-balance point with the dropper tool

Same footage, after a little colour grading

A more saturated grading option (what some would call taking it to 11, to show what we have to work with ˆˆ)

Exported video clip example (first grade option)
CONCLUSION
To conclude, letting camera software handle underwater ambient light colour correction is like trying to shoot on land with coloured lighting and expecting the camera to fix everything digitally.
On land, beyond setting the colour temperature to match your light source, if your light has a strong colour cast, you’d typically add a lighting gel or change the light itself rather than relying on the camera’s software to correct the cast.
This is exactly what a physical filter does underwater in ambient light. Our primary light source - the sun - is filtered by water and has a colour cast.
Most modern cameras can handle mild casts near the surface.
But when dealing with strong blue, green, or cyan casts, such as at around 10 metres depth, it is still best - even in 2025 - to physically correct the light with a filter and to manually set the white balance point rather than relying on the camera to try do this automatically.
In a complex environment like underwater ambient light, it’s still better to manually set the white balance at depth - or, if that’s not possible, shoot in a flat profile and reset it in post-production - rather than relying on camera software to handle it.
In both cases, using a well-designed filter on the lens helps rebalance colours by compensating for the colour cast caused by water's filtering effect on ambient light.
This approach delivers more workable footage in post and generally better results overall. It can also help you get the most out of your camera, especially if you’re using an older model with limited software capabilities (see for yourself in the examples above what a GoPro 7 is still capable of…)
Voilà. Thanks for making it to the end.
I hope others find this approach useful, even if it is seen as outdated or old-fashioned.
Just try it yourself and do it right. Understand filters, and trust manual white-balance. It works.
Cheers, happy bubbles, and most of lovely colours to you all!
Ben

GOING DEEPER (further discussion)
WHY DOES THIS APPROACH WORK
When used within the right parameters, this workflow of shooting flat ambient light footage with a filter delivers excellent, workable results.
It often outperforms unfiltered, in-camera corrected footage, especially on action cams that cannot manually set white balance at depth.
Let’s dig into the reasons why this is the case.
1. The problem with in-camera software-based white-balance and colour correction
We live in a time when cameras have powerful software corrections capable of amazing things.
So why – despite claims that software will solve everything and that filters are a thing of the past – does filtered footage shot in flat profile give end results which generally still look better than in-camera software-corrected footage, especially when it comes to colour balance?
And why is filter-use still common in blue-chip professional productions (mostly shot on cinecams) but seen as outdated in amateur and semi-pro circles?
Putting aside cameras like those from Canon, which can produce very pleasing (though not always the most accurate) results when performing manual white balance at depth, automatic in-camera white balance and colour correction generally do not work well at typical ambient-light diving depths.
And it's important to note that if you work with in-camera software-corrected footage and attempt to fine-tune white balance or simply grade the footage by setting the white balance point in post on an easy white or grey target (like sand, a diver’s tank, bubbles, or bleached coral), you’ll often end up with odd reds or magenta peaks and strange colour balance.
I’ve done this many times. Editing unfiltered, non-flat GoPro footage from colleagues in various locations simply does not work well, or has a very limited reach.
Rebalancing white balance causes colour balance to break down, leaving you stuck with limited adjustment options.
This happens mainly because the camera software boosts the red channels to compensate for the underwater blue cast on ambient light.
This creates two main problems:
• The camera artificially boosts red channels, which degrades image quality.
• A strong colour cast often remains - usually cyan, green, or blue - and if it doesn’t (for example, in “underwater mode”), the resulting palette tends to look unnatural and unbalanced.
When you set white balance at depth or in post, you are telling the software “this area should be gray or white,” which should cancel out the blue and cyan cast.
But if the reds have already been over-boosted by the in-camera software, the result becomes unnatural, producing all kinds of strange magenta tones and other colour distortions.
A typical example of footage shot with auto-settings on recent action cameras, and colour-corrected in post, showing a residual cast
(source)
2. Why shooting flat and using a filter generally works better than auto in ambient light
Just to be clear, the most important point in this workflow is to set the white balance manually. This is standard procedure when shooting underwater ambient light video, and shooting in a flat colour profile while adjusting white balance in post is simply a workaround for action cameras that lack crucial manual white balance control at depth.
If footage is shot in a flat colour profile, as opposed to in-camera auto-colour correction, the reds are not artificially boosted.
This allows for cleaner white balance correction and colour grading without magenta distortions, and also captures a greater dynamic range.
These advantages are well understood in still photography, where shooting in RAW mode is standard.
A flat or flat-ish profile lets you manually adjust recorded reds and magentas in post without dealing with baked-in colour corrections that vary across frames.
Even better, using a well-designed physical warming filter on the camera - such as the UR-Pro or equivalent - acts on ambient light before it reaches the sensor.
This means:
• The sensor records a warmer image, reducing the need for software correction.
• A good filter that lets deep blues pass through (for example, one with a fluorofilter-like spectral profile) results, after white balance reset, in a warmer, more neutral, and more accurately balanced image.
Deep blues in the background remain intact while the foreground gains accurate tones, producing a more natural and balanced look.
GoPro7 footage shot in flat with a good filter, before and after setting the white-balance point in post

Setting underwater white balance is essentially about how much you need to "stretch" colour channels to counter seawater’s filtering of ambient light
The more stretching required, the greater the image degradation.
Using a physical filter on the lens reduces the amount of stretching needed to rebalance the image.
In short, filters physically warm the ambient light before it reaches the sensor, helping to reduce the green/cyan cast.
This:
• Enables better manual white balance control at depth or in post
• Avoids baked-in in-camera software corrections that are difficult to work with in post
• Preserves depth in colour by extending the filter’s effect deeper into the scene, resulting in less drastic background colour loss than software correction
The main downside is the inevitable loss of stops of light caused by the filter, which can be a dealbreaker in some shooting conditions.
In contrast, in-camera software colour correction:
• Manipulates individual colour channels, with results that can vary widely
• Often produces baked-in artefacts and uneven colour palettes, and does not fully correct the colour cast
• Degrades footage, making it difficult to grade in post
• Can be unstable and vary within a sequence, which is problematic for consistent grading
Understanding action cam limitations: AWB/ Kelvin vs. MWB
For action cameras, it’s important to understand a key limitation: current models typically offer only two approaches to white balance underwater.
They either rely on Auto White Balance (sometimes with a dedicated underwater profile) or allow the user to lock white balance a fixed Kelvin value.
Neither of these option is equivalent to a true Manual White Balance performed at depth.
Auto White Balance constantly shifts based on exposure and scene changes, which generates inconsistencies and boosts the red channels, which typically leads to unbalanced colour palette, with uncorrected colour casts at depth.
Meanwhile, locking a Kelvin value only adjusts colour temperature along the blue–orange axis. It does not meaningfully correct the green–magenta tint, and generates a strong blue-green / cyan colour cast.
A true Manual White Balance, on the other hand applies a full three-channel (RGB) correction based on a sampled reference target, and corrects tint (magenta/green).
This type of correction is essential for balanced colour rendering of underwater footage. Ideally, cameras would allow locking the result of an auto WB calculation at a certain depth (effectively turning it into a manual balance…), but most action cams do not.
This limitation also explains why mixed-lighting approaches such as ambient filters on video lights often produce rather poor results with action cameras shooting in AWB, as the process relies on setting and locking an accurate manual white balance to ambient light at depth.
And this is also why the workflow described in this article works: locking the white balance at depth and later applying a proper manual white balance correction in post-production typically yields better and more balanced colours than relying on an action cam’s Auto WB (underwater-mode included) or worse, a fixed Kelvin value alone.
GoPro7 Supersuit housing with AOI wide lens adapter and a fluorofilter gel

3. Limits of manual white-balance setting (at depth or in post-production) and of filter use
As mentioned earlier, the following limitations will happen, even when using a good filter:
• In clear, well-lit waters like the tropics, a filter’s effect typically breaks down beyond 20 to 30 metres depth in good conditions.
• You can still set white balance, but the colour cast becomes too strong and the image balance collapses. You would need a stronger filter, but then you lose too much ambient light, which itself becomes scarce with depth - a true catch-22 situation.
• After a certain point, ambient light is insufficient and seawater’s filtering effect becomes too strong.
Setting white balance in these conditions, whether at depth or in post, stretches colour channels too much, causing distortion similar to shooting without a filter.
In these situations, it’s best to accept the colour cast or rely on artificial light.
• In shallow water, such as snorkeling depths, the filtering effect on sunlight is mild. Working on filtered footage here means you are actually cancelling out the filter’s effects to set white balance. It’s possible, but there is little reason to use a filter in shallows since the required hue corrections degrade image quality.
• Available ambient light is crucial. Using a filter means losing stops of light. In some sea conditions, there simply isn’t enough ambient light to use a filter effectively. Like at depth, it’s best to accept the colour cast or use artificial lighting. As previously mentioned, boosting ISOs can only go so far on action cameras.
• Filter design versus seawater qualities / conditions. Most filters are made for blue or cyan water - which is ideal for ambient light shooting - but not for greener waters.
Cyan-cutting filters reduce green tones, which can result in unnatural colours and poor balance compared to filters designed specifically for green water.
The UR-Pro and Keldan brands, for example, offer, or offered, green water filters (which are typically magenta)
These require experimentation, but since greener waters are usually darker, the light-related limits mentioned above often apply.
Depth limits: ribbontail ray swimming at 25m (seafloor is + 40m plus), GoPro7 footage capture, flat profile with a filter
A WORD ON FILTERS
As previously mentioned, not all lens / camera filters are well designed or adequate for our purposes.
Unfortunately, many commercially available filters are really not designed by people having looked into filtering characteristics and are just very bad (<cough> PolarPro...</cough> ), and also used by people not shooting in flat and rebalancing the footage in post, but using auto-settings instead, which tended to give filters a bad-name because of strange hues this generated...
Yet as explained above, to get good consistent results when using a filter, it is always best to shoot in a flat profile and set the white balance point manually, either at depth if the camera allows it, or in post, on cameras like action cams.
A filter like the beloved, proven UR-Pro, or others with a similar profile and a good warming effect really works best for this approach, especially on action cams, which are still quite limited in their handling of underwater white balance issues, despite all the marketing hype.
Historically, the UR-Pro company developped, in the 1980s, a very efficient filter for shooting at depth in blue water.
This filter works very well on cameras ranging from cinecams (Gates sold UR-Pro filters for their housings...) to DSLRs, mirroless and, until a few years back, action cameras. Unfortunately, the company no longer exists, and UR-Pro filters are now very difficult to find.
The UR-Pro hold a special place for me as I've started using them on GoPro4 action cams, and kept at it because it just works really well.
And recent gear addition such as wide angle conversion lenses for action cameras (by AOI / Backscatter / Inon) sent me on a quest to retro-engineer my beloved UR-Pro filter, which you can read about here: https://waterpixels.net/forums/topic/1414-ur-pro-filters-info
I came up with the following recreation of the UR-Pro Cyan's spectrum transmission curve:
Recreation of the UR-Pro Cyan spectrum transmission curve 

For other cameras, high quality alternatives exist, primarily Dr. Mustard's Magic Filters (primarily designed for ambient still photography, first marketed in 2006) and especially Keldan's Spectrum Filters.
It's best for you to experiment with what works best for you with your camera setup.
On my Lumix LX10 compact, I actually prefer the Keldan Spectrum -1.5 filter gel (ambient light test reel here), which is not as strong as the UR-Pro Cyan and more accurate, but got good results with UR-Pro, Magic Filters and Keldan.
On the GoPro however, the Keldan and Magic don't work as well, as this type of camera seems to require a slightly stronger filter to get good results in post.
Warming isn't everything, but based on tests, the UR-Pro Cyan offers the strongest warming effect (around 3000–3100 K at –1.6 EV), more than the Original Magic (≈ 2400 K) and the Keldan SF-1.5 (≈ 2350 K)
As an example, here is a side-by-side, flat and unbalanced, then lightly graded comparison of UR-Pro and Magic filters on Gopro7 action cameras, highlighting the marked differences between the two filters on action cameras. This quick test was done on breath-hold in east Bali (Jemeluk), with the AOI wide lens on one camera.
GoPro7, Magic Filter and UR-Pro Cy filter, unbalanced, flat footage
GoPro7, Magic Filter and UR-Pro Cy filter, rebalanced in post and lightly graded
But as this test example show, even a weaker filter like the Magic Filter gel is still workeable on action cameras, but the spectrum is slightly different.
When rebalancing, only the Magic filter requires boosting magenta in white balance, while UR-Pro and Keldan require reducing it, which is a significant difference.
The main idea to take home from research on the UR-Pro cyan filter spectrum profile is that is basically that of a fluorofilter (aka fluorescent filter).
Fluorofilters were a type of filter designed to "Convert U.S. Cool White or Daylight type fluorescent lamps to 3200K photographic tungsten and remove the excess green." to quote filter maker Rosco, ie. to convert a light source that is overly green and cool, such as fluorescent lighting.
A fluorofilter profile like the Rosco 3310's is very close to the UR-Pro's original profile, in fact almost identical.
UR-Pro spectral transmission curve, vs. Rosco 3310 Fluorofilter gel curve
The issue these days is that fluorescent lights have been phased out by LED lights, rendering fluorofilters obsolete in the lighting world, and thus also very hard to find!
Despite the difficulties, there are interesting commercially available alternatives in lighting gels—it is mostly a matter of matching similar spectrum transmission curves.
The Lee 166 Pale Red and the Lee 08 Dark Salmon (LDS) are both good practical alternatives for example.

Unfortunately, the Lee Pale Red has also been discontinued, and also had a general light transmission that was a little too low for action cams, resulting in an ISO boost.
Which leaves us with the Lee Dark Salmon (LDS).
The LDS was actually already tested in water and works fine, but with some caveats: As I wrote in the UR-Pro thread after the side by side comparison, it is stronger / darker (and a bit warmer) than the UR-Pro - meaning a little more loss of light / ev, and also a slightly deeper tint in the reds - this is visible when looking at the camera's ISO sensor data, with a higher ISO on the LDS, and also the resulting SOOC footage:
GoPro7, UR-Pro Cy filter and LDS, unbalanced, flat footage
GoPro7, UR-Pro Cy filter and LDS, results rebalanced in post and lightly graded
Yet what this also means is that, as expected, the Lee gel actually works somewhat better than the UR-Pro when going deeper, but this is really give and take, as it means a greater loss of light - which could be fine in the tropics, less so elsewhere. Handling of the blues is also a little different, as seen in the curves.
There are probably other fluorofilter-type gels still available somewhere, as well as others with similar profiles.
The key is to find one with a curve as close as possible to that of the UR-Pro cyan filter's fluorofilter style curve.
The logic is straightforward: seawater filters sunlight and creates a cooling effect, adding green/cyan. A fluorofilter is specifically designed to counter this.
But as you can also see on the UR-Pro spectrum graph - and this is where a fluorofilter differs from a simple green-cutting filter - it still lets deeper blues through (resulting in a pleasing seawater blue). This characteristic is harder to find in standard lighting gels.
Possible UR-Pro cyan alternatives in the Lee range 
It would also be interesting to test Keldan's stronger spectrum filter gel on action cameras, as I only tested the SF-1.5 gel.
The hunt is on!
MIXED LIGHTING SCENARIOS
Regarding the complex but fascinating issue of mixed-lighting scenarios, which combine ambient light with filtered artificial light, Swiss manufacturer and concept pioneer has published and collaborated on good introductory videos on the subject:
The Keldan Ambient Filter Concept
Understanding the Ambient Filter
BTM - Filters for Underwater Videography (Red Filter, Magenta Filter, Ambient Light Filter)
Recent Keldan light models include integrated LED-based ambient filtering, eliminating the need for an actual physical filter on the lights.
When it comes to empirical research on ambient filter creation and filter matching, I'd strongly recommend looking into the following thread by fellow Waterpixeler Dreifish https://waterpixels.net/forums/topic/1413-red-filters-and-blue-ambient-light-filters-for-mixed-light-shooting/
as well as Interceptor121's similar but more ancient research here: https://interceptor121.com/2019/11/25/matching-filters-techniques/
Mixed lighting shooting scenario, filter on the cameras lens and on the video lights
(source)
FURTHER READING / LINKS
Related threads
https://waterpixels.net/forums/topic/1380-shooting-action-cams-with-a-red-filter-in-flat-profile-and-manually-white-balancing-in-post-production/
https://waterpixels.net/forums/topic/1414-ur-pro-filters-info
https://waterpixels.net/forums/topic/1413-red-filters-and-blue-ambient-light-filters-for-mixed-light-shooting/
Camera lens filters and white balance
https://waterpixels.net/forums/topic/1414-ur-pro-filters-info
https://www.youtube.com/watch?v=Zn4NRQgl2tw
https://www.youtube.com/watch?v=COxalutbD38
https://wetpixel.com/articles/ur-pro-shallow-water-filter-review
https://www.bubblevision.com/underwater-video/white-balance.htm
https://interceptor121.com/2013/01/13/underwater-video-tips-polar-pro-red-filter-for-gopro/
https://xray-mag.com/pdfs/articles/Photography_UsingFilters_15.pdf
https://wetpixel.com/articles/filters-and-ambient-light-photography/
http://www.magic-filters.com/download/UWP26a.pdf
https://wetpixel.com/articles/complementary-filters-and-wide-angle-underwater-photography
http://web.archive.org/web/20191209011451/http://www.urprofilters.com/content.do?region=FilterInstructions#tips
https://wetpixel.com/articles/ur-pro-shallow-water-filter-review
https://www.youtube.com/watch?v=8mMb-FcWQz8
https://wetpixel.com/forums/index.php?/topic/16970-expodisc-white-balance-filter/
https://www.cambridgeincolour.com/tutorials/white-balance.htm
https://youtu.be/7DRmzwaO7YU
Mixed-lighting / ambient filters
https://waterpixels.net/forums/topic/1413-red-filters-and-blue-ambient-light-filters-for-mixed-light-shooting/
https://wetpixel.com/forums/index.php?/topic/69260-solving-the-mixed-light-problem/
https://www.youtube.com/watch?v=yKk9VBponz0
https://www.youtube.com/watch?v=COxalutbD38
https://www.youtube.com/watch?v=Zn4NRQgl2tw
https://interceptor121.com/2019/11/25/matching-filters-techniques/
https://interceptor121.com/2019/08/03/getting-the-best-colors-in-your-underwater-video-with-the-panasonic-gh5/
-
 4
4
-
 4
4

Recommended Comments