Leaderboard
-
.jpg.c5e6bd876847a2be9e8f7ad68dd32d7c.jpg)
Davide DB
Super Moderators1,749Points1,461Posts -
TimG
Super Moderators1,627Points1,621Posts -
Chris Ross
Super Moderators1,601Points1,491Posts -
-Edit.jpg.0739718b849caea17a4f73bb93954a2a.jpg)
Dave_Hicks
Members1,030Points716Posts


Popular Content
Showing content with the highest reputation since 09/11/2023 in all areas
-
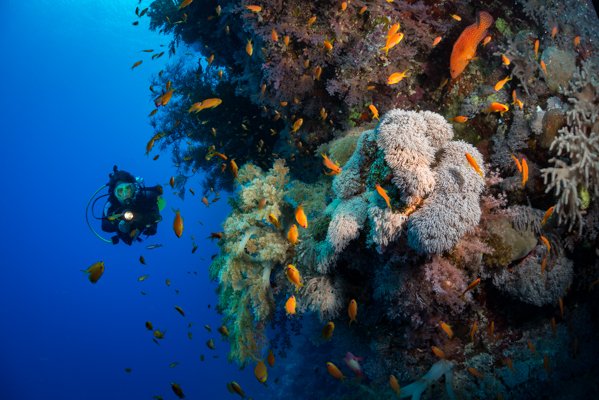
28 pointsI just wanted to share some pictures of my recent and first ever trip to Bangka and Lembeh! Equipment used was: Nikon Z8 + Nikon Z 105mm Macro Seacam Housing and Strobes plus Retra Snoot


 28 points
 -
24 pointsMy first leafy sea dragon I found after moving to South Australia, I was very excited to finally see one. They're very shy and tend to turn away from you when you approach, so I got very lucky with this portrait. R5, 15-35mm, 2 x Z330s
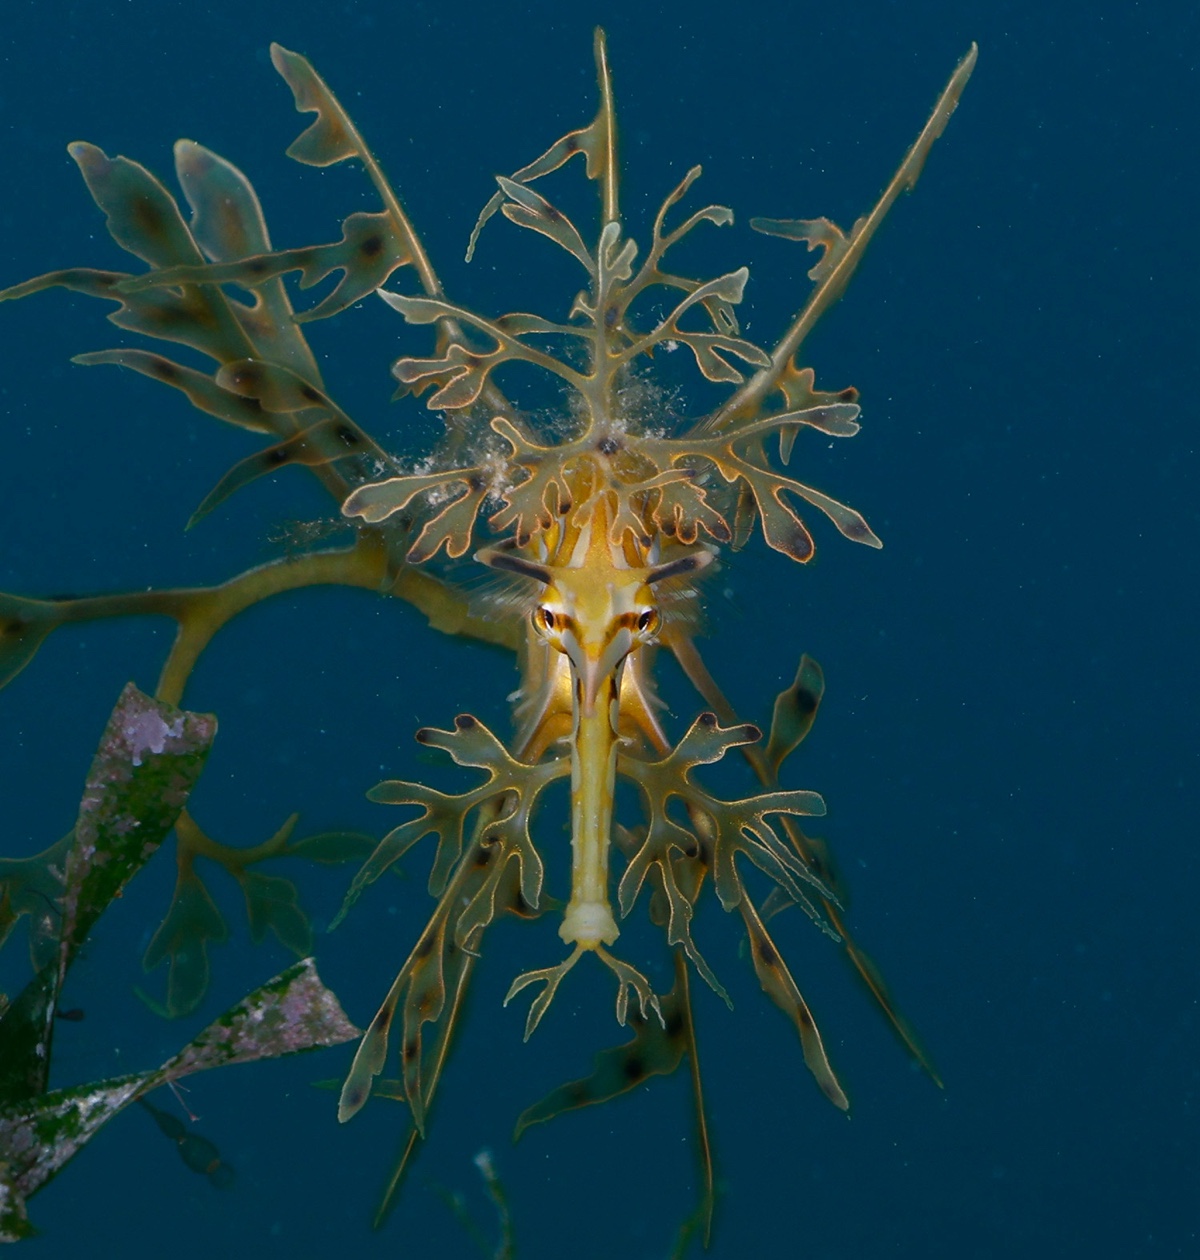 24 points
 -
 While I am mostly a wildlife/nature photographer, one of the most interesting books on photography that I have read in a very long time is "Magnum Contacts Sheets" - link below (and no, I don't get a commission if you buy it 🙂) https://www.amazon.com/Magnum-Contact-Sheets-Kristen-Lubben/dp/0500292914 This book shows the contact sheets of the photos taken by various Magnum photographers in trying to get their shot. It provides an absolutely fascinating insight into the mindset and creative process followed by some of the best photographers in the world. One of the biggest take-aways for me was the degree to which these photographers "work" the subject, in terms of exhausting various angles, perspectives and compositions. It took a lot of waiting to get the fusiliers aligned just right While this may not be news to some of the old hands here at Wet/Waterpixels, this is something I have rarely seen divers do in the real world, especially those new to underwater photography. Regardless of whether they are carrying a Go Pro, a TGx or a housed system, most photographers I see will swim up to a subject, spend a few seconds composing the image and adjusting their lights, take the shot and then swim off to the next subject. While this may be good for getting clean documentary shots of the subject, the results are generally lacking a little in artistic value. Yes, I did say "artistic value". As the art of underwater photography evolves, well-exposed, sharp photographs of various marine life (documentation) have become pretty much common-place. So how does a photographer evolve his/her images to make them stand out? The next step up from simple documentation is showing behaviour/action - and while this requires the photographer to be alert and technically proficient, there isn't necessarily a lot of creative input here either: the subject does the heavy lifting in terms of making the image. There wasn't much creative input into this image other than the choice of angles - replace the tiger shark with a less interesting fish and this photo would not be very interesting The highest level of photography (IMO) involves creating images where it is the design and composition that makes the image stand out - not merely "look, here is a cool subject". In wildlife, for example, it is much harder to take a great image of an antelope than a lion - similarly, it is much harder to take a "wow" shot of a coral head or some reef fish underwater than a whale shark or manta. You have to spend time thinking about what to include and exclude in the image, how to compose the frame, how to light it, etc. etc. When it comes to artistic design, your first shot is unlikely to be your best shot - atleast not consistently or unless your name starts with "Henri" and ends with "Cartier-Bresson". It takes time to work through the various compositional aspects in order to find the best image - ie, you need to work the subject. If you do, you can be rewarded with images that go well beyond the obvious. I'd like to illustrate what I mean with an example of how I went about taking one of the shots I really like. To set expectations, I have the natural creative talent of a brick and have to take a very methodical approach to taking images. So this process may seem a little plodding to the creative geniuses out there. For the rest of us, perhaps it may be helpful. This was a coral head I came across on a dive during a trip to Raja Ampat: I found the glass fish sheltering under the coral to be quite interesting and got into position, angled my strobes, set the exposure and fired off a shot, resulting in this: Ok, it's a shot showing the coral and the fish. But there really isn't much else to redeem it. It's lacking colour and pop, and there really is no unifying theme to the image other than "here's a bunch of stuff". And most that stuff is adding nothing to the image (and would not, regardless of how great the corner sharpness was 😜). So I decided to get a little closer and see what I got. It took around 10-15 shots from various angles before I found something that looked promising: Ok, now the image has a little more pop and there are no extraneous elements. But it still seems a little haphazard. Hmm, maybe having the glass fish appear more synchronised would help? This led to a few more shots (well, 60+, actually) trying to get the pesky fish to be aligned the way I wanted. Some of them: There were quite a few other variants of the above, with the fish facing one way or another. All were pretty nice but from a design element, there was something lacking - these images were still not giving me a sense or scale of being on an amazing reef in Raja Ampat. While nicer than the earlier images, these were still simple "look, here's some fish" images. So I decided to go a little wider to see if that would help capture the essence of the underwater world a little better. Ok, now this felt better. The blue water on the other side of the coral balanced the glassfish a little more, and gave a greater sense of the reef, and I was quite pleased with the image. But then I started thinking about how all the visual elements were only on one side of the coral whereas the blue water was completely lacking in any point of interest. Some more shooting and gesturing to my dive guide resulted in this: Bonus points to the coral grouper for a serendipitous appearance This (to my eyes, at least) felt like the best photo of the bunch - a good 100+ exposures after the initial image. I could have stopped after the first few images, I could have stopped after 20-30 images but by spending 30+ minutes in this one location, I found a photo that truly appealed to me. Is it perfect? Of course not. There is perspective distortion with the diver that could have been mitigated by having the diver move away from the edges. I'd have also have liked him to be holding a torch. That's a testimony to the fact that despite the time I spent, I could have always worked the subject more. So what's the takeaway here? Pretty simple: too many divers spend their entire dive swimming around, taking a couple of photos here and a couple of photos there. That's perfectly fine when you are starting out and is a good way to hone your technical skills and build a good foundation of documentary images and also action photos. But as your skills evolve, a good way to improve the quality of your images is by becoming more selective. Try to get a few really great shots as opposed to a large number of average ones. And in order to achieve this, shoot fewer subjects - but the subjects that you do shoot, shoot them really well. By that, I don't mean just blindly fire away and hope for the best. Instead, take a deliberate approach to positioning yourself, your perspective and exposure/lighting. Think about different ways you can compose the image. Then review the results, decide what could improve and repeat. Starting thinking like a photographer who happens to be on scuba - as opposed to a scuba diver who has a camera. Sure, this isn't always easy to do: unless you have your own private guide or are diving with a group of photographers, you rarely have the ability to spend as much time as you prefer on a subject. But if your goal is take the best possible images, you will have to find a workaround to that. Most dive centres are generally very receptive to (and slightly dread!) underwater photographers, and are willing to work with them in terms of guides, groups, etc. Make that extra effort and you will find the quality of your images improves significantly. Footnote: the series of images above is not a statement about how awesome the final image is. I like it a lot (and I shoot to please myself), but I have photographer friends who aren't that impressed by it (which is perfectly fine). The goal is to illustrate the approach to working a scene, and hopefully, this sequence illustrates it well. Sometimes, no matter how much you try, the animals don't cooperate. I spent a lot of time working through various compositions till I found one that appealed to me - all it needed was an appropriate subject swimming through at the right location. Despite waiting for almost 30 minutes, I didnt have any luck better than this.23 points
 -
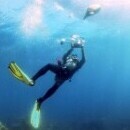
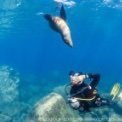
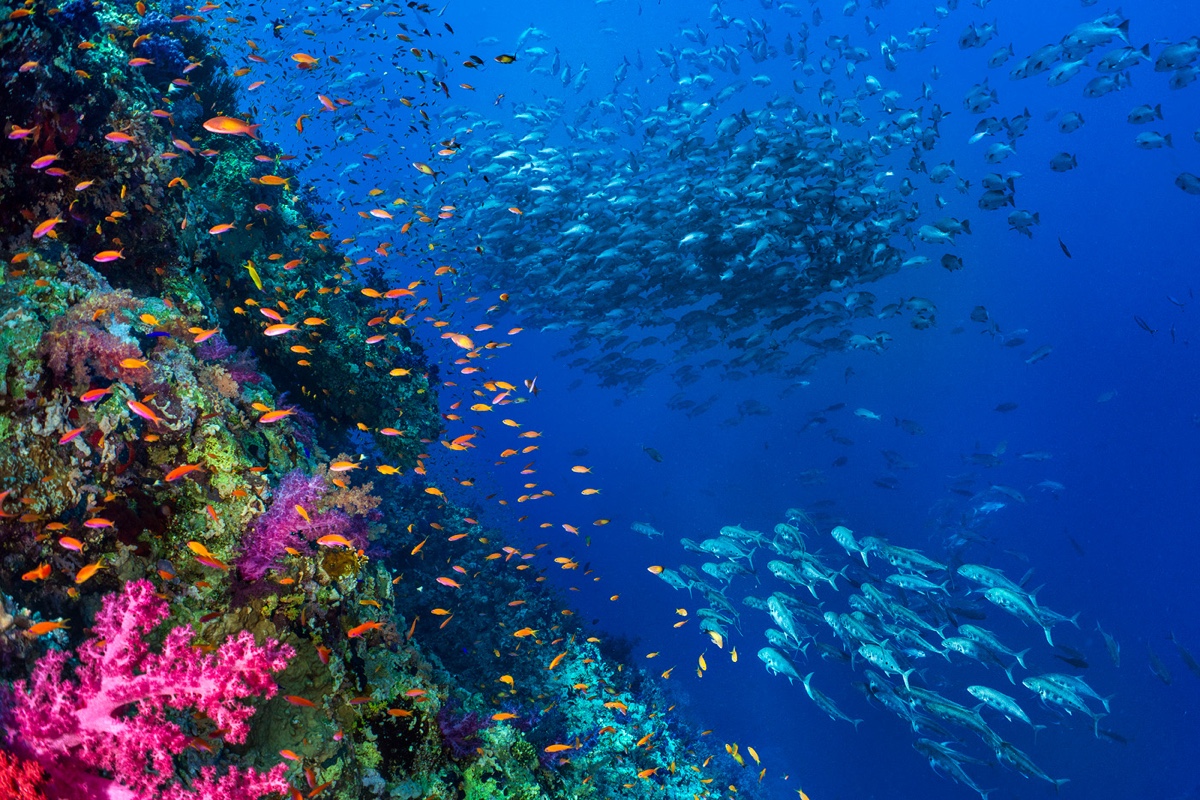
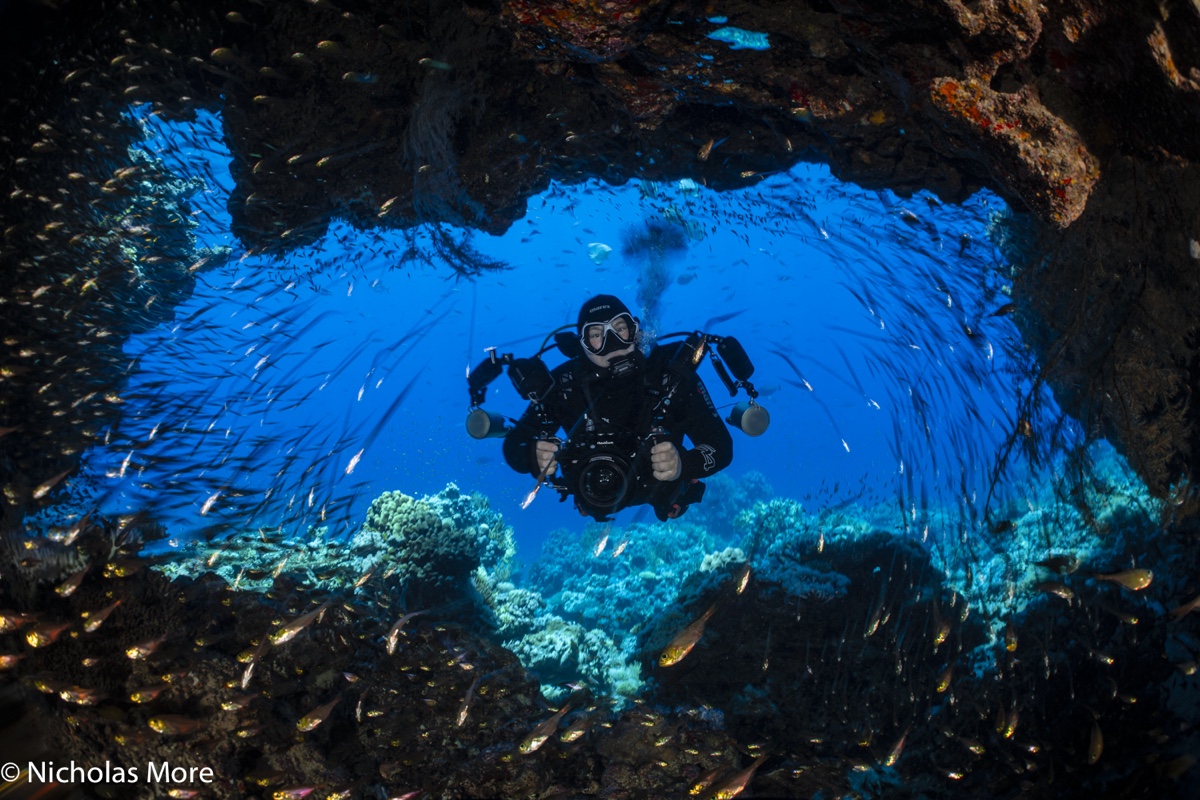
23 pointsAnother tradition of this thread is cheating - by posting multiple images! Here is my favourite shot: Which is my favourite because this was my favourite dive of the year. It was just one of those moments when the underwater was truly stunning. I was at Raw Mohammed in the Red Sea and seemingly had the place to myself, with great schools moving through and a beautiful reef. Photo taken with Sony A1 and 28-60mm. Nauticam housing, Nauticam WWL-1B. 2 x Retra Pro Max flashes. 1/200th @ f/11. I even have a photo of me on the dive - thanks Nick. In the spirit of cheating - I've also recorded a video running through all my favourites from 2023, if you want to see more photos: Alex
 23 points
 -
22 pointsI am excited to announce today the launch of a new YouTube channel - The Underwater Photography Show, with me and Matthew Sullivan. Hopefully it is an enjoyable and accessible source of information. Please subscribe if you are interested in such things! https://www.youtube.com/@UWPhotoShow Waterpixels.net even gets a mention on our first episode!
 22 points
 -
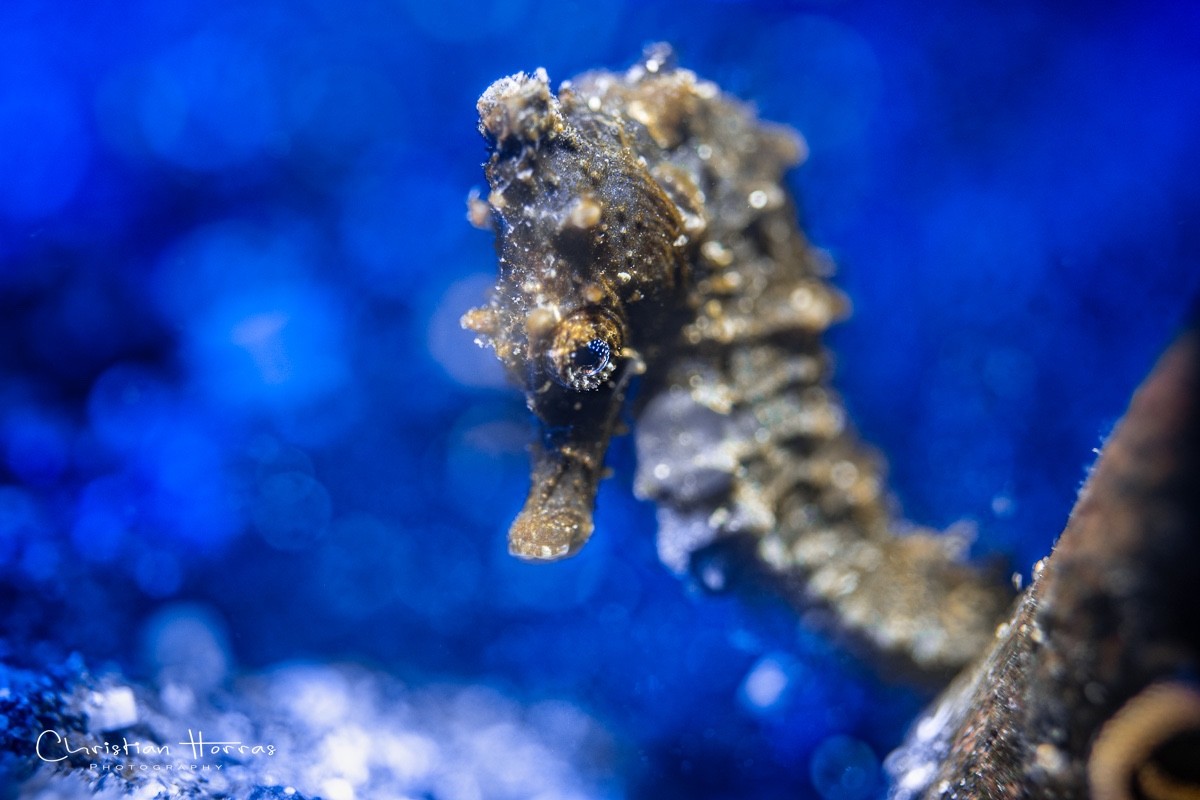
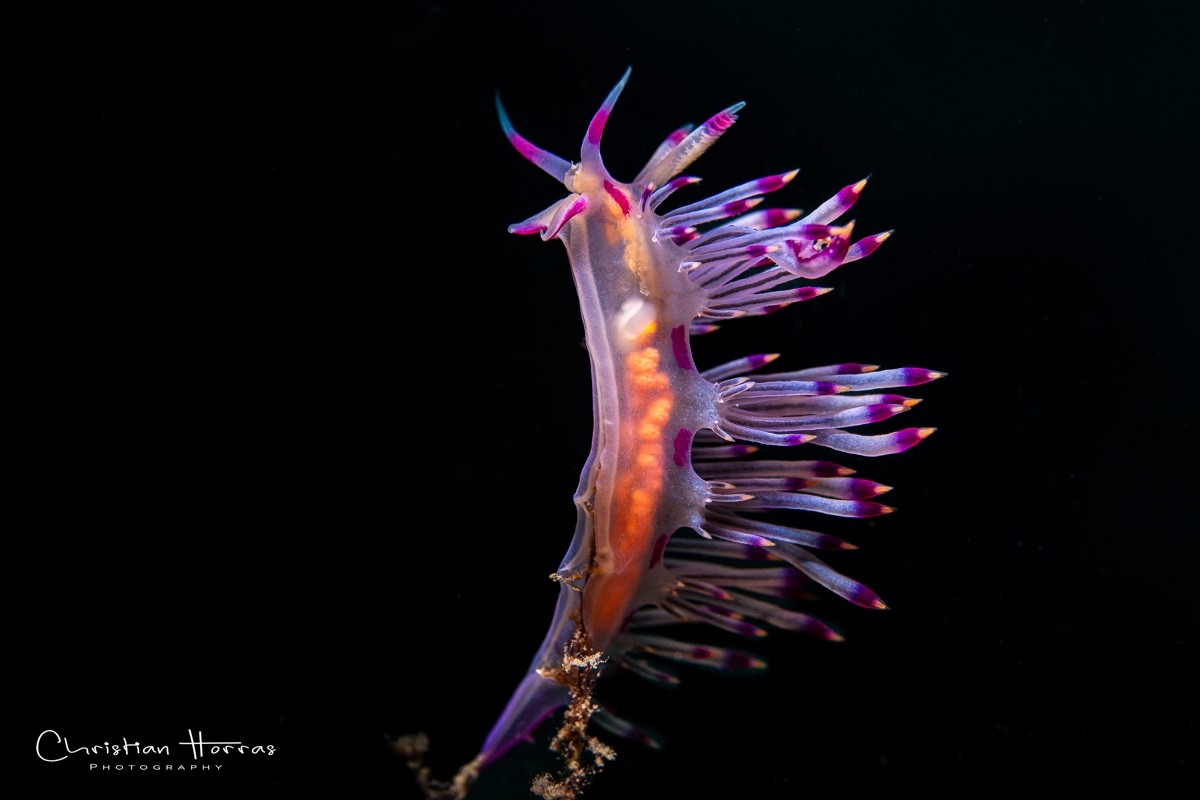
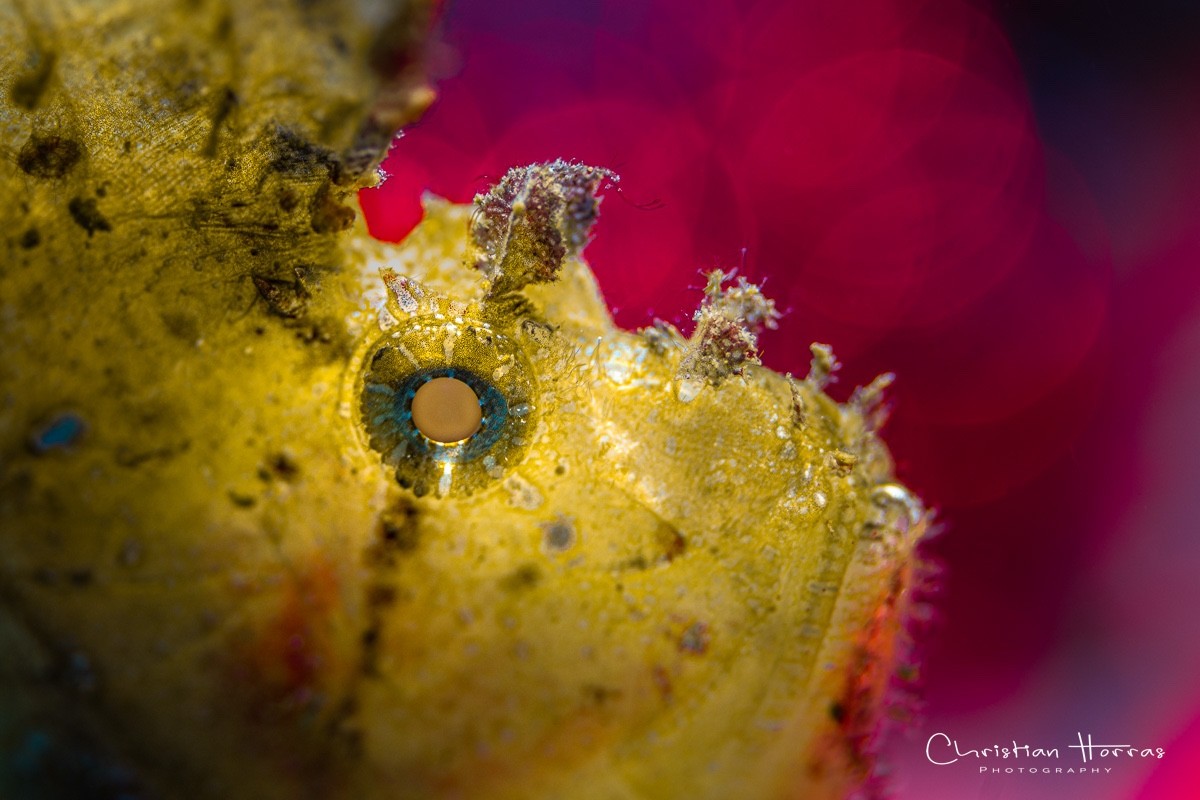
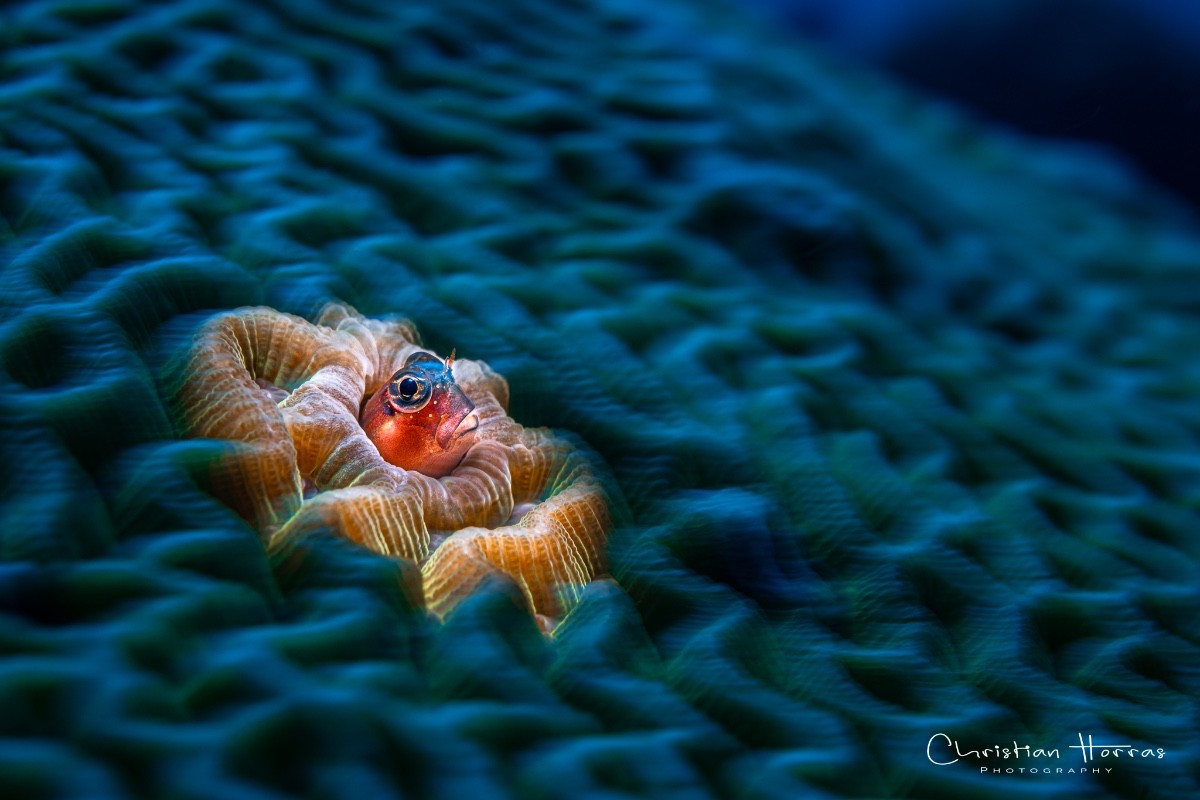
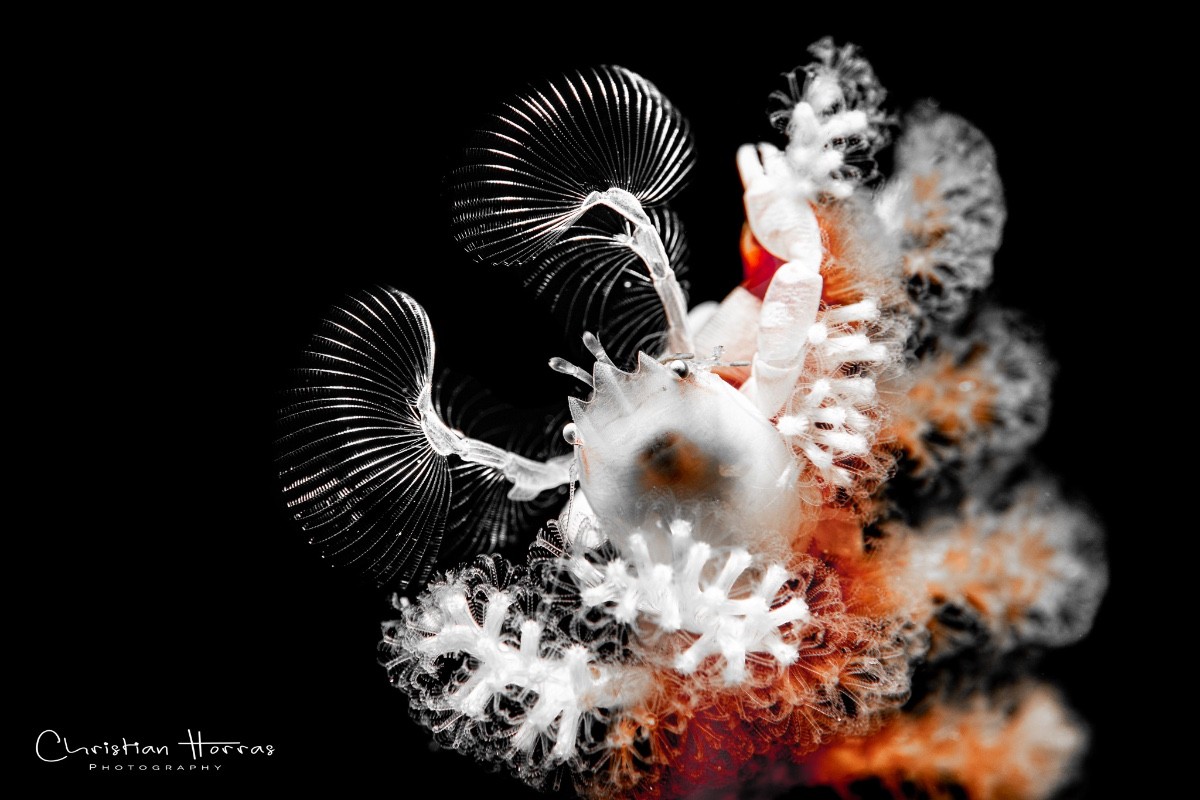
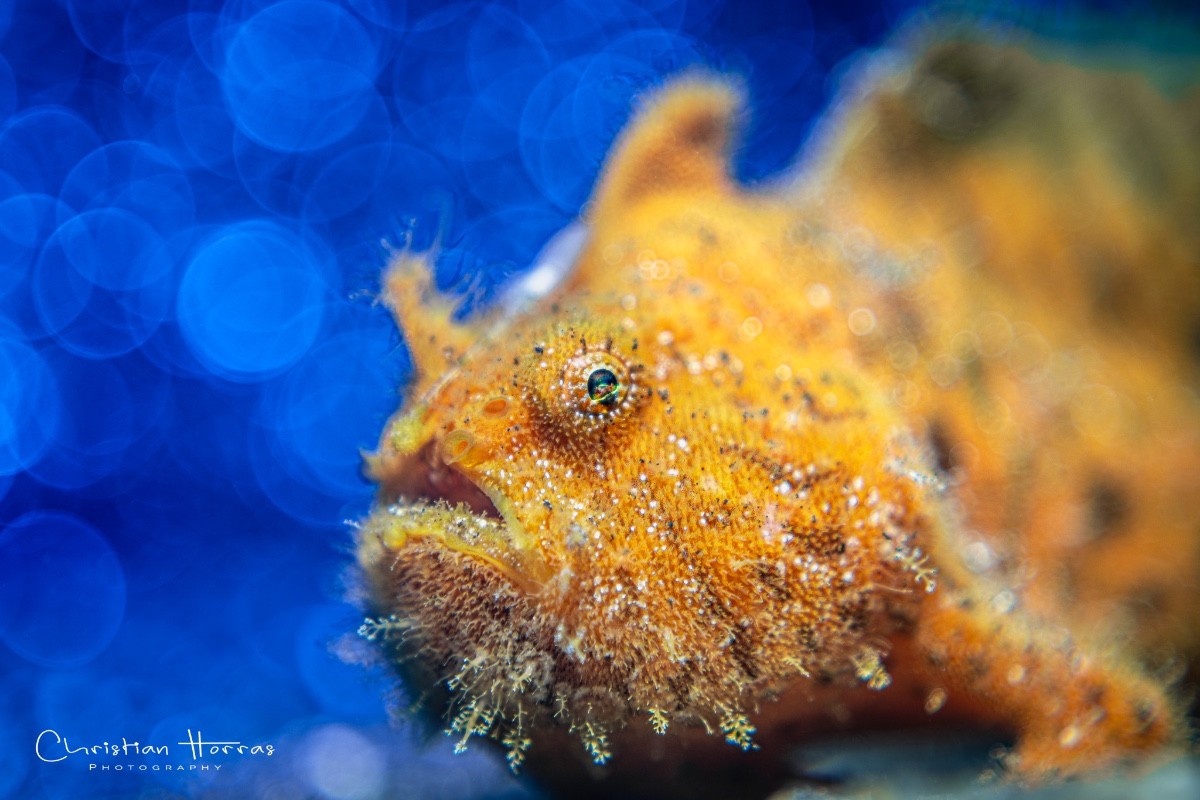
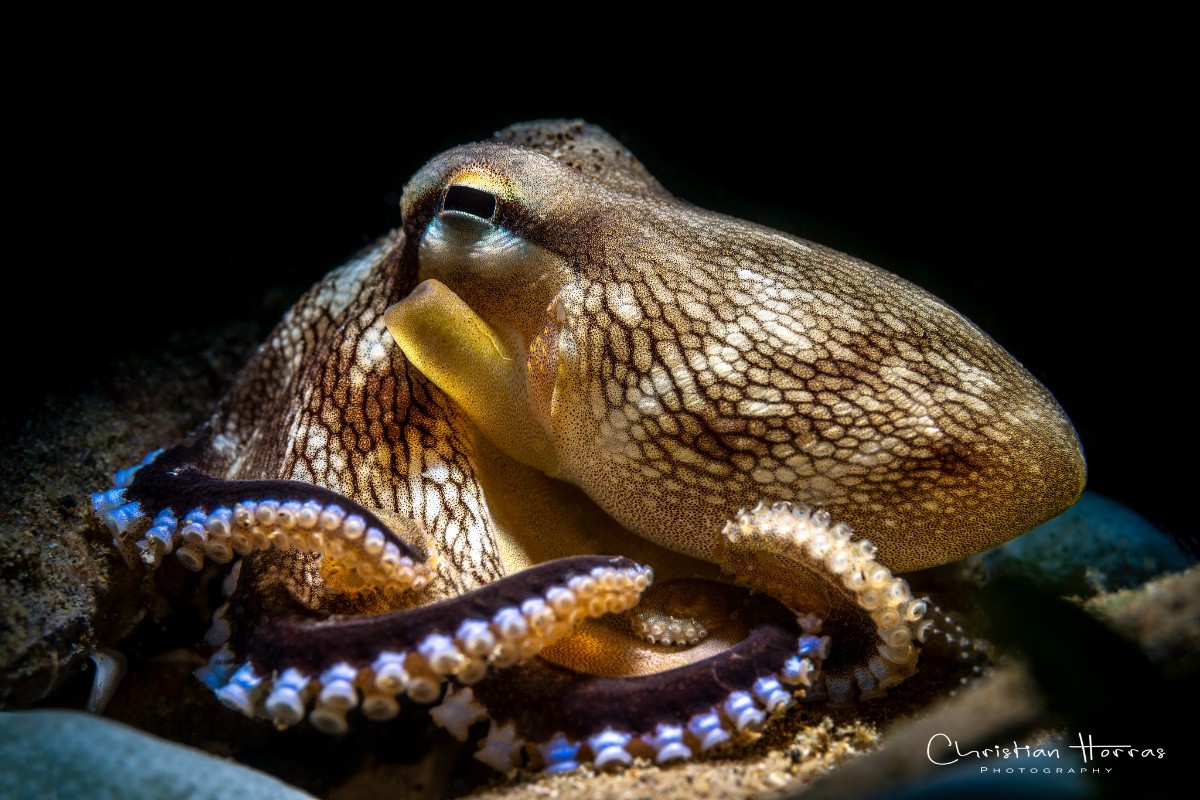
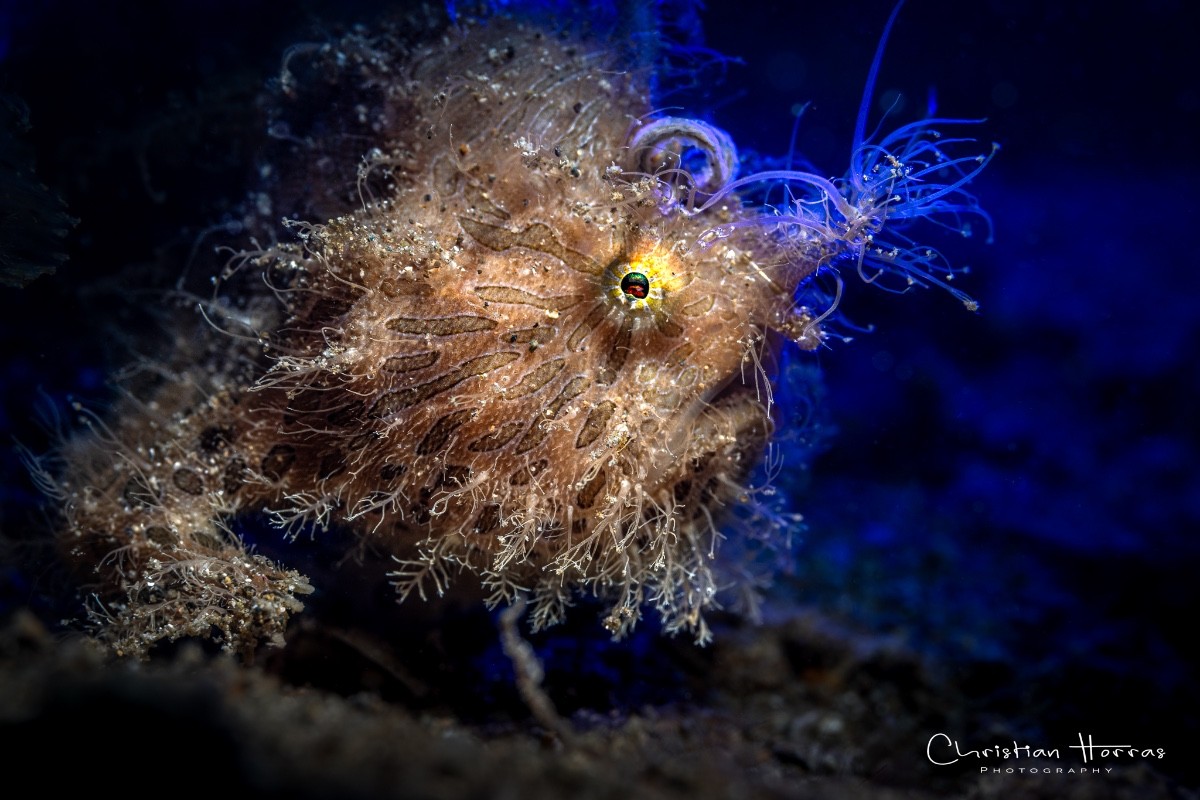
20 pointsA few pictures from my trip to Anilao (Philippines) in September 2024. Unfortunately the weather was very bad and we had high water temperatures, too. So there were not that many critters around as I was used to. Also Blackwater diving was not possible because of the weather. Equipment used: Nikon Z8, Nikon Z 105mm Macro, Nikon 8-15mm Fisheye with 1.4TC (first picture); Trioplan Copy (last picture) Seacam Housing, Seacam D150 Strobes, Retra Snoot
 20 points
 -
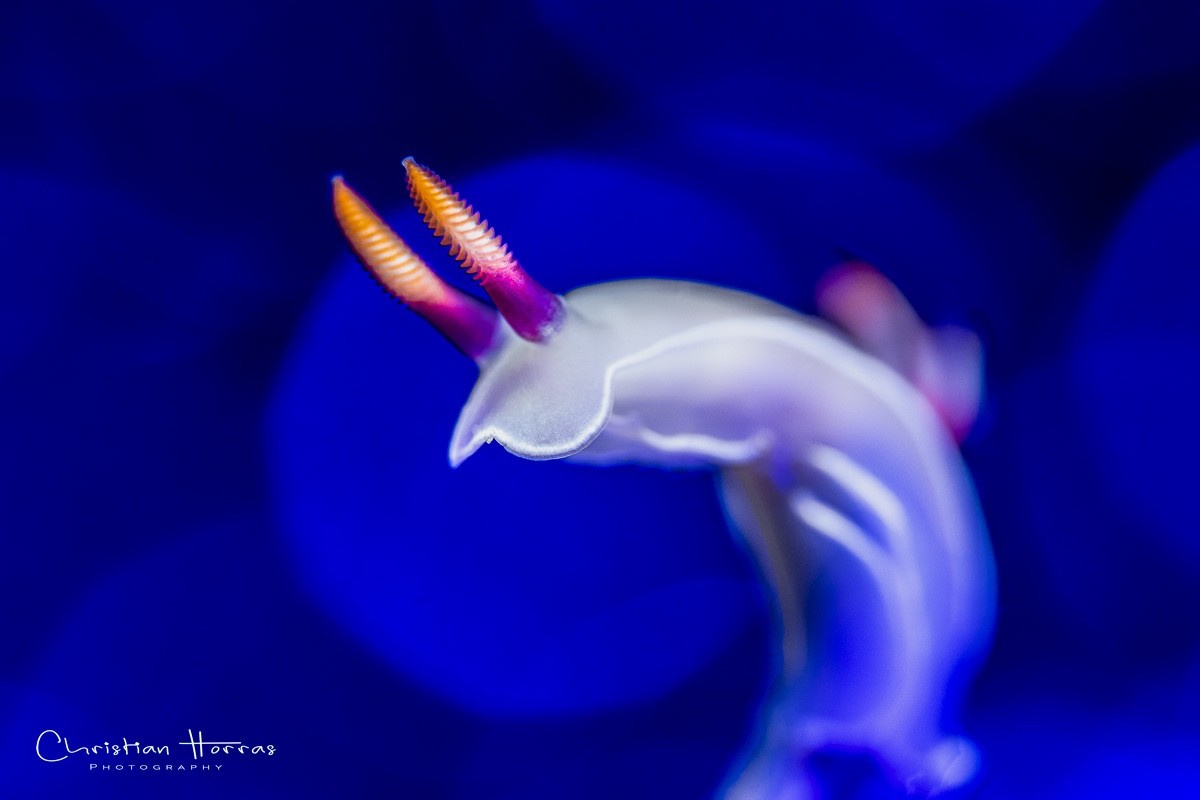
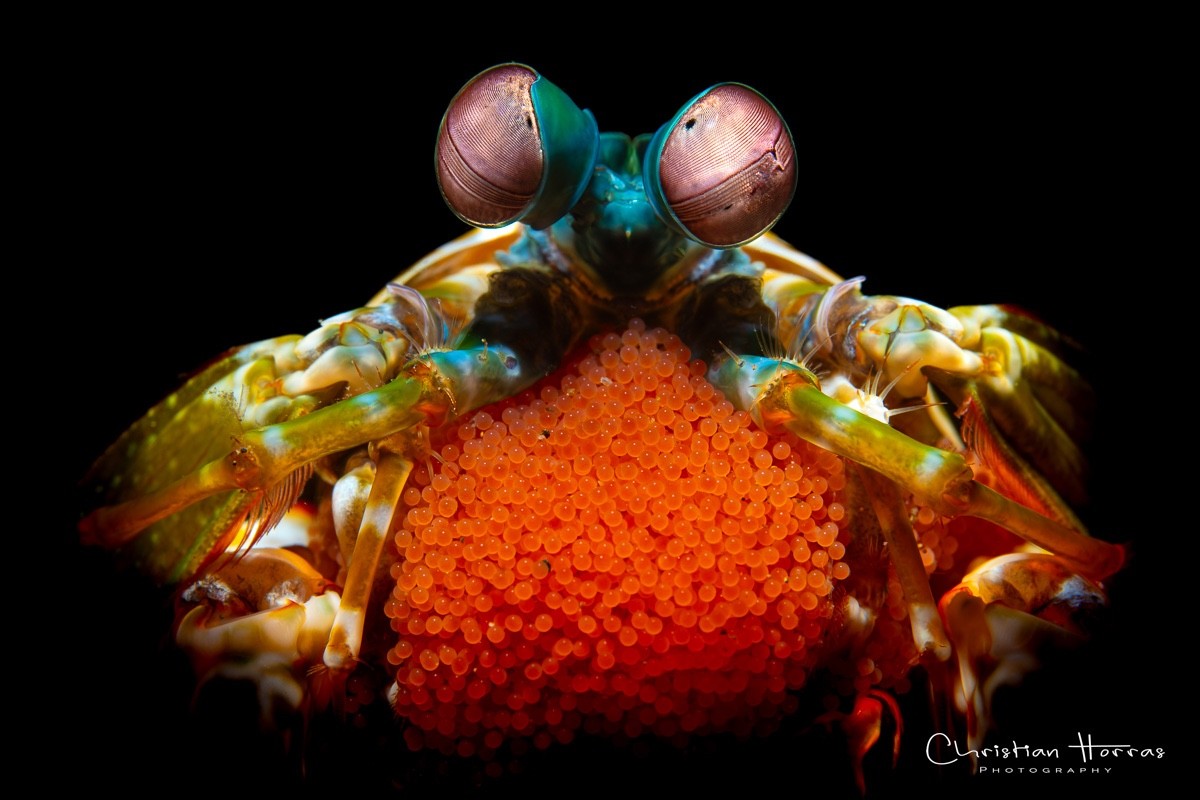
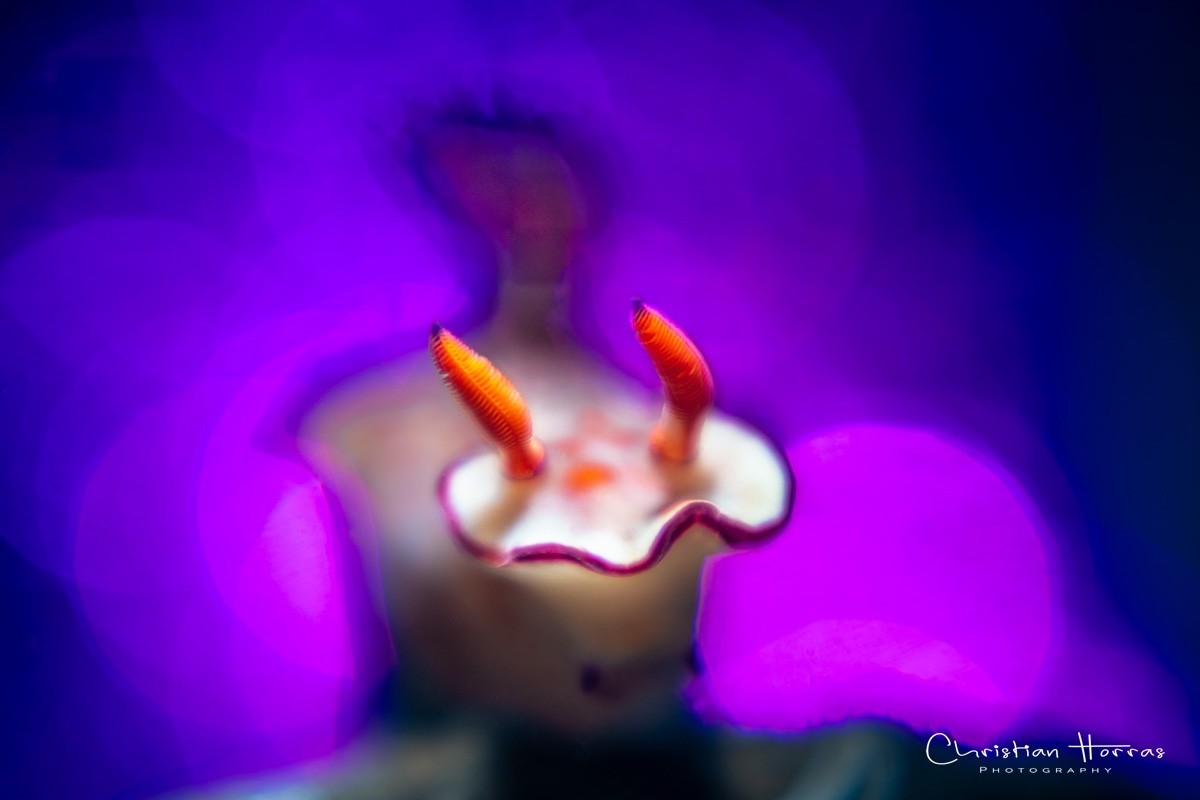
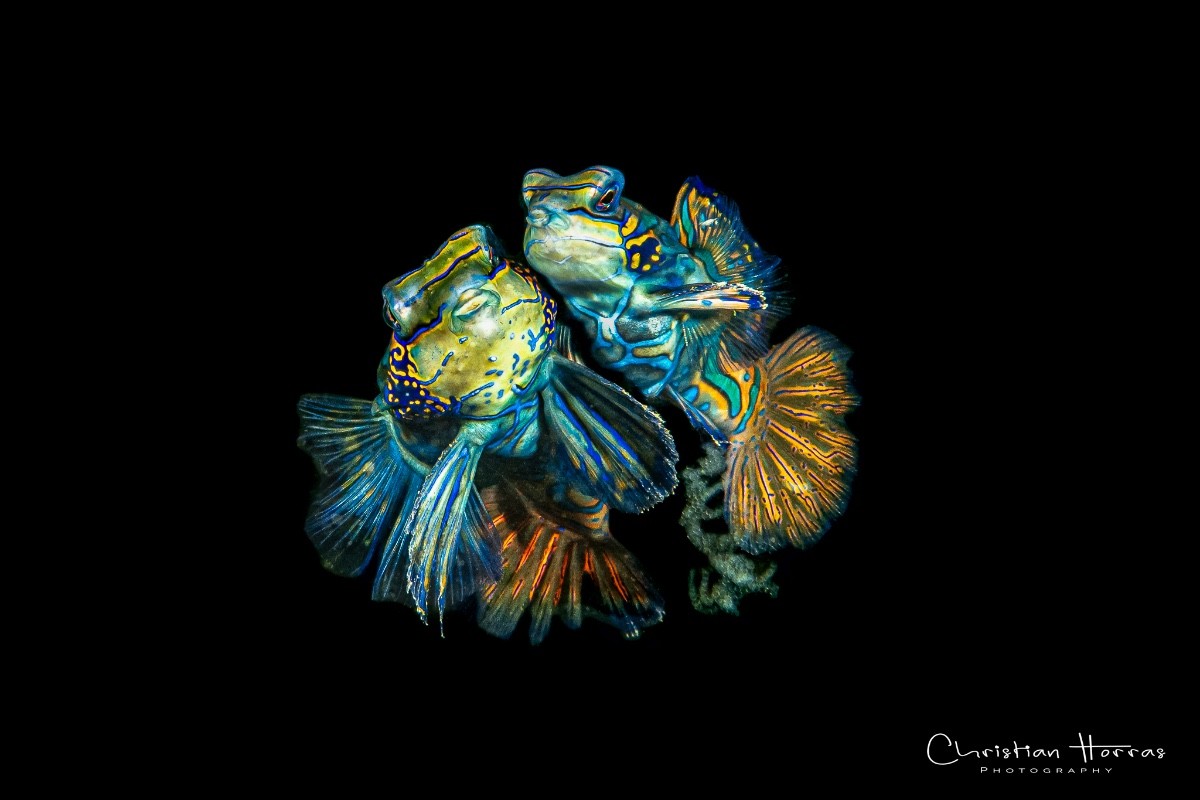
20 pointsA few more shots from my first trip to Bangka and Lembeh, including my first Mandarin diver ever 😬 Equipment used: Nikon Z8, Seacam Housing, Seacam strobes, Retra snoot
 20 points
 -
17 points
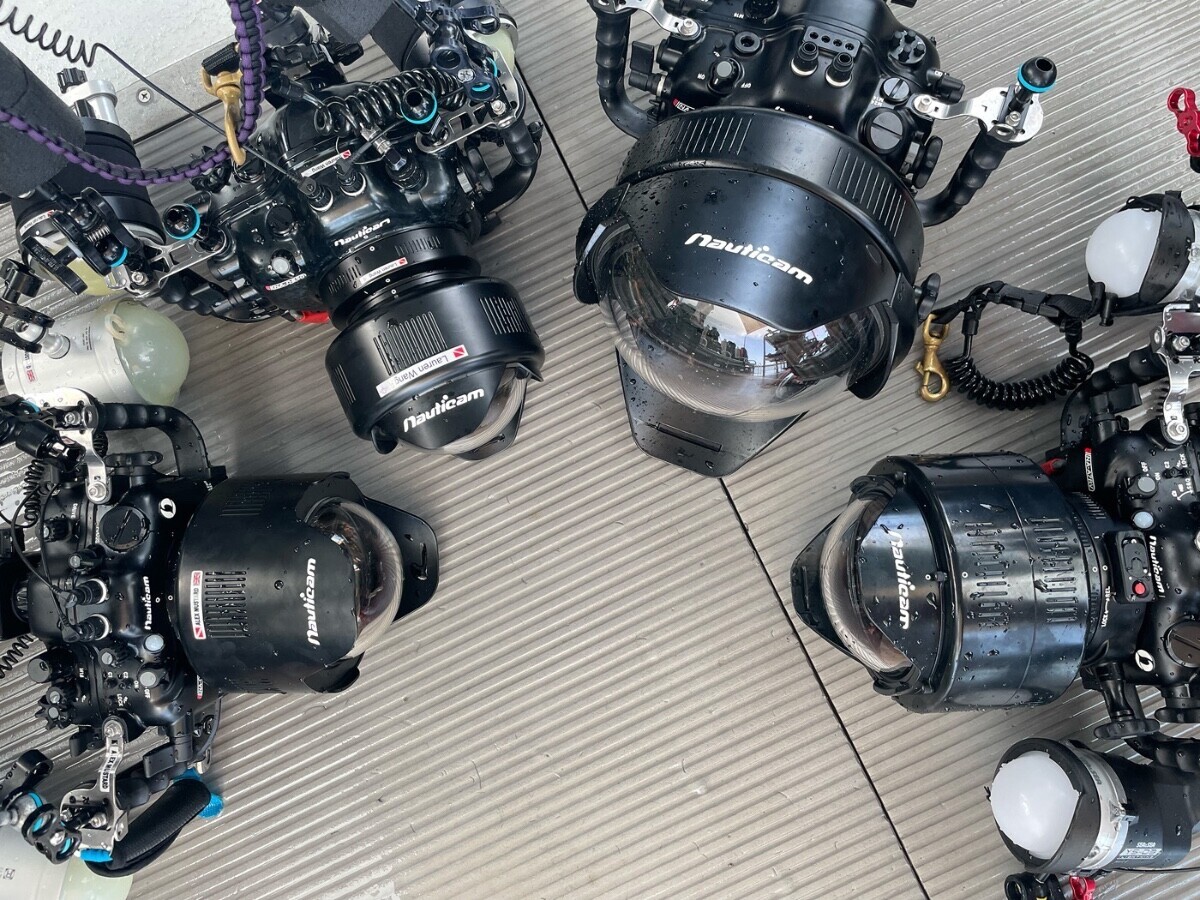 Last year I decided to go big - switching from the tiny RX100 to FF (FullFormat). In my case, it was the A7IV as the best value for money. But having made the decision on the camera model is only one step - lens, housing and port is much more difficult. But with the support of the nice guys here and the old forum, I am now the happy owner of a sleek combination that is tailored to my needs. But how do you know what you need? This article might help. The most common type of camera used by underwater photographers is one that is inserted with lens into a housing and has either a flat (flat port) or curved (dome port) front glass at the port. Even in the days of analogue photography with the Nikonos system, for example, water contact lenses were developed that explicitly take into account the refraction of light at the water-to-glass contact surface. This reduces distortions that would otherwise occur when light hits the port at an angle and cause blurring at the edges. Nauticam has therefore developed some different types of water contact optics that evolved and serve different purposes. FCP (Fisheye Conversion Port) and WACP (Wide Angle Conversion Port) are "dry" optics designed to turn a mid-range zoom lens on the camera into a wide-angle zoom when the combination is taken under the surface. WWL (Wet Wide Lens) is the older version, somewhat less compact and made of more components, wet lens, but otherwise very similar to WACP. EMWL (Extended Macro Wide Lens) takes a different approach: different underwater lenses are placed in front of a macro lens and a flat port in order to be able to adjust on different subjects - from macro to large fish. First and newest: FCP Picture courtesly provided by Alex Mustard A dry lens that is attached directly to the housing with the appropriate (depending on the camera and lens) port extensions. In concrete terms, you can imagine the FCP as an ultra-wide-angle lens for underwater use. A lens such as the Sony 28-60, Canon 24-50 or Nikon 24-50 is attached to the camera and the FCP is mounted on the housing. This achieves a maximum field of view of 175° - a real fisheye. In the zoom position, the field of view is still 85°, i.e. still quite wide-angle, comparable to a 24mm lens over water. Next WACP: Still new, especially the WACP-C The WACP ports with the endings -C for compact, -1 for the "normal" variant and -2 for the maximum variant are not quite as extreme. Also "dry" optics - see above. They are intended to cover a field of view of approx. 70°-130° - i.e. comparable to a lens with a normal focal length (approx. 30mm) to a slight fisheye wide angle (11mm). On the camera, the WACP-C and WACP-1 require similar lenses as for the FCP (for example Sony 28-60, Canon 24-50 or Nikon 24-50), but the largest variant requires a wider-angle lens such as 14-30mm to achieve the same field of view. These water contact lenses are quite bulky and heavy (WACP-C: 2.3kg, WACP-1: 3.9kg, WACP-2: 7.0kg) and offer better sharpness than dome ports, especially at the edges, but above all they provide a wide zoom range under water and focus even directly at the glass. The WACP-C, although labelled as a compact version, also fits some of the full-frame cameras and is the most suitable solution for me personally. WWL-1(B): AFAIK the two WWL ports (WWL-1 and the newer WWL-1B) are the predecessors of the WACP ports. The area of use is the same as with WACP: field of view approx. 70-130°, i.e. wide normal focal length to slightly ultra-wide angle/fisheye when using zoom lenses with a focal length range of approx. 25-60mm. The difference to the WACP solutions is the technical design. With WWL, you have a compact plan port on the housing and the WWL is mounted wet, i.e. with water between the front glass of the port and the WWL lens. Advantage over the WACP solutions: lighter overall, and you can remove the WWL under water and then have a lightweight telephoto lens (...no one ever does...). Disadvantage: The telephoto lens is rarely needed and air bubbles between the port and the WWL can be annoying. EMWL: One size matters fits all The EMWL wants to be and can be an "all in one": The basic here is that an 90 mm macro lens is mounted on the camera and the corresponding port with flat glass at the front (flat port) is mounted on the underwater housing. A close-up lens (e.g. SMC-1) for magnification or the EMWL can be used on a flip port. The EMWL consists of two or three elements: The focusing unit, which is available in variants for Nikon, Canon and Sony, is located directly in front of the macro port An optional extension piece (relay lens) then follows, which turns the image upside down and brings the front glass closer to the subject The actual lens, which is available in 160°, 130°, 100° and 60° angle of view versions, is located at the top. The 130° lens is particularly popular and is ideal for CFWA, but also for large fish or panoramic images. In contrast to FCP and WACP, the EMWL is a wet lens, so there is water between the port glass and the focussing unit, but also between the relay lens and the objective lens. Image quality is high in every direction but bubbles between the parts can be annoying and there have been issues about focus breathing. The main areas of application are thus: FCP: Fisheye wide-angle zoom, medium volume, compact WACP: Wide-angle zoom, medium to large volume depending on version WWL: Comparable to WACP, Lighter and slightly cheaper, but with technical disadvantages EMWL: fixed focal lengths that can be changed under water, somehow bulky, objectionable appearance To show the differences in size and appearance here a pic from Alex Mustard, showing (left to right) FCP (prototype), WACP-C, WACP-2, WACP-1 (Thanks, Alex!) Cost (€)? You have already camera, housing and lens. And focus gear. And port extension. And arms, flashes and so on. Just the port: Rough estimates FCP: EDIT Jan 14th: Now on Nauticam website €6.482,00 (incl. VAT) WACP-C: €2.9k WACP-1: €4.5k WACP-2: €8.2k WWL-1b: €1.9k (with flatport) EMWL: €8.5k (with flatport, 60°, 100°, 130° optics, rely, focusing unit, flip-holder, SMC-1) If I made errors or incorrectness anybody please feel free to add or correct17 points
 -
17 pointsAs the first month of WaterPixels winds down and the New Year approaches, it strikes me how happier and lighter this website feels, especially compared to the way Wetpixel ended for me. I think a lot of this has to do with how Rich, Tim, Chris and Davide have handled the transition, and how the new recruits and refugees from WP have taken this up. I would raise a year end toast to the Mod's and the community. Well done all! Ian17 points
-
I have done multiple wide angle dives in the last few months with the Retra Pro Max, Seacam 160, Backscatter HF-1, Kraken KS160 (and Scubalamp SUPE D-Pro in December). They are all very good strobes. My preference is the Retra, but if I was forced to use one of the others I'd get by fine. I am always interested in testing gear that might expand by capabilities - but I won't test gear that I feel will restrict my photography in any way. I am not interested in wasting my dive time using lesser strobes - but the fact that I have done multiple dives with all of these - is a vote of confidence in them all. The Retra is my favourite because it has the nicest quality of light, lots of power and is two strobes in one (in Lembeh (May) I shot it small with 4 batteries, while in Raja Ampat (March) and Red Sea (June) I shot it with 8. None of the other strobes here are ideal for macro - so you probably need to budget for a second set of something else if you do dedicated macro trips. People make a lot of fuss about 8 AAs, but if you get good, fast chargers - they are super easy to live with and in real world UW photography you are never waiting for them to recycle. The battery life is a big step on from previous Retras. The controls are simple and excellent. Like the Bluetooth updates and I like how you can fix and change aspects of them by connecting to phone. Wished they made a non-TTL model. I own Retra Pro Max, totally reliable. I've not tried their sticky out Lithium battery yet, but I am not planning to get them (but will try some when I have a chance). The first Seacam 160s I tried (borrowed from he who shall not be named of Wetpixel) when they first came out were unreliable - and I didn't like them as a result. But I borrowed Erin's in March and had a very good experience with them. I find the light very, very similar to the Retras, just with slightly more throw and slightly less softness. The light output level is near as damn it the same as the Retras with real subjects. The batteries are nice, but that is a lot of money to pay and you need your own spares if nobody else is shooting these strobes. This is what is best about AAs - you can borrow them from everyone if you have a charging issue/flood etc. The power control was a bit annoying, without a deadstop - so you have to look at the screen all the time to know where they are set, and even worse the smaller increments are indicated by small dots on the screen which are hard to see without looking (closely). Erin's were set to 1/3 stop increments which was also annoying - but I presume this is an option. Anyway, very good strobes, but I wouldn't have them over the Retra even at the same price. Erin's were totally reliable. The Kraken KS-160 has a nice quality of light. But it does not have as much light output as the Retra and and Seacam. I know it has more stated WS-1 than the Retra - but this does not translate to light output. But they are still powerful strobes and capable of rapid firing with the Lithium batteries (although after you've shown off to your buddies - this really has limited uses in normal underwater photography, other than making everyone think you have no sensitivity towards the wellbeing of your subjects). The lithium battery packs are very nice to live with and charge straight from USB-C which is nice. I used them a few months apart, but I felt that the light and power from the "similar" SUPE D-Pro was identical. The SUPE I tried was not reliable and several of the power settings did not work. The Krakens were totally reliable. I think that they are correctly priced versus the Retras - cheaper - but a level below. I like that they are simple with no TTL. The Krakens weak point is ergonomics. The main power knob is in whole stop settings and then your have a turny dial to adjust within stops - I could say more, but this is not nice to use. They are heavy in the water, but have good buoyancy collars. The Backscatter HF-1 does not have the natural quality of light of the strobes above. But boy, does it have a lot of power. And it also has a well judged diffuser (the flat warmest one) that gives it a very decent quality of light, when attached. While still giving out more power than those above. It has excellent battery performance, which means you can shoot all day (not a big deal), but more importantly encourages you to use more of the power, more of the time. If you regularly shoot big animals/pelagics in bright conditions this would be my choice. If you shoot more close focus wide angle then you might favour one of those above with a more pleasing quality of light. The ergonomics are better than the Kraken and Seacam. They are a bit heavy in the water. They were totally reliable on my trip. They also have a video light. They are very attractively priced at present. They are my second favourite here. Alex17 points
-
17 points
-
16 pointsOne of the critters unique to Sydney divesites is the Sydney pygmy pipehorse, they are quite small and cryptic and apparently restricted to the coast south of Sydney NSW. They are so cryptic that it takes real experience to find them and they can "disappear" seconds after you have been shown precisely where one is. Lucky enough to dive recently with a diver who routinely finds up to 40 individuals on a dive at The Steps, right at the entrance to Sydney's Botany Bay and got a lot of photos of individuals with varying colouration. They range in length from 30 to 55mm long and colour varies in shades or reds, pinks, white and green-brown shades. To add to frustrations they sway just a little out sync with the surge and squirm a bit following food items, plus their eyes also swivel rapidly and there's plenty of shots where the pupil can't be seen as it is looking behind.16 points
-
16 pointsI can't decide which is my favourite from these two taken during my trip to Lembeh in July. Both taken with the Nauticam EMWL with 160º objective lens.
 16 points
 -
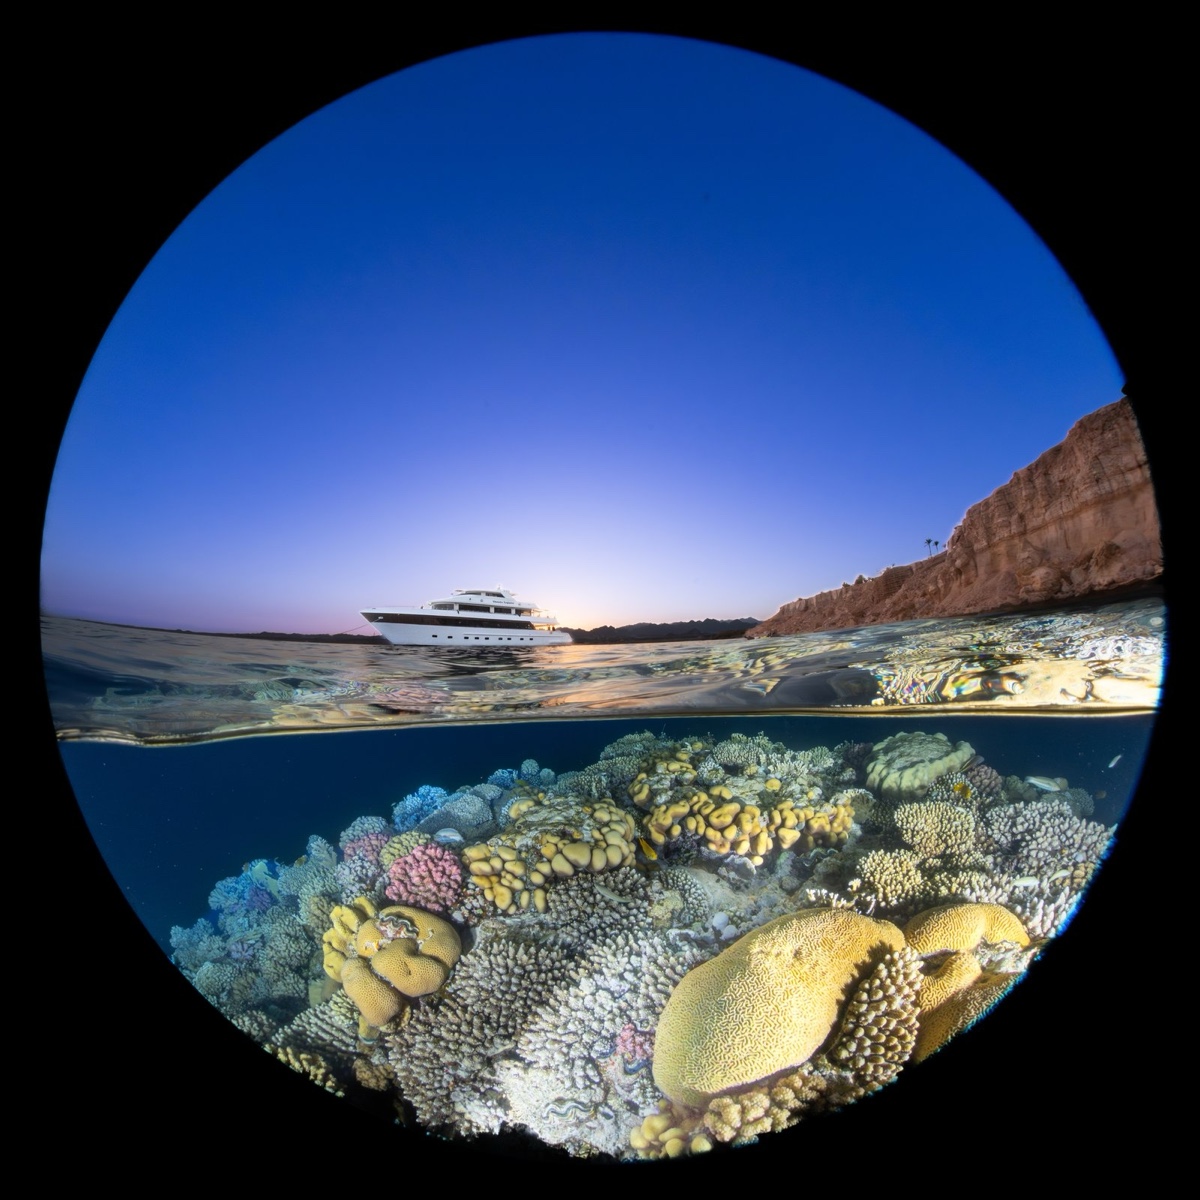
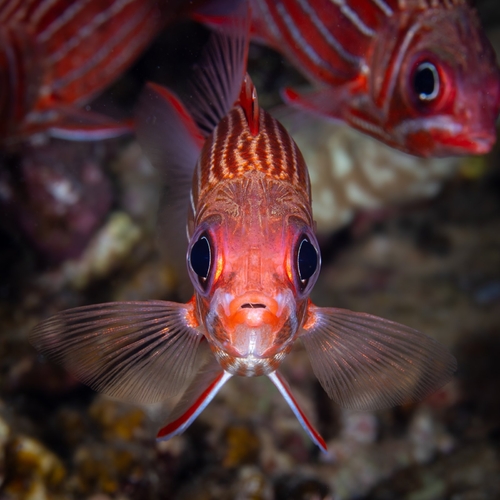
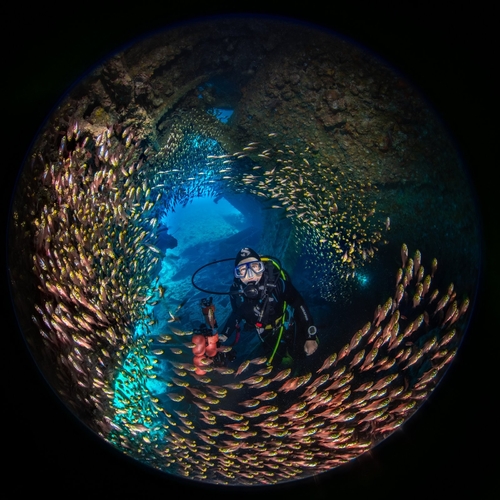
16 pointsBeautiful photos at display here! I just cannot decide wich one I like most, I was so excited with my new camera in 2023 (A7R5). I have to cheat and put in three photos (all made on the Red Sea workshop with Alex in June/July 2023): SS Thistlegorm: practically no current and very good vis allowed to take a panorama from the stern. Canon 8-15mm fisheye @15mm, 1/160s, f/11, ISO 1000, no strobe: And here Lisi in the SS Dunraven, coming towards me and separate the enormous school of glassfishes inside. I love the circular fisheye look and this was such a good occasion. Canon 8-15mm fisheye @8mm, 1/5s, f/13, ISO 500, 2*Z330 strobes: A macro, taken at Gubal island. The big eyes of the squirrelfish make it look like a character from a Japanese cartoon. Sony 90mm macro, 1/200s, f/16, ISO 100, 2*Z330 strobe: And here an extra cheater: MY Ghazala Explorer at sunset near Ras Muhammed. Canon 8-15mm fisheye @8mm, 1/125s, f/22, ISO 800, 2*Z330 strobes: All the best in 2024 too you All and great success to Waterpixel! Wolfgang

 16 points
 -
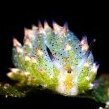
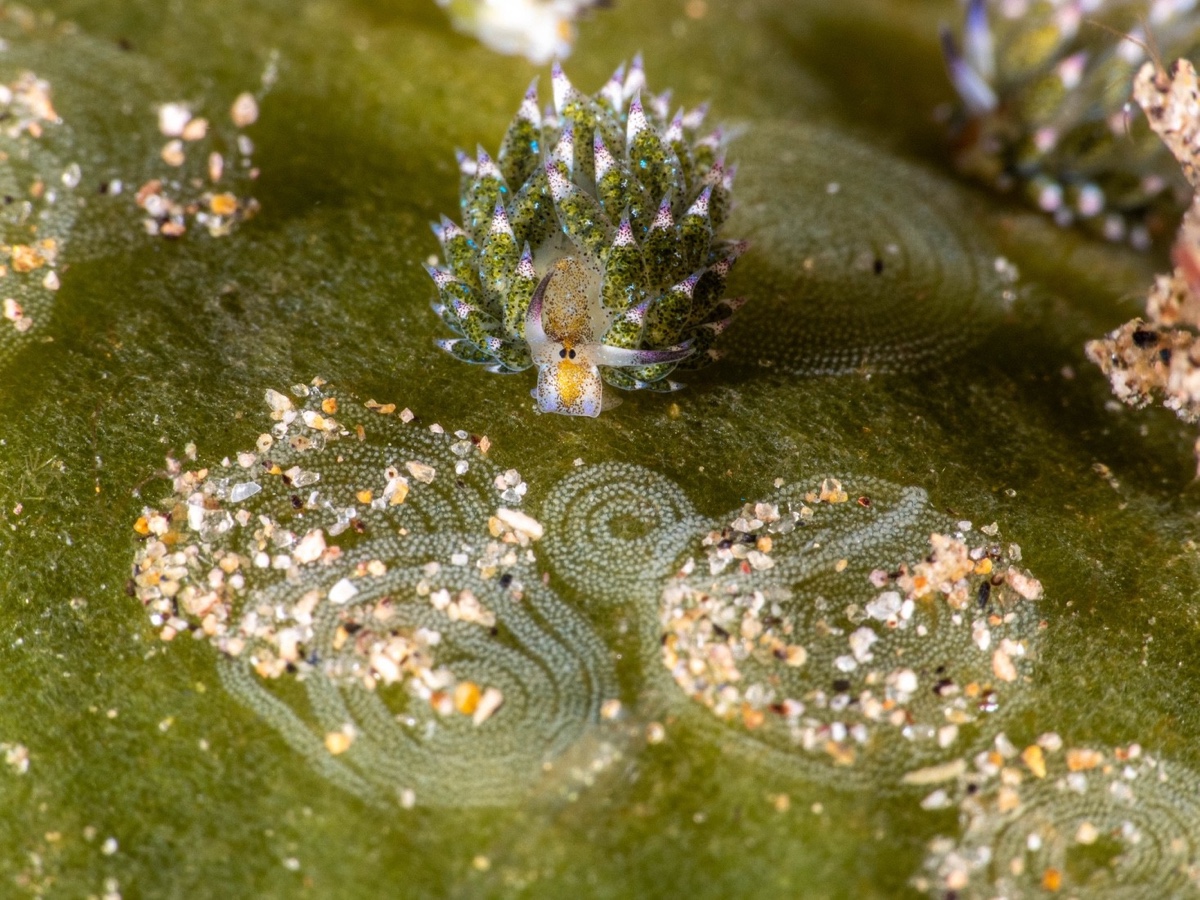
16 pointsWith some coaching from our guide while diving at Atmosphere Resort on the Dauin coast, I was able to spot this Kuro Sapsucking Slug on my own.
 16 points
 -
15 pointsHey everyone, I’m excited to share that I’ll be upgrading our forum software to the latest version soon. This is a major update focused on backend improvements, enhanced security, and overall modernization. While I’m working hard to make the front end as close as possible to what we’re all accustomed to for this initial migration, you will notice some changes. Here’s what to expect: Classic and Modern ThemesThe current look and feel of the forum will be called “WPX Classic” and will remain the default for now. After the migration settles, I’ll introduce a “WPX Modern” theme. You’ll have the option to switch between Classic and Modern based on your preference. Even in the Classic theme, the forum will gain a more modern, functional experience. Key ImprovementsWhile there is an endless list of little things that are improved on the front & back end, here are a few of the key improvments. Mobile: A significantly improved mobile browsing experience and App Setup. Dark Mode: A native dark mode option will be available from launch. My Streams Menu: A customizable view for sorting articles, posts, topics and even tags, moving beyond just showing “Unread All.” Performance Improvements: Along with the software upgrade, I’m also moving the forum to a new server. This upgrade to both the software and hardware should provide noticeable performance improvements. While things have been running pretty well, now is the perfect time to make these enhancements. Future Customization: This upgrade will enable us to introduce and customize future enhancements on both the back end and front end, giving us greater flexibility to adapt and improve over time. Temporary ChangesTags: Tags will be temporarily disabled at launch but will return soon as we digest how to use in the new system. The updated tagging system will be more useful, allowing features like creating streams based on tags and following your preferred tags. The store will not be available initially after the migration. A new store will be launched soon. Downtime InformationThis migration is a large and complex task. I estimate that the forum will be offline for up to 4 hours during the update. I’ll try to keep the site accessible in guest mode during this time, but you won’t be able to log in. Migration TimelineThe update will take place between April 12th and 15th. Once I finalize the exact date and start time, I’ll post an update here. I’ve already done a few dry runs, and I’m confident it should go smoothly. Thank you for your patience and understanding as we work to bring you these exciting updates. I’m confident this upgrade will not only enhance our community now but also set the stage for continued improvements and useful features in the future, providing a more secure and customizable platform for everyone. I think thats it for now.. Stay tuned for more details.15 points
-
Hi, i want to share a video from my latest trip to Greenland with you The professional freediver Anna von Bötticher and I spent a tour in East Greenland and dived unique icebergs. An iceberg was crystal clear and gave a utopian impression underwater. At another iceberg we went into the water right next to a huge iceberg at the narrow gap that is created by the tides. It was great, almost endless visibility and a great atmosphere. Read more in the Youtube description and watch it till the end, its not 2:22 long! Alex.15 points
-
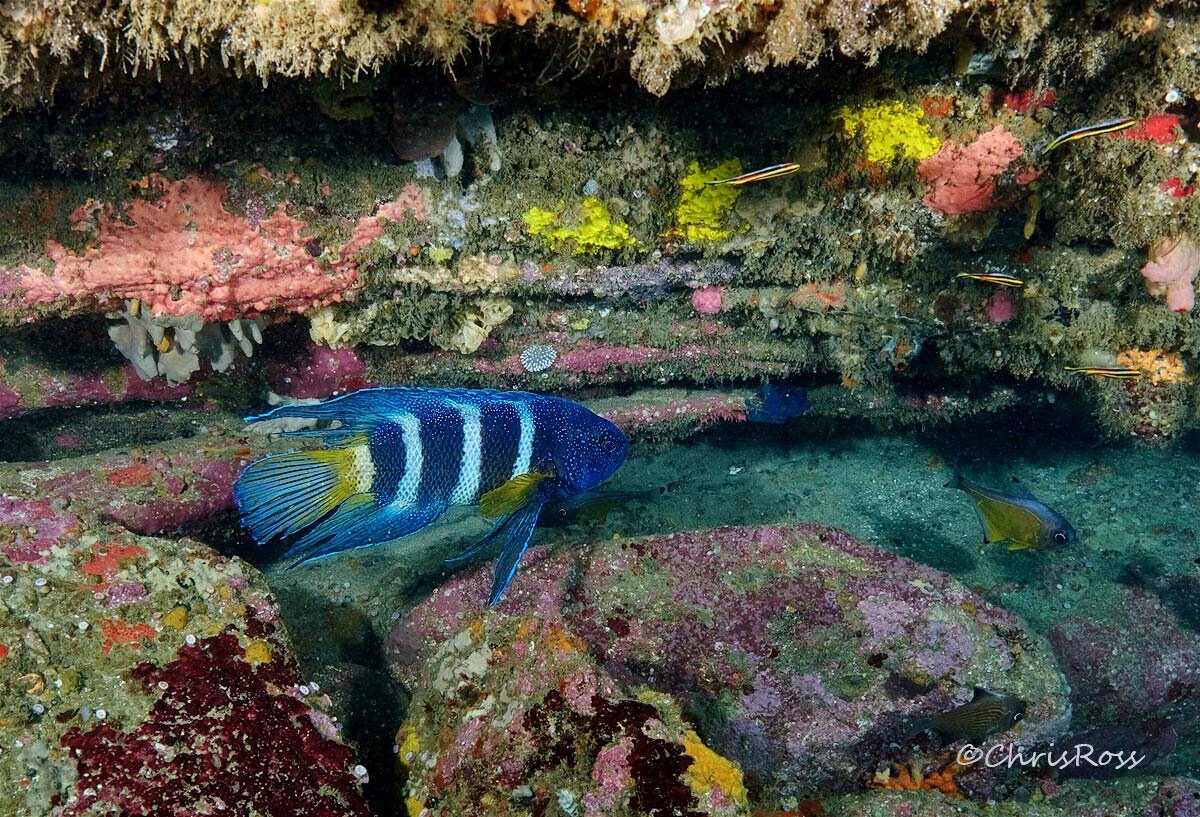
15 pointsWell, just joining, so a little late, but here are some of my faves in the last 2 years, since diving has been minimal for me.
.jpg.133f41c99a8dd3061e308466c118891b.jpg)
 15 points
 -
 We are proud to announce that the winner of the 2025 Australian Geographic Nature Photographer of the Year, Overall category, is our fellow member Ross Gudgeon for his photograph titled "Fractal Forest". Fractal Forest - Macro By Ross Gudgeon, Western Australia From the 2025 Australian Geographic Nature Photographer of the Year announcement: The overall winning shot, Fractal Forest, skews perception and leaves us questioning reality with an inside-out view of a cauliflower soft coral, captured by Western Australian photographer Ross Gudgeon in the Lembeh Strait of North Sulawesi, Indonesia. Our judges remarked that the photograph gives us a unique perspective on coral, with the photographer taking us out of the marine habitat into a whole new world. There’s nothing fake here, but still we ponder, is this nature or a painting? Technical details: Inside-out view of a cauliflower soft coral. Named for its characteristic appearance that resembles a cauliflower, with numerous small, rounded, bump-like polyps that give it a puffy texture. This unique perspective was made possible by the Nauticam EMWL, an underwater version of the probe or insect eye lens. Lembeh Strait, North Sulawesi, Indonesia Sony FE 90mm F2.8 Macro G OSS with Nauticam EMWL wet lens, 1/100, f/9, ISO 400, Sony A7RIV, handheld, 2 x Retra Pro flashes. Here the competition winners announcement: Australian Geographic Nature Photographer of the YearEntries for the 2020 Australian Geographic Nature Photographer of the Year are now closed14 points
 -
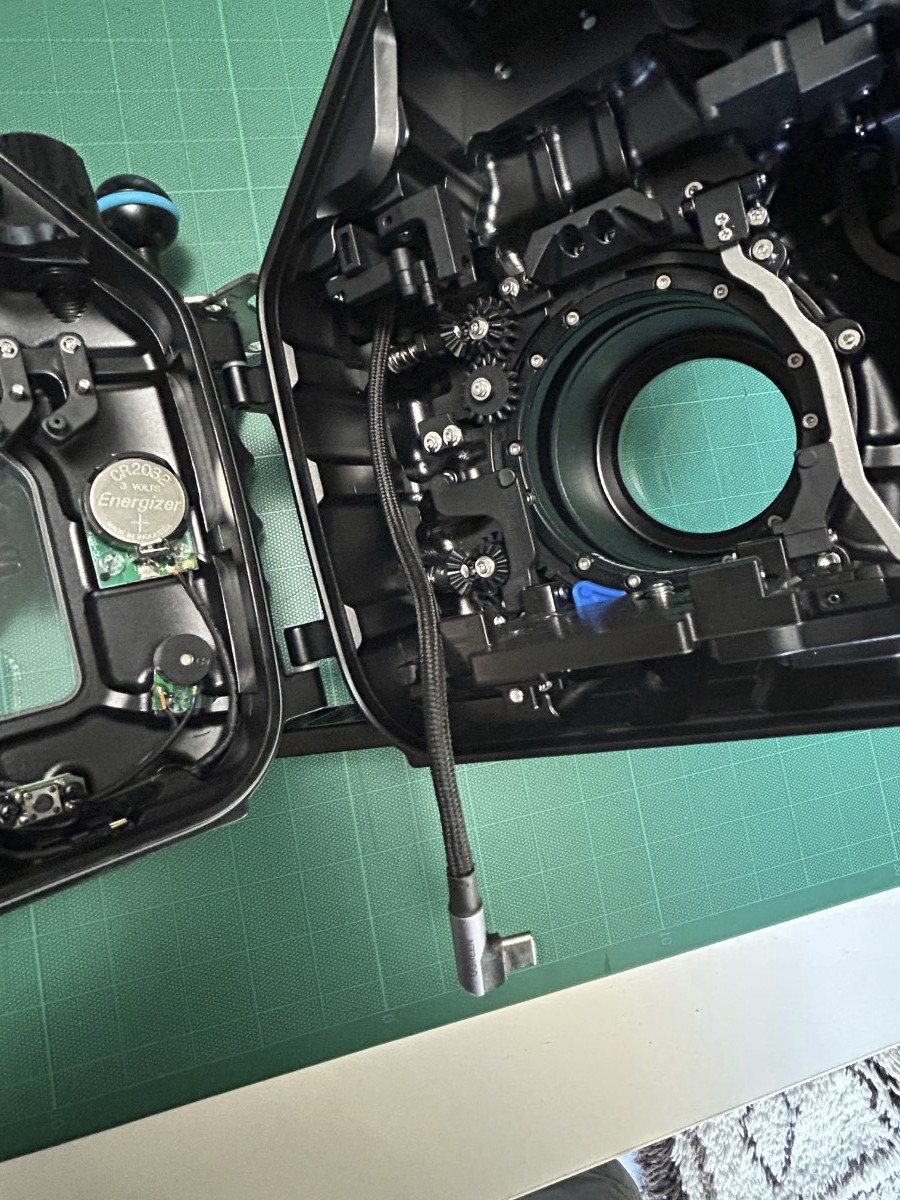
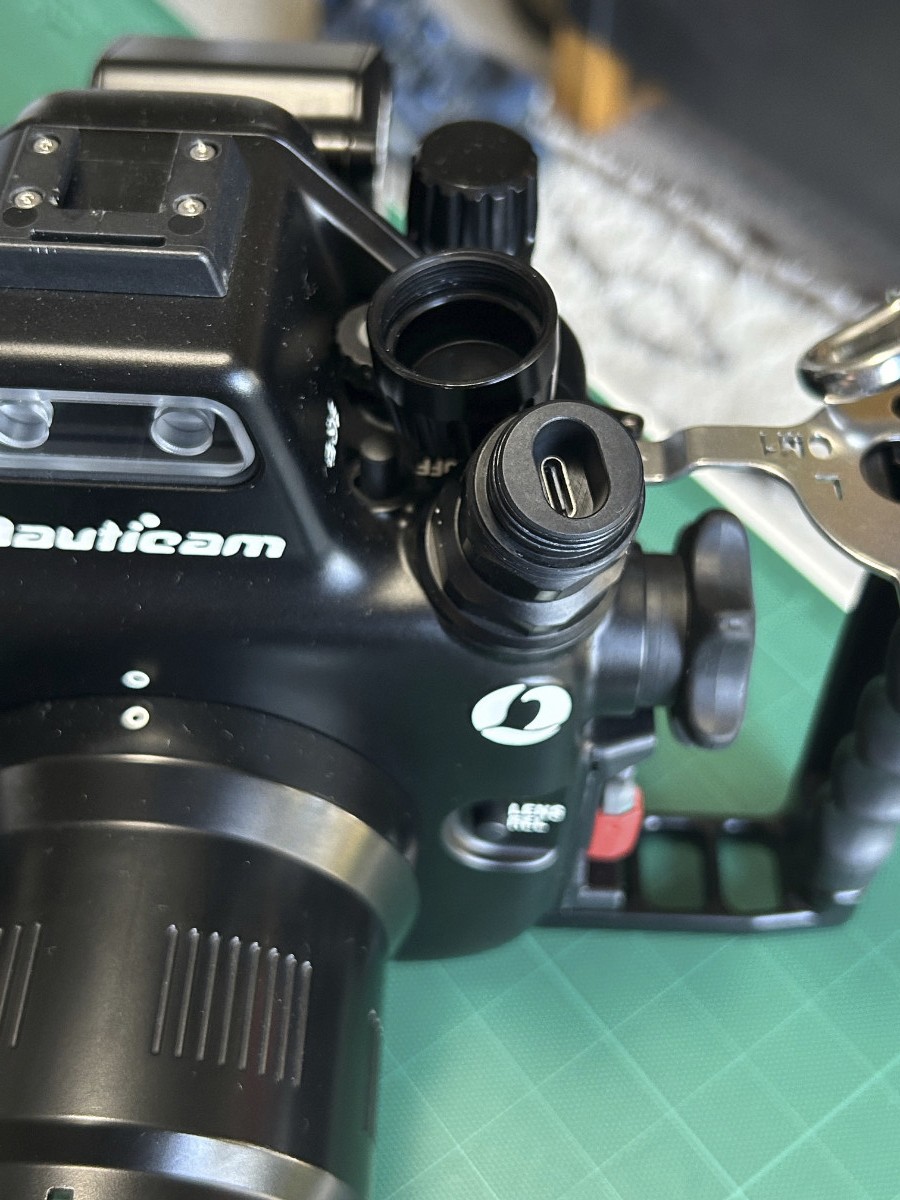
14 pointsBefore my most recent trip last year I purchased the Nauticam USB-C bulkhead for my OM-1 housing which uses the M24 bulkhead on the housing. The setup consists of an M16 bulkhead and a specific M24-M16 adapter that is machined so that the right angle USB plug will fit through. In summary it works as advertised, I can charge the camera without breaking the vacuum and also download images. Download is a little slow compared to using a card reader it seems the limit is set by the camera interface. I achieved around 28 Mb/sec, while I can achieve 150 Mb/sec with my card reader. Battery charging seems to be about the same as plugging the camera directly into a charger. I got the bulkhead as I shoot the Canon 8-15 with metabones adapter, which requires placing the camera in the housing then assembling the lens from the front placing the dome over the installed lens. This takes some time to pull apart and re-assemble, so being able to charge and download without opening is one less thing I need to deal with each evening after diving. Here is a couple of photos of the bulkhead installed, it seems to be a high quality cable. and externally the bulkhead uses a sealed cap similar to a vacuum valve to protect the USB terminal inside. It is sealed so holds a vacuum if the cap is removed. Overall I'm happy with it as it does what it's meant to do.
 14 points
 -
14 points
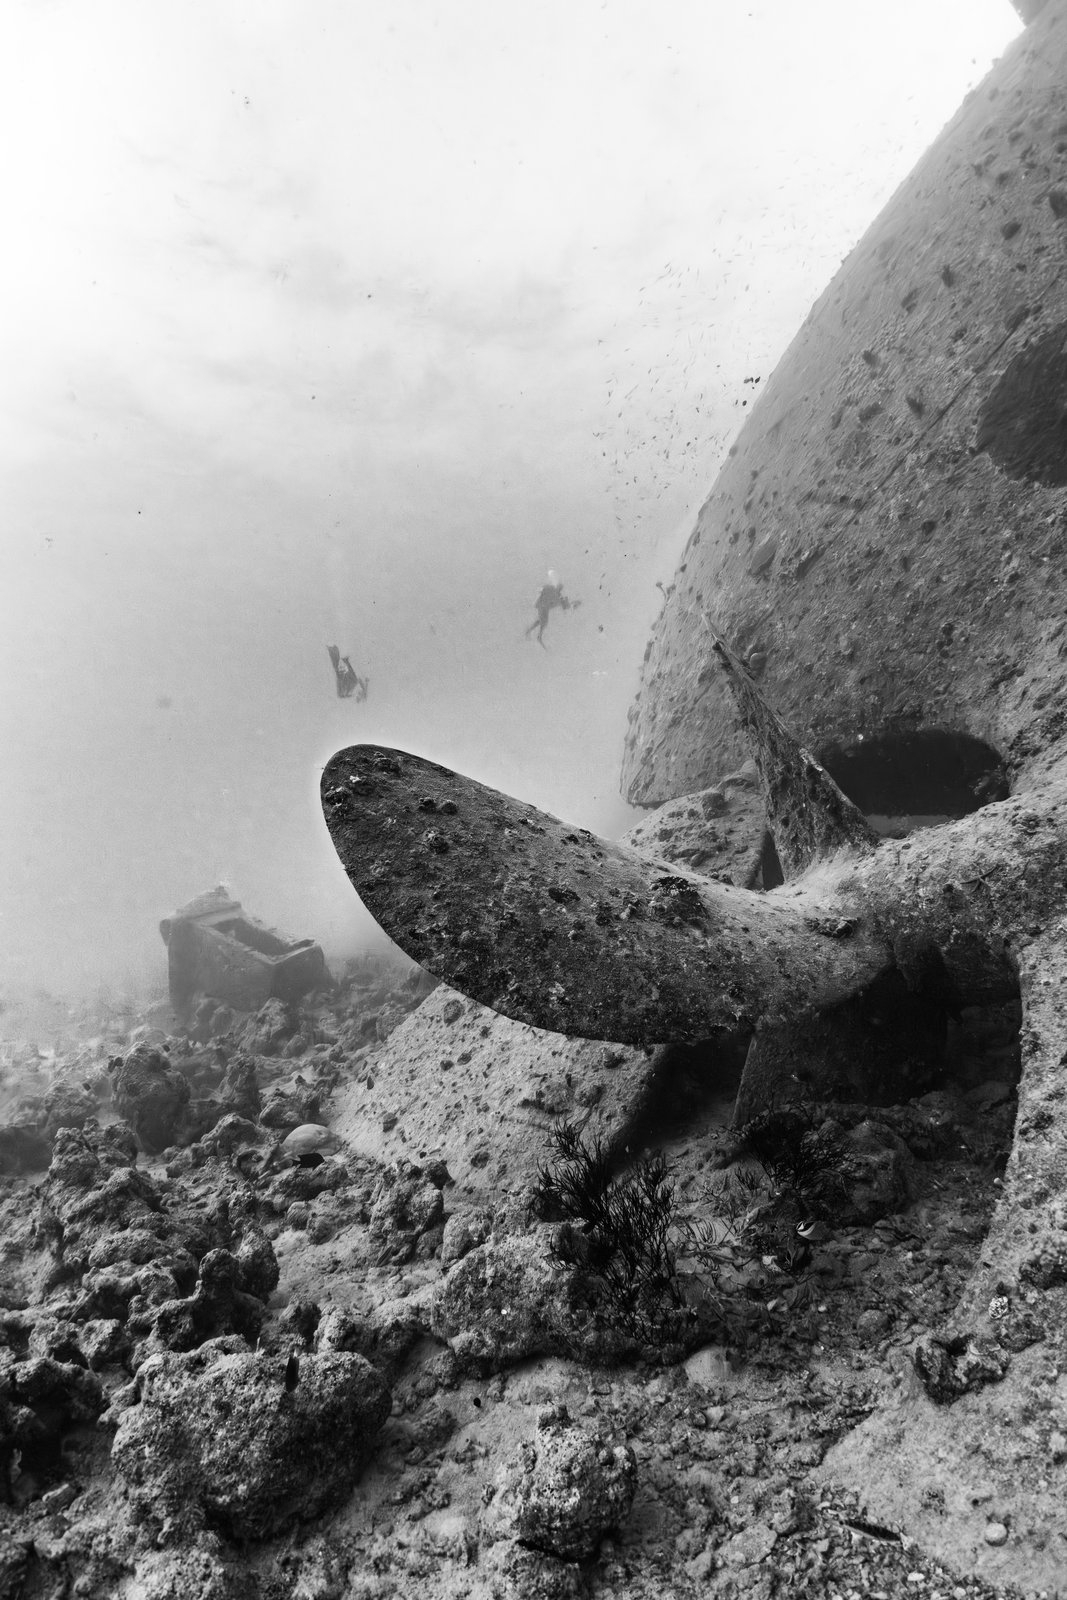
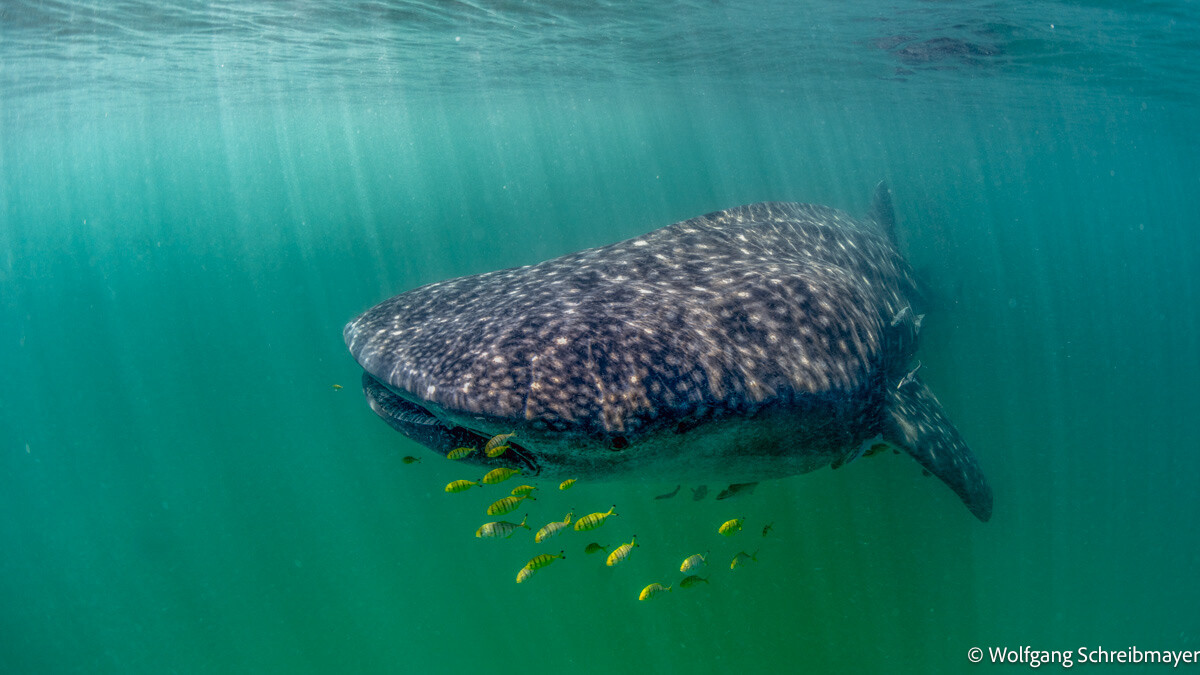 Mafia Island is located in the Indian Ocean, off the East African coast of Tanzania. I learned about Mafia Island from reports of several scubadivers in internet platforms, who consider it an “insider tip”. In November/December 2024 three divers (Lisi, Franz and me) set out towards Mafia in order to experience firsthand the diving and possibilities for UW-photographers. Mafia Island is not difficult to reach via international flights from Vienna/Austria to Dar es Salaam/Tanzania. From there, the travel continues with a short 30’ flight via domestic airline. The airport in Kilindoni, the largest village of the island, is small and, accordingly, the airplanes are small too (the photo shows the main building of the airport and, to the left, the nose of the aircraft that brought us there). By default, only 15kg of luggage, including the cabine luggage, are allowed in the small aircraft. It is very positive to note, that one can book extra luggage in advance by EMail with the domestic “Coastal Airline” (https://coastal.co.tz/), in order to avoid unpleasant surprises when arriving with masses of unannounced luggage. This way, our extensive diving and photo equipment was “nullo problemo” (in order to avoid overload of the aircraft, we had to book an extra seat in advance, that remained empty). There are several resorts located on Mafia Island, but only a single one, “Big Blue Mafia Island Diving Centre” (https://bigblumafia.com/) is perfectly positioned within the Mafia Island Marine Park, where most of the diving spots are located (the marinepark fee, that has to be paid for every single day of the stay once upon entrance, is worth every single cent). This resort is owned and managed by Maura, an Italian, who is the friendly contact person for booking and payment. She is married to a local diving instructor, native to the island, who runs the diving base (their son is working as diving guide, one can say it is a true family enterprise; also the other instructors, guides and employees contributed to a very pleasant stay including safe and wonderful diving). Accommodation is simple, but corresponds to western standards, comprising tasty half (or, when required, full) board and aircondition. Cleaning and freeing the huts from mosquitoes with pesticides is done twice per day. At this point it is appropriate to mention that effective repellants and malaria prophylaxis are strongly recommended by our Austrian tropical medicine specialists. Diving is done using Dhow style boats, that provide plenty of space for the few divers. They are made from heavy tropical woods and are powered by an outboard engine. When winds allow, the boats are also able to sail along silently and swiftly. Chole Bay is the heart of the natural reserve and accordingly most diving spots are located within the bay. Depending on weather, diving spots outside the bay can be dived also. Since the tidal range within Chole Bay is substantial, departure times for the two-tank boat dives are dominated by the tide, are highly variable from day to day and were between 05:00 AM and 14:30 PM during the two weeks of our stay. Despite careful consideration of tidal times, substantial currents are possible. At low tide the visibility within the bay can be pretty modest (as low as 4-5m), but at high tide and also outside the bay it can be remarkably good (up to 30m). Taken together, the diving conditions are certainly not easy for UW-photographers. This is more than compensated by outstanding biodiversity and abundance of species that guarantee the presence of great motifs in high number, rewarding those that take up the challenge. School of common blue-striped snappers (Lutjanus kasmira), outside Chole Bay. Sony A7R5, WACP-C, Sony 28-60mm @28mm, 1/160s, f/10, ISO 100, 2* HF-1 (4500K diffusers): Also inside Chole Bay, the quality of hard coral is good. Sony A7R5, Canon 8-15mm @15mm, 1/100s, f/10, ISO 100, 2* HF-1 (4500K diffusers): Attracted by me, since I was using the macro setup (when I was equipped with the fisheye lens, mating Nembrothas were almost guaranteed), a giant Potato Grouper (Epinephelus tukula) shows up inside the bay. Sony A7R5, Sony 90mm macro, 1/200s, f/9, ISO 100, 2* HF-1 (4500K diffusers): The diving comprises plenty of motifs for wideangle photography, but Chole Bay can be regarded as a true macro destination for UW-photographers as well: Numerous nudibranch species can be encountered around Chole Bay. Noteworthy to state, our stay coincided with the mating season of the Golden Nembrotha (Nembrotha aurea). These seaslugs are hermaphrodites and mating takes place by connecting the sexual organs, located on the right side of the body, with each other in order to transfer the sperm. Sony A7R5, Sony 90mm macro, SMC-1, 1/250s, f/14, ISO 100, 2* HF-1 (4500K diffusers): Blue Pseudoceros flatworm (Pseudoceros bifurcus) moves leisurely over hard coral. Sony A7R5, Sony 90mm macro, SMC-1, 1/200s, f/14, ISO 100, 2* HF-1 (4500K diffusers): Shrimp city is a coral block located inside Chole Bay that is not only populated by countless camel shrimps (Rhynchocinetes durbanensis), but also glassfish, damselfish, anthias, muray eels and groupers. Sony A7R5, Sony 90mm macro, 1/250s, f/13, ISO 100, 2* HF-1 (4500K diffusers): Longnose Hawkfish (Oxycirrhites typus) sitting on black coral. Sony A7R5, Sony 90mm macro, 1/200s, f/13, ISO 100, 2* HF-1 (4500K diffusers): Reef octopus (Octopus cyaneus) peeks out curiously from its shelter. Sony A7R5, Sony 90mm macro, 1/200s, f/18, ISO 100, 2* HF-1 (4500K diffusers): A report about diving at Mafia Island cannot be complete without whale sharks (Rhincodon typus). Outside the marinepark, between the African eastcoast, where the impressive Rufiji river ends up in the Indian Ocean, and the west coast of Mafia Island, the Mafia channel is formed. The high input of biomass from the Rufiji river delta causes plankton to bloom within this strait. This results not only in poor visibility (6-10m; and hence (again) challenging conditions for UW-photography), but, at certain times of the year, whale sharks gather for feeding. Snorkeling excursions by boat are offered and we were able to spot up to 15 different whale sharks on a single day (including a touching encounter with a female shark, closely accompanied by her half-grown up offspring). Whaleshark feeding on krill. Sony A7R5, WACP-C, Sony 28-60mm @31mm, 1/200s, f/7.1, ISO 200: Whaleshark fading away into the blue. Sony A7R5, Canon 8-15mm @15mm, 1/250s, f/6.3, ISO 250: It was an unforgettable diving trip and fond memories will endure. We already have booked flights and resort for another two weeks in November 2025, in order to visit again this little paradise… 😊14 points
 -
14 pointsNo idea. The normal rule in underwater photography is think of the maximum amount you can possibly justify or afford and then double it!14 points
-
14 pointsHi, i went back to Malapascua Island after 17 years to see Tresher sharks. We saw up to 8 Tresher sharks cruising together in one spot. Luckily i spent 2 weeks in Malapascua, (compared to most other divers who stay only 2 or 3 days), because the viz varied from 25 to bad days 10-12 meters. Afterwards i visited Moalboal to get some Sardine school shots. Enjoy watching! Alex.14 points
-
14 points
 Negative Space The two main tips on starting underwater photography are Get Close and Shoot Upwards. The idea being that the closer you get, the less the water interferes with the image. By shooting upwards there is a better chance of increasing the impact of subject by separating it from a messy background. Those two elements of guidance, especially the latter, can go a long way to improving image-making. But there comes a point for many underwater photographers where images become all a bit routine - yet another fish portrait? A FRESH APPROACH I hit this plateau some years back whilst running a dive resort in the Lembeh Straits. Just how many xxxxfish/seahorse shots could I take? I wanted fresh ideas. A fresh approach. I wanted to create something that wasn’t a fish portrait. A resort guest, a very talented underwater photographer, pointed me in the direction of using “negative space”. What? Negative space is “a term used in art to describe the space surrounding a subject. Also called white space, it is typically empty and lacks details as to simplify an image. Negative space surrounds positive space in a work of art”. “Typically empty” and “lacks details” are the key elements. A blank canvas. So how do you find or create “negative space”? A very simple example: if you shoot upwards, into the blue, you have lots of negative space - the whole ocean. Lighting can be tricky but is manageable. SEARCHING FOR NEGATIVE SPACE How about searching for a piece of coral that produces effectively a blank canvas? Corals can come in all sorts of interesting colours, shapes and sizes: think, for example, of Elephant Ear corals with their vibrant orange colour. A blank, orange canvas. Then see what lives there, what lies there, what might come on to that canvas and create a visually striking image against the negative space. What about a colourless rock? Or one covered in red algae? With this technique, you think about the dive in a different way and new ideas emerge: graphical images, images of perhaps only one or two strong and contrasting colours or shapes. The fish portrait starts to disappear and the image becomes one of lines, colours and contrasts. The subject might become an accessory to a strong visual impression. Try a dive where, instead of going hunting for a subject, you go hunting for a good negative space, a canvas, and see what might be there or, with patience, what might show up. Take some time to weigh-up the canvas: angles, colours, contrasts…. you might end up spending the whole dive in only one or two spots. CREATING NEGATIVE SPACE Inevitably though some dives sites just don’t offer negative space. So create your own. There are several ways. Using the widest aperture setting, so reducing depth of field, can turn a fussy background into a creamy, indistinguishable canvas. This is using the “bokeh” effect beloved of portrait photographers. This works very well if shooting low and upwards. (I can recommend 45-degree viewfinder for this!) and for subjects that are parallel to the camera sensor rather than being at right angles. Or the opposite: a fast shutter speed will reduce the amount of light the camera sees and turn the background into that classic black canvas. Or maybe not quite so fast and get a mid or dark blue canvas. Rather than shoot at, say 1/100, try 1/250 or the fastest your camera can sync with the strobes. High Speed Synchronisation - HSS - equipped strobes and triggers are a major bonus allowing much higher shutter speeds. Or use a snoot. Snoots are a great way of concentrating light onto a subject. A negative space is then created in the shape of a black or unlight canvas for the areas the snoot does not light. SEE THE DIFFERENCE Hunt for negative spaces, play around with these techniques and you may well find a whole new style of diving and a whole new way of image-making. Images which are strong graphically or in their simple and contrasting colours. And if that doesn’t work, you can always go back to fish portraits. A fast shutter speed creates a black canvas A red canvas of algae A wide aperture creates a blurry background Coral creates a canvas for a graphical image Snoots create negative space and highlight subject14 points
 -
14 points
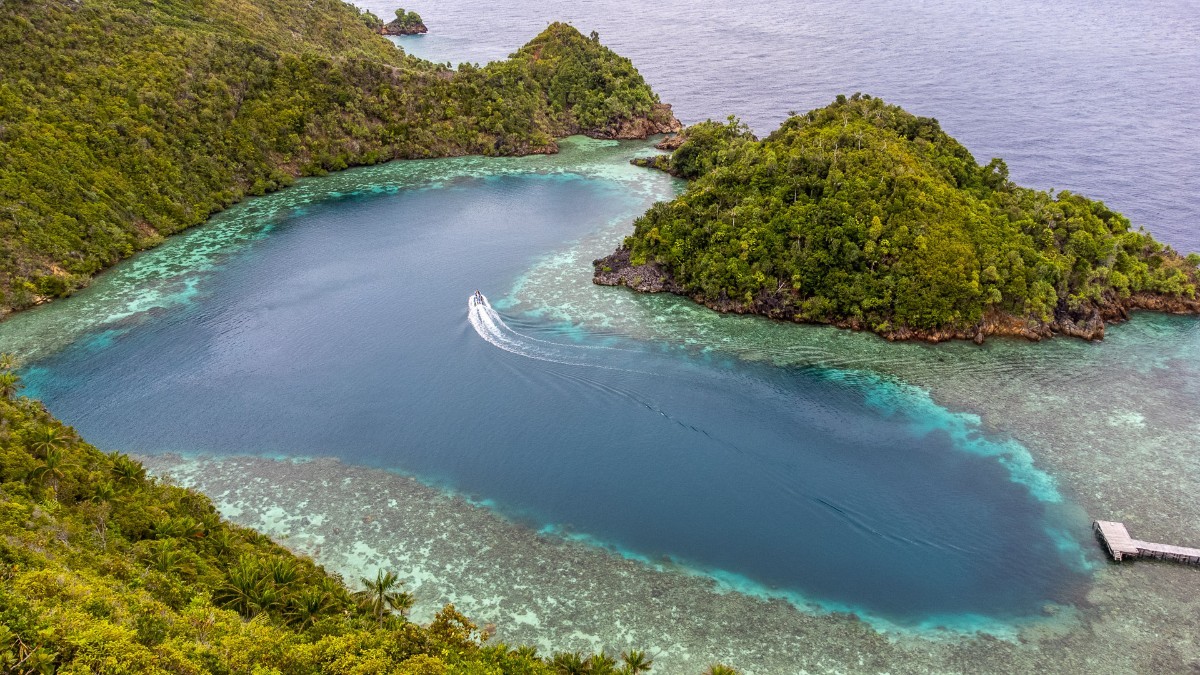 Raja Ampat is universally known as "The Heart of Coral Triangle”, for its unrivaled wealth, including: 540 hard coral species (more than 75% of the world's coral species); 60 types of crayfish; 1,070 types of reef fish; 699 types of mollusks. Also on land, Raja Ampat has incredible diversities: over 874 plant species that 9 are endemic and 6 are protected species, of which 360 species are trees. Also there are 114 species of herpetofauna with 5 species of which are endemic and 5 other species are protected. There are also 47 species of mammals, of which 1 is endemic and 3 is protected. And lastly, there are 274 bird species with 6 species of which are endemic and 8 species are also included in the protected category. This mega-biodiversity and various types of endemic flora and fauna that cannot be found anywhere in the world. For that reason, 66% of Raja Ampat's terrestrial area is a Nature Reserve or Conservation Area, and 5 Regional Water Conservation Areas or KKPDs cover an area of 1,125,940 hectares. The epitome of Raja Ampat's beauty is found in the Misool area, which, due to its distance from the more frequented areas, and the very strict management policy of the marine park, allows marine life to continue to thrive. I’ve visited Raja Ampat 3 times, and every time I go back I feel that, unlike many other places I have visited, the marine life here doesn’t seem to suffer the anthropic pressure, a sign that environmental protection and public awareness are working extensively. The heart-shaped lagoon of KARAWAPOP Geosite The last time I visited Misool, I was on a cruise aboard the Gaia Love vessel, after a long crossing from Ternate (Halmahera), which I have already talked about in a previous article. The first stop in the Misool area was at Pele island. We dove sites as Pele’s Playground, Kaleidosoope and Toblerone, all with wonderful corals and pelagic life. I was amazed by the colors of Kaleidoscope, and I understood why this site was named like that. The Gaia Love at sunset, moored in the Pele area Moving east from Pele, we arrive in the Fiabacet/Warakaraket area, near the Misool eco resort. Here we can find some of the most iconic dive spots in Misool, such as Nudi rock, Magic Mountain, Boo Windows, Four Kings, just to name a few! The abundance of life and color in these areas is absolutely astonishing. We stayed in the area for the rest of the cruise, being able to count on an infinite number of fantastic dive sites in a very short distance. My favorites were, once again, Boo Windows and Four Kings. Between the spectacular cliffs of Boo and the pinnacles of 4 Kings every encounter is possible, even with our beloved winged friends, the Mantas. Here we had the privilege of swimming in very close contact with a majestic oceanic manta that stayed with us for almost the entire dive, making some laps and then coming back to greet us. Finally, after 11 days of fantastic diving, we set sail for our port of disembarkation, Sorong. I must say with a lot of melancholy, since these places enter your soul and you never want to leave them. Conclusions. My experience on this cruise, which started in Ternate and ended in Sorong, touching the most beautiful places in Halmahera and Misool, was absolutely extraordinary. I have to thank all the staff of Gaia Love who made sure that every moment of the crossing was unforgettable, starting from the top-quality food, to the diving guides who were always very attentive and who always made us feel safe and protected. I would also like to thank the officers on board who were always able to manage all the moments of the cruise with the highest professionalism. As for the photographic equipment, for those who are curious, I recommend reading the previous article where I detailed everything. See you next time! Pietro Cremone14 points
 -
14 pointsHere is what I know, the hosting provider had a major datacenter move for a bunch of there servers. The notice was sent out weeks ago that this would be happening. Moved server account holders will be given a new IP address for their servers when the move happens. DNS records for domain will need to be updated to new IP address for the site to be reachable again. So this is where things are, the server was moved to new datacenter on new hardware & software and a new IP. Adam should have been notified of this multiple times and he will need to change and update the DNS records to reflect the new IP for wetpixel.com or the server will never be able to be reached. So I guess we wait and see if he ever updates that. I imagine even if it comes back, the days are still numbered when it does go offline permanently. In reflection of the last year and our actions to get this site going when we did and migrate as many members as we have.. I’m thankful we did it and thanks to all of you for helping rebuild the community here. 👏14 points
-
14 pointsHello to all members of WaterPixels. It has now been almost 5 months since the birth of this wonderful community. We do not forget where we came from and we have done everything to make the transition to this new community as smooth as possible and to continue the good work that had been built up over twenty years. We also see the impact of social media and how they have made public debate more toxic. Behind our avatars and nicknames there are still people with all their facets, complexities and feelings. This is why we want to remind everyone that when registering and using the forum, you agree to accept the following conditions of use: https://waterpixels.net/terms/ Be respectful: Treat all forum members with respect and courtesy. Avoid personal attacks, insults, or any form of harassment. Disagreements are fine, but keep the discussion civil and focus on the topic at hand. Just agree to disagree. Maintain a welcoming environment: Foster an inclusive and friendly atmosphere. Avoid discriminatory language, hate speech, or any form of offensive content that targets individuals or groups based on their race, ethnicity, gender, religion, sexual orientation, or any other characteristic. Stay on-topic: Keep discussions relevant to the forum's purpose and guidelines. Avoid derailing threads or posting unrelated content. If you have a new topic to discuss, create a new thread or find an appropriate existing one. Leave it to the moderators to decide if something is badly off-topic bearing in mind that the forum is about having fun as well as learning! No spamming or self-promotion: Avoid excessive self-promotion, advertising, or posting irrelevant links. If you want to share content or links, make sure they are relevant and add value to the discussion. Protect privacy and confidentiality: Respect the privacy of others and avoid sharing personal information without consent. Do not post private or confidential information about yourself or others. Report inappropriate behavior: If you encounter any behavior that violates the code of conduct, report it to the forum moderators or administrators. Do not engage in public arguments or attempts at moderation. Be mindful of intellectual property: Respect copyright laws and give proper credit when sharing or quoting content from other sources. Do not post copyrighted material without permission. Use appropriate language and tone: Avoid excessive use of profanity, offensive language, or derogatory remarks. Maintain a professional and respectful tone in your interactions. Be aware of the consequences: Understand that violations of this code of conduct may result in warnings, temporary suspensions, or permanent bans from the forum. Respect the authority of the moderators and administrators in enforcing the code. From now on, a progressive system of warnings will be implemented that may lead to the suspension of users who do not comply with the above-mentioned code of conduct.14 points
-
14 points
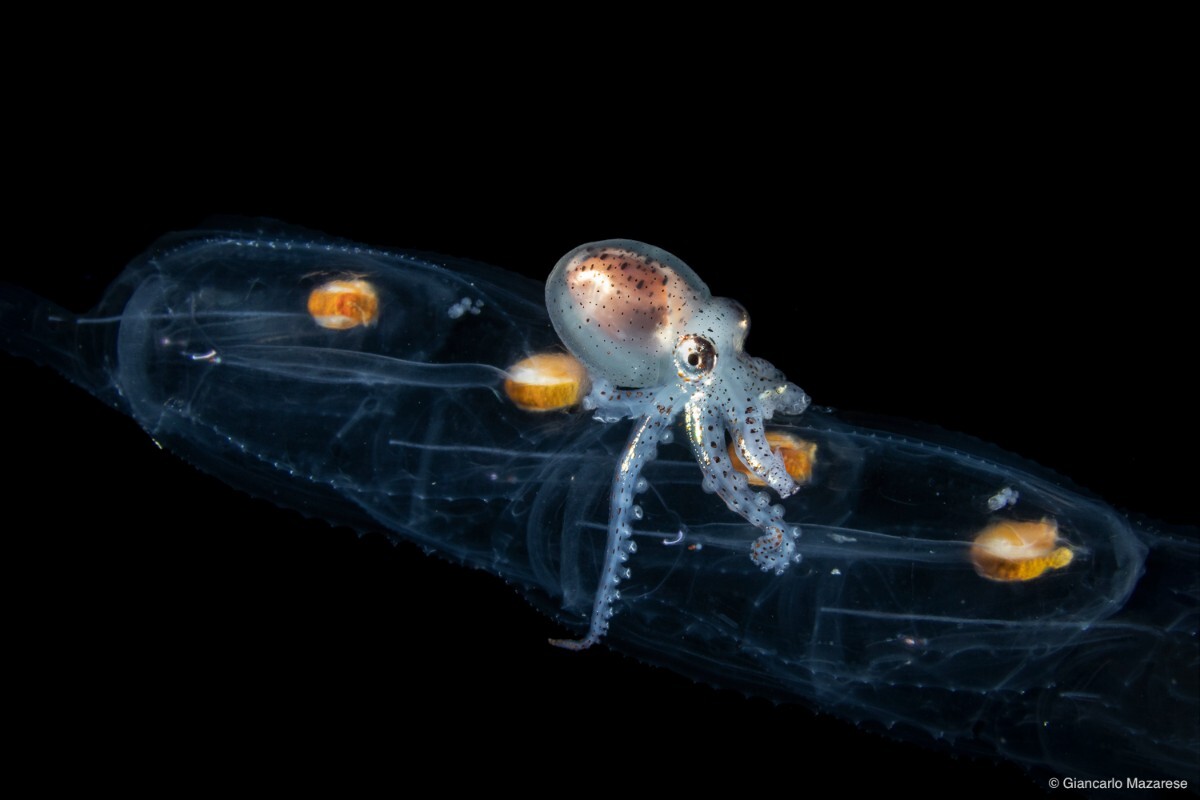 Disclaimer: Thanks to Pietro Cremone, the Italian distributor of Nauticam, I had the opportunity to try out this interesting lens on a recent trip to Anilao for blackwater dives. Blackwater diving is a form of night diving that involves exploring open waters off oceanic coasts. Unlike traditional night dives, which take place near the shore or in shallow waters, blackwater dives occur in deep waters, typically offshore over deep ocean floors. During these dives, divers immerse themselves in dark waters, often with depths exceeding 100 meters. A bright buoy connected to a variable-length line (20-30 meters) is placed in the water, to which very powerful torches will be attached. The lights are used to attract plankton and marine creatures to the surface, offering divers the opportunity to observe these unique creatures up close and appreciate their beauty in a completely different environment. Additionally, the lights serve as an optical reference for divers as they drift with the currents alongside the buoy and line. Blackwater diving can be an extraordinarily fascinating experience, but it requires adequate preparation and some experience with night diving. Divers must have excellent buoyancy control and perfect self-management skills, including with their photographic equipment. In recent years, these dives have become very popular, especially among underwater photographers, who can capture stunning images of animals that normally inhabit oceanic depths and, thanks to currents and the upwelling phenomenon, ascend towards the surface. Among these creatures, one can find zooplankton, larval stages of many fish species, mollusks, shrimp, etc., and even rare encounters with Paper Nautilus or the Blanket Octopus. Locations for this type of diving are scattered around the world, and the most famous ones with dive centers with greater experience can be found in: Anilao in the Philippines, Hawaii in the USA, Palm Beach in the USA, Lembeh in Indonesia, and Cozumel in Mexico. For photographic equipment, it is recommended to use a macro lens with a 1:1 ratio and a good field of view (ideally 50 or 60 mm equivalent full frame), with good AF speed, two strobes, and a focus torch positioned on the housing to assist the AF system of the camera body, and a narrow-beam torch for searching subjects, which can also be positioned on the housing or held by hand. For photographers using Nikon or Olympus, they are fortunate to have two excellent lenses available: the Nikon AF-S 60mm f/2.8 G ED Micro and the Olympus M.Zuiko Digital ED 30mm f/3.5 Macro, which are perfect for Blackwater photography. However, for Canon and Sony photographers, it is unfortunately more complex because the available optics have very slow AF (Sigma 70mm f/2.8 DG Macro Art and Sony FE 50mm f/2.8 Macro), and in Blackwater, it can be frustrating to try to focus as we really have to seize the moment: subjects are free in the water and besides drifting, they move constantly, making it much more difficult to capture correctly. Using more performing lenses like Sony FE 90mm f/2.8 Macro or Canon 100mm f/2.8 L Macro unfortunately becomes more complex, even though they have a good AF speed, due to the narrow field of view. An interesting solution to solve this problem is provided by Nauticam. In recent years, Nauticam has been investing heavily in "wet" optics, such as the WWL and WACP-C series, to name a few. In 2020, Nauticam launched a new system of wet optics on the international market, the EMWL series (Extended Macro Wide Lens). The EMWL is designed to work with various macro lenses and is optimized for both photos and videos. It is a "wet" mount design so that the lens can be attached and removed underwater. This increases the versatility of the entire system. EMWL is a modular system composed of three main parts: the focusing unit, the relay module, and the lens. Plus, an accessory for quick mounting. On the Nauticam website, you can find a detailed description of its features and the modules that compose it. Being a Canon user, I have strong limitations on the lenses to use in BW, and I thought this lens could help solve them. The setup I used is as follows: Canon R7, Canon EF-S 60 macro, Nauticam NA-R7 housing, N100 flat port 74, Reverse Angled Viewfinder 32º, EMWL Focusing Unit #1, and 60° objective lenses. Pre-Dive Considerations It is important to note that the EMWL is a lens designed for underwater use and must be immersed in water to function properly. When testing the flash before the dive, it is necessary to get very close to the object, about 1 cm, to make the camera's autofocus work. If you photograph in the air, the autofocus will not focus on anything; immersion of the lens in water is essential. However, at a distance of 1 cm from the lens, autofocus works and allows testing the flash dry. The EMWL is composed of heavy optics. On the Nauticam website, you will find tables for each part of the EMWL. In my specific configuration, the Focusing Unit weighs 728g, the Objective Lens 60° 378g, the Reverse Viewfinder 700g, and the M77 to BM II 122g, for a total of 1,928 grams to add to the normal configuration without a 45° Viewfinder. In my case, I use the normal 45° Viewfinder and should subtract the weight of mine, which is about 480g. So, compared to my base configuration, I add a weight, out of the water, of 1448g. I emphasize this point because on my first dive, I didn't worry at all about the additional weight, but using the camera with this extra weight was a bit more complicated in normal BW use. I recommend neutralizing this additional weight as much as possible with floats or floating arms. In-Water Use With a 60° field of view, framing subjects becomes significantly easier, which is definitely the strong point of this system. This allowed me to quickly and better frame the subject through the Viewfinder. Locating and focusing on the subject was significantly simpler with this lens, allowing me to track it and get as close as possible. The autofocus was not affected by the additional lenses of the Nauticam EMWL system. The focusing systems, single-point AF or AF tracking, worked perfectly. I did not notice any differences compared to normal use. I only experienced a worsening when using the red color of the focus lights. With subjects more sensitive to white light, such as Squid or Paper Nautilus, I usually use only the red color of the focus lights. However, with the EMWL, changing the color of just one focus light from red to blue or white, the autofocus work perfectly again. The Objective Lens 60° has the ability to adjust the minimum focusing distance in 3 modes; surely the 55mm-infinity adjustment is preferable for blackwater photography. Searching for the minimum focusing distance, especially for smaller subjects, framing becomes more complicated, but I noticed a greater magnification of the subject. Comparing notes with Pietro, he confirmed that the 60° lens can achieve a magnification of 4x at the CFD, and this is another advantage of this system. Obviously, for smaller subjects, it is always more difficult to get a good shot, but with this lens, we could photograph other subjects that we normally give up on because they are too complex or have obtained poor results due to the 1:1 ratio of the lenses used up to now. Another impression I had is that the lens provides a greater depth of field. Reviewing the shots taken of a male Paper Nautilus attached to a tunicate, I noticed that a good part of the tunicate and the Paper Nautilus were well in focus. However, I did not have many similar shots during this test session. The only "negative" feedback I can provide from my experience using it in blackwater is that occasionally, on slightly overexposed shots and with highly reflective subjects, the lens produces a white halo around the subject. In the shots taken, the number of files with this issue was negligible, but I felt it was important to mention it. Final Thoughts I was thrilled to use this system, and I would like to thank once again the Italian distributor of Nauticam (Fotosub-shop.it - Pietro Cremone) for giving me the opportunity to test it in black water. Certainly, this system requires various trials in the water by the user, but once the right balance is found, it can provide incredible images of both typical subjects in blackwater and smaller subjects. The cost of the complete configuration may not be within everyone's reach, but as we know, our hobby is expensive, and we do enjoy expensive toys. If you have the opportunity to purchase it, you could overcome the limitations we have with the lenses used in blackwater. If I have the chance to try it again, I would like to use the 100° lens for larger subjects, such as a Blanket Octopus (if they are easy to find), a beautiful female Paper Nautilus, or a large jellyfish; it could be very interesting, considering also that changing lenses can be done underwater, being very careful not to let it slip, though... I will keep you updated. Hydrozoan Jellyfish - 1/320 F14 ISO 320 Tube anemone larva - 1/320 F14 ISO 320 Flounder larva - 1/250 F16 ISO 320 Mantis shrimp larva - 1/250 F16 ISO 320 Crab larva - 1/250 F16 ISO 320 Unidentified - 1/250 F16 ISO 320 Juvenile benthic octopod on a salp - 1/250 F20 ISO 320 Juvenile benthic octopod on salp - 1/250 F22 ISO 320 Seahorse, Hippocampus sp. - 1/250 F18 ISO 320 Dotterel Filefish - 1/250 F20 ISO 320 Veliger larva - 1/250 F16 ISO 320 Shrimp larva - 1/250 F16 ISO 320 Mantis shrimp Larva - 1/250 F18 ISO 320 Fish larva - 1/250 F16 ISO 32014 points
 -
14 pointsThis was an image I captured with natural light at the end of dive as I was heading to the exit and saw the other buddy pair in the water doing their safety stop. I think it captures the expansiveness and the feeling of clear-water, ice-diving of floating under expansive clouds. Plus, I like the grain as it gives it a bit of a classic feel like I was shooting hi-iso slide. The story of the image was I forgot my flash sync cables (doh) on this dive so was forced to shoot everything with ambient and very little light. This dive was pretty much pitch black so I pushed the camera to its limit throughout the dive and ended up taking pretty different pictures than I frequently do and this ended up being one of my favorite images I took during the year. This is from Dayton's Wall, Ross Sea, Antarctica.
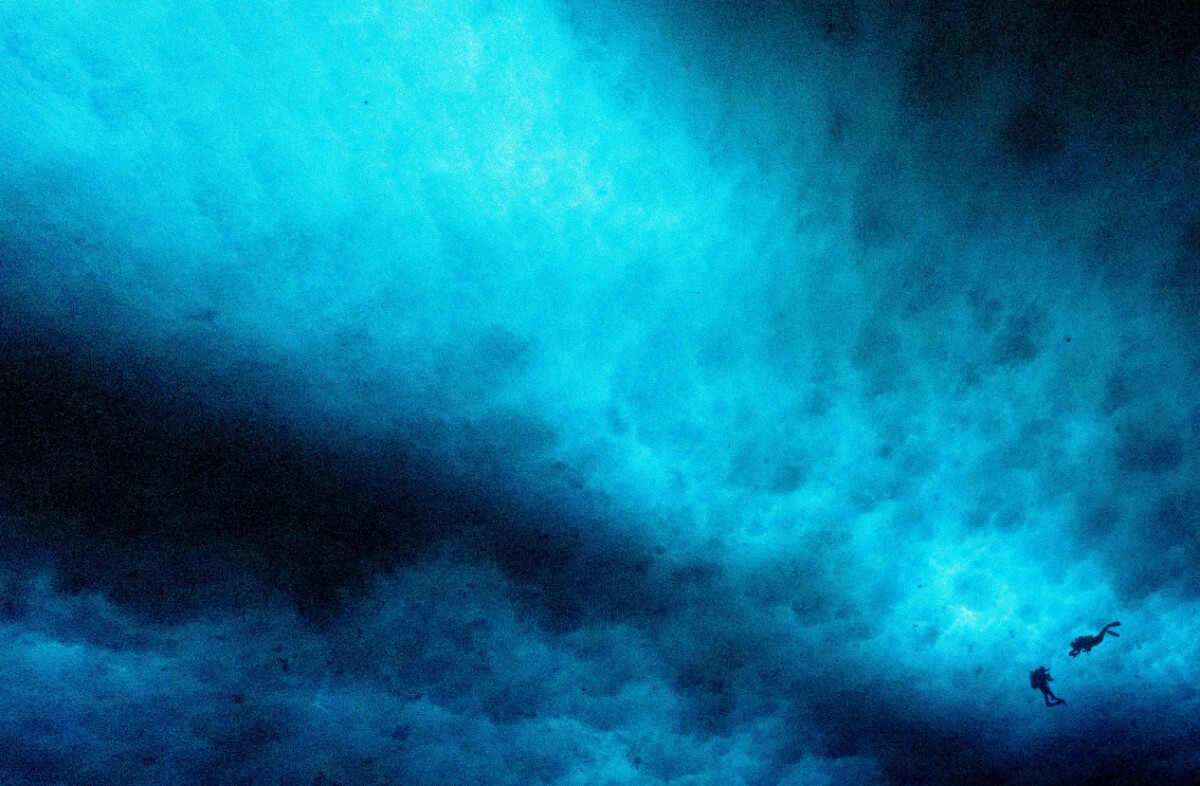 14 points
 -
14 pointsThis is probably my favorite photo of 2023. The main reason is the cool subject in it. Marine Iguana was one of the top items in my bucket list. In 2023 i have been so fortunate to dive with them in Galapagos. Nikon D850, 105mm macro+Nauticam EMWL 160, 2 x Inon Z330 strobes
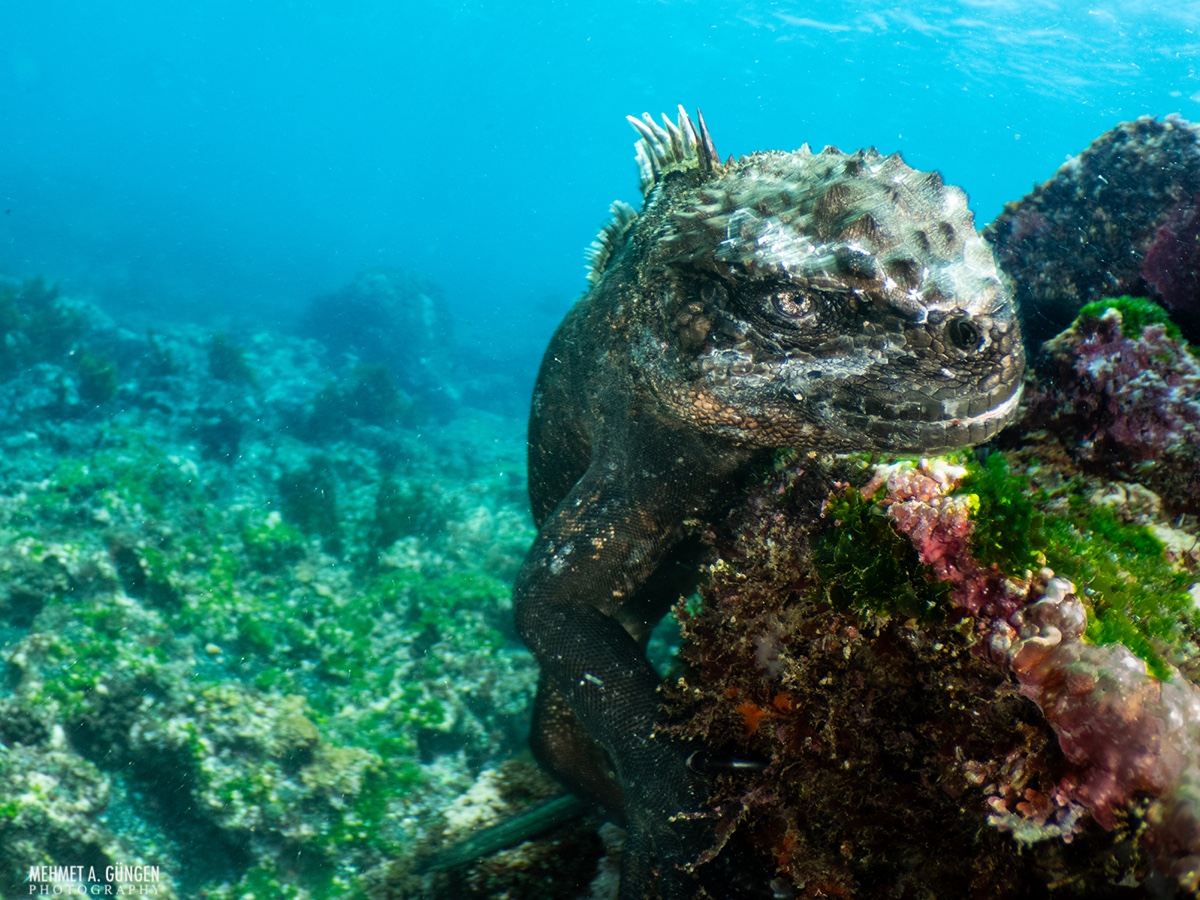 14 points
 -
14 pointsSouthern Right Whales Sony A1, WACP-1, 14m 1.8GM and ambient light (I reduced the image size/resolution as each original is 30mb+) Shot under special permit issued by the Argentine government
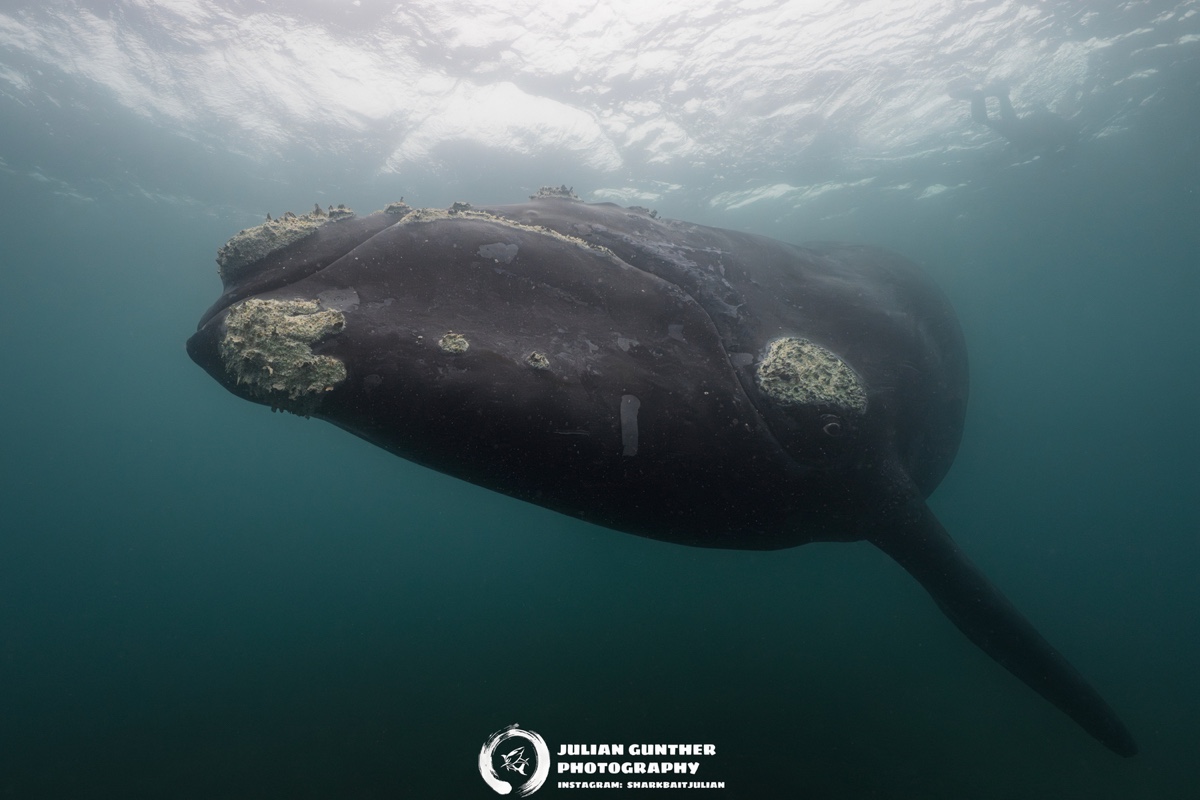
 14 points
 -
13 pointsA trio of Humpback Whale (Megaptera novaeangliae) escorted by Bottlenose Dolphin (Tursiops truncatus) and California Sea Lion (Zalophus californianus) as they hunt and feed in Magdalena Bay, Baja Pacific, Mexico. Seeing whales underwater for the first time was definitely the highlight of a snorkeling trip to Magdalena Bay with Nautilus Liveaboards. Nikon Z8 w/8-15mm @15mm fisheye lens, f8@1/250s iso640, Natural light
.jpg.12273f15aec9ee16a95e1f5ced4c198d.jpg) 13 points
13 points -
I had the chance to shoot it in Lembeh, last week, while the Backscatter boys were in town. Matthew and I will surely chat about it when I am back.13 points
-
13 pointsStarting a new thread to do a quick review of using the MFO-3 with the Olympus 60mm macro. The 60mm is commonly used on m43 setups as the usual macro lens, it's quite sharp and AF is quite good on later bodies but it's a bit on the long side at 120mm FF equivalent, so larger subjects require backing up a lot with a lot of extra water in the way along with all the particles to make backscatter. The MFO3 reduces the field from that of a 60mm lens to about 37 mm focal length increasing diagonal field from 20 to 33 degrees. I used it for the first time in Lembeh Strait this week, popping it on to shoot things like Lionfish, anemone fish and other larger subjects like big cuttlefish. The extra field of view is significant and allows you to shoot these subjects with a lot less water between you and the subject. I found the field to be quite sharp into the corners when reviewing on my laptop and the subject really was very sharp. AF was pretty snappy as well. In Lembeh where you might be shown a tiny emperor shrimp followed immediately by a 200mm long scorpion fish or cuttlefish it was really very useful, in fact I'd say it was indispensable. I carried in a pocket on a pair of cargo shorts complete with bayonet mount and found it easy to get out but a bit trickier to get back in with one hand. I took the supplied neoprene pouch on the boat and after rinsing stored it in there to stop it drying out. some examples: Weedy Rhinopia - slight crop: A False clown anemone fish, I would normally crop and get in closer but this shows the sharpness across the frame: A Trumpetfish which was about 500mm long : A zebra lionfish, cropped slightly: Hopefully this gives some idea what the lens can do. The only real downside is the bulk of the lens, it a big lump but easy to use with bayonet mount. The pics were chosen to show the versatility I found. Lens supplied by Scubapix, the Australian Nauticam distributor it was from the first batch imported. I paid for the lens my myself. Let me know if you have any questions, hope the review is useful for those considering it.
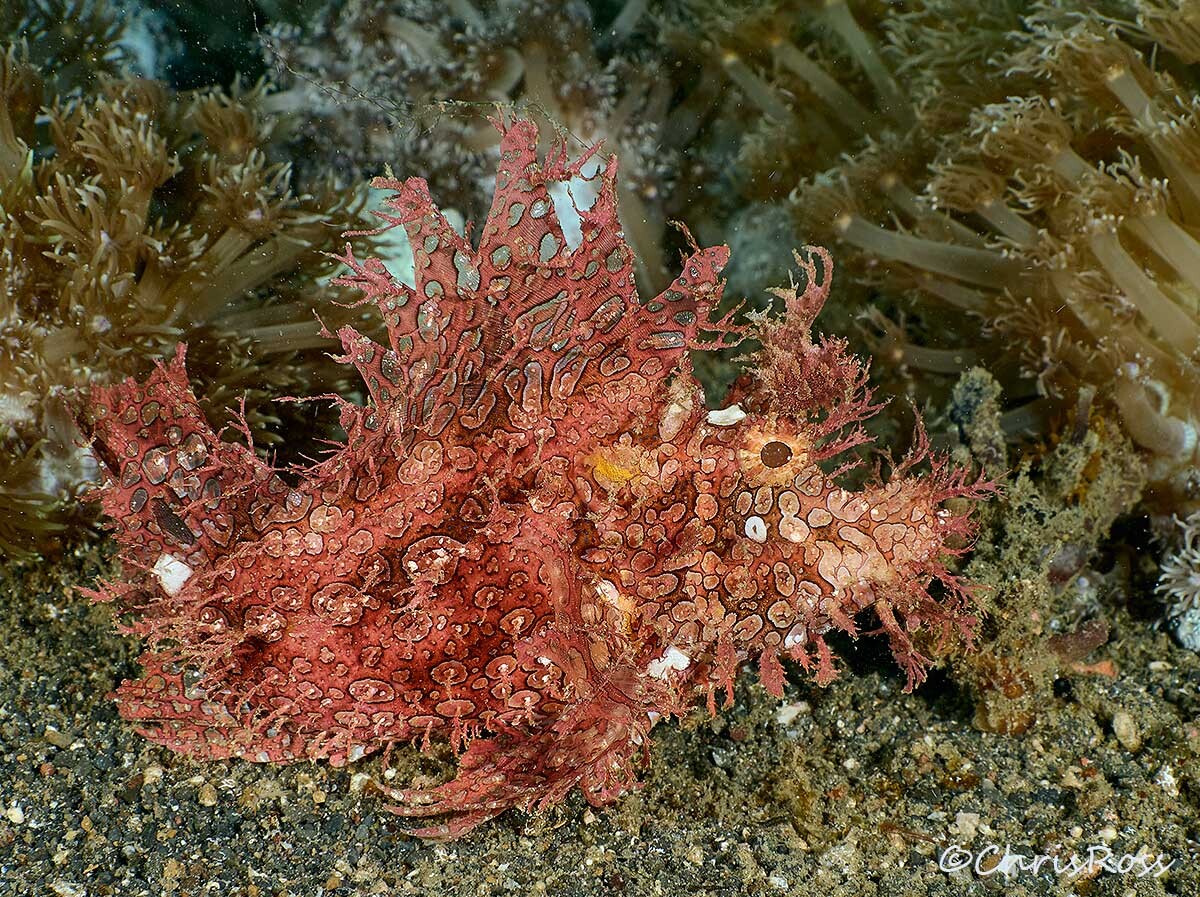

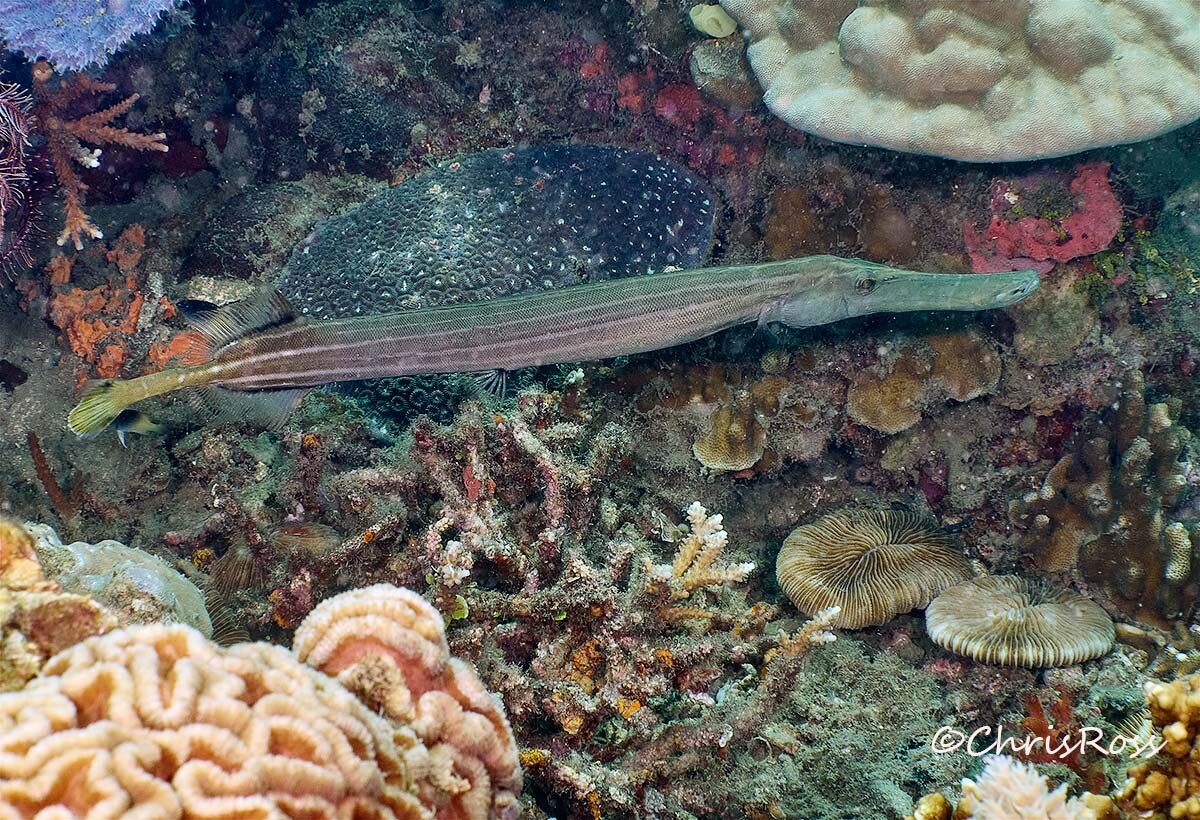
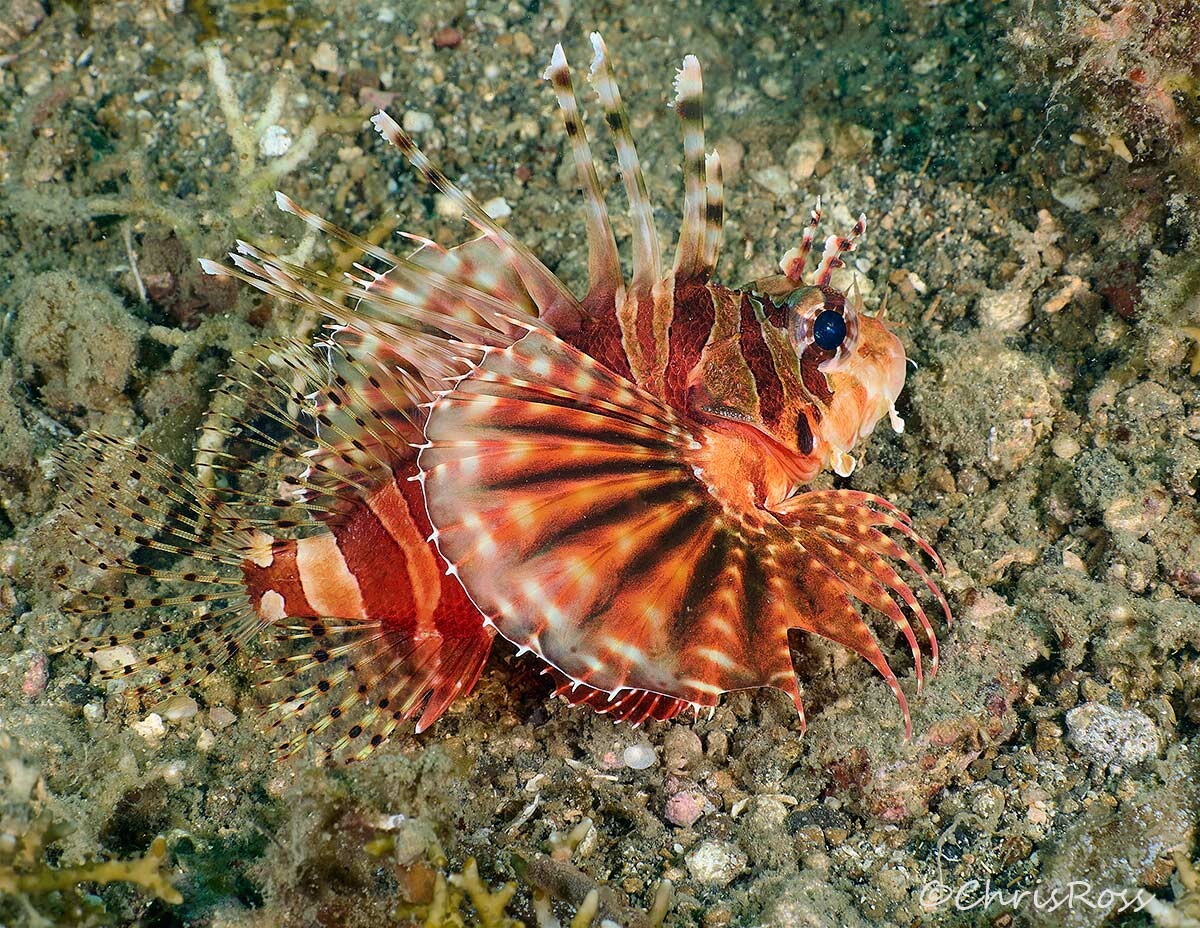 13 points
 -
13 pointsHello everyone, I've now completed 20 dives with my two new AOI UIS-P1 Ultra and i am absolutely satisfied with my purchase decision. I've used the flashes both in the lake and now in the Red Sea, and I can only say positive things about them. They're fast, easy to use, and they have a lot of power! Even with dry gloves, the flashes are easy to operate. The displays on the back of the flash provide information about the status, battery life, etc. When the flash is firing at full power in TTL, an audible signal is given. Along with the new flashes, I also replaced my flash trigger and treated myself to a Backscatter Smart Control TTL trigger. This is also excellent, and I shot most of my images using TTL, and it works fantastically. For me, the big advantage of the backscatter trigger in the Nauticam housing is that there are no cables going up to the LEDs, which makes the whole process of installing and removing the camera from the housing much easier. Tino
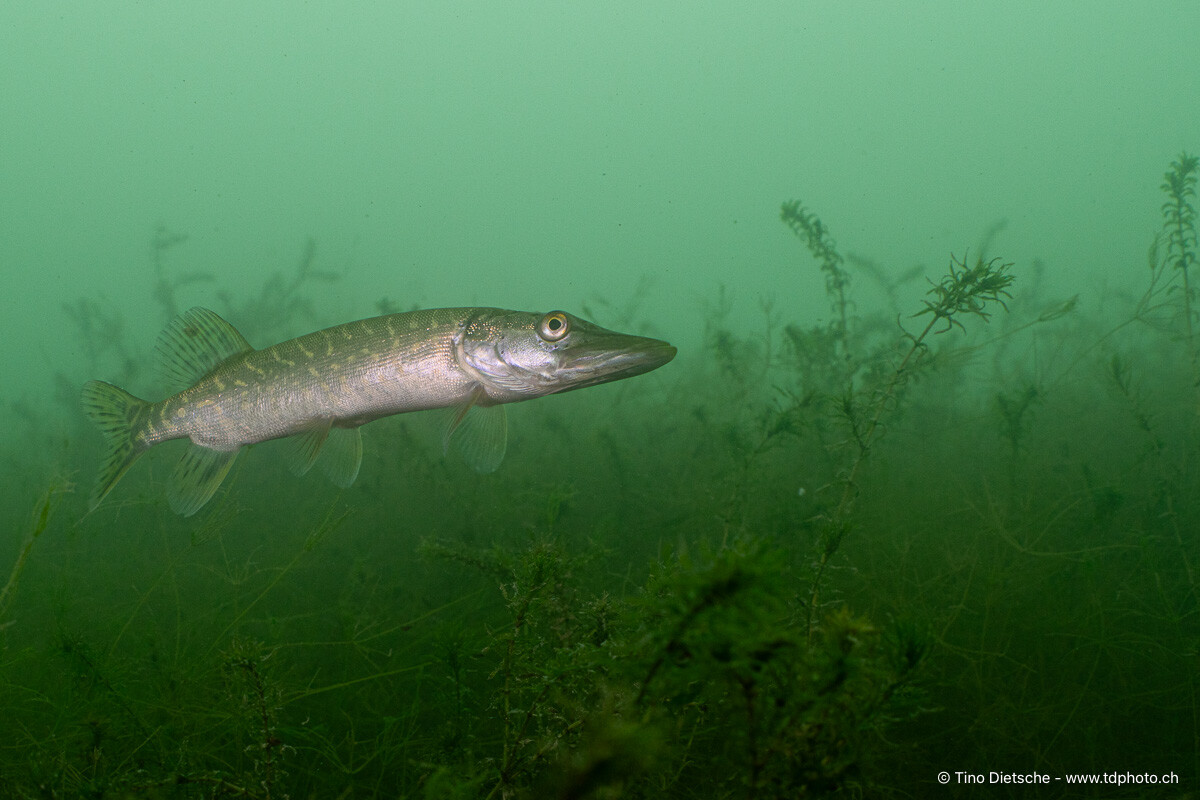
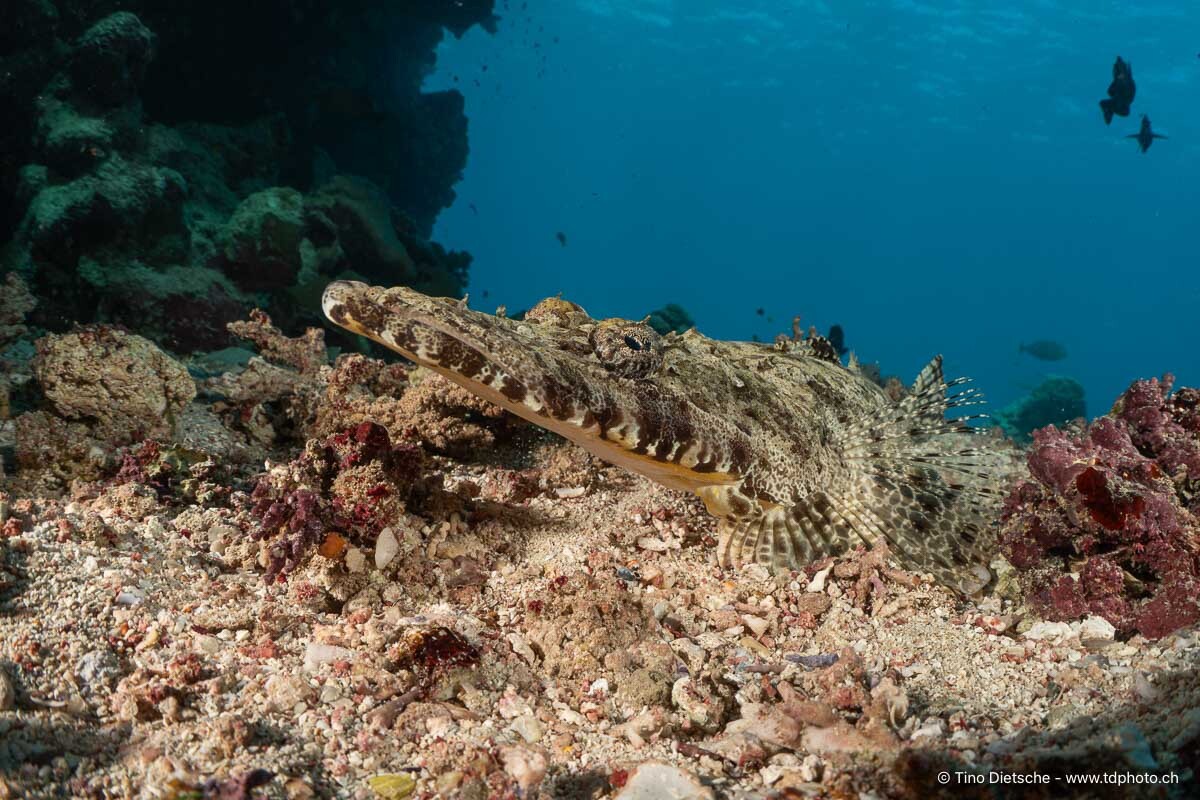
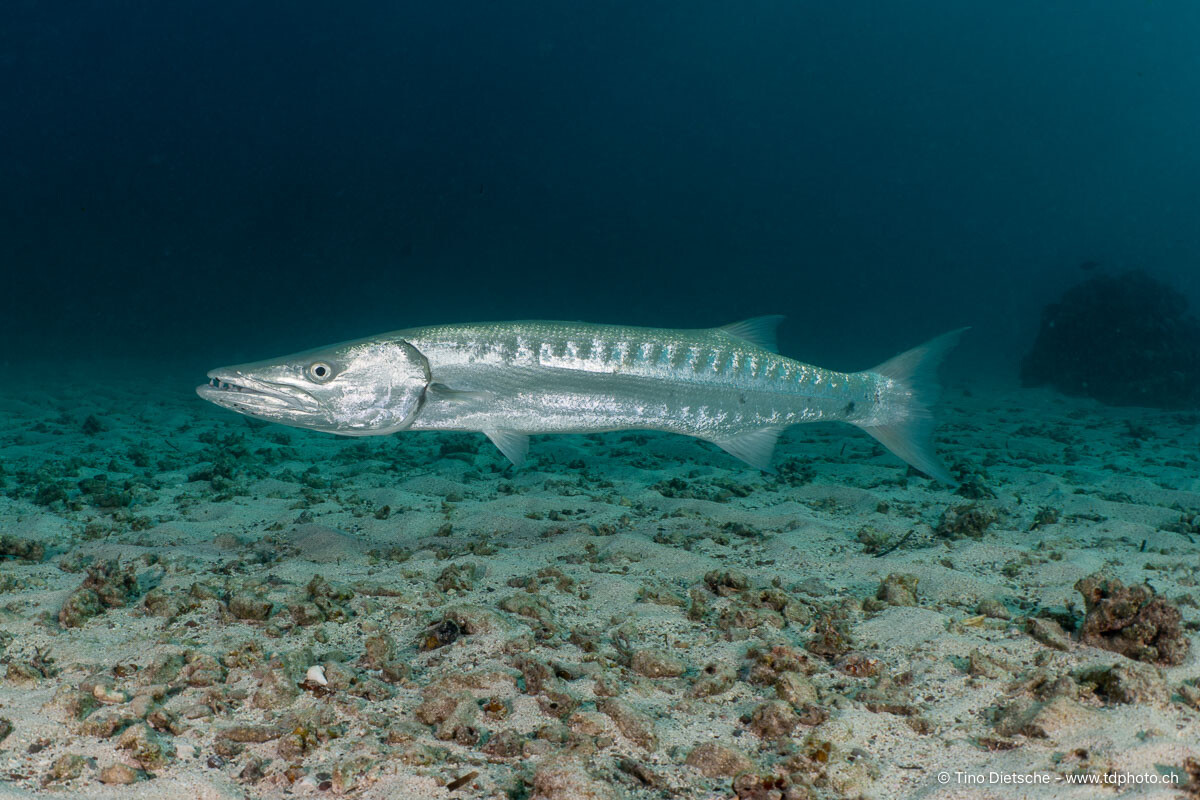
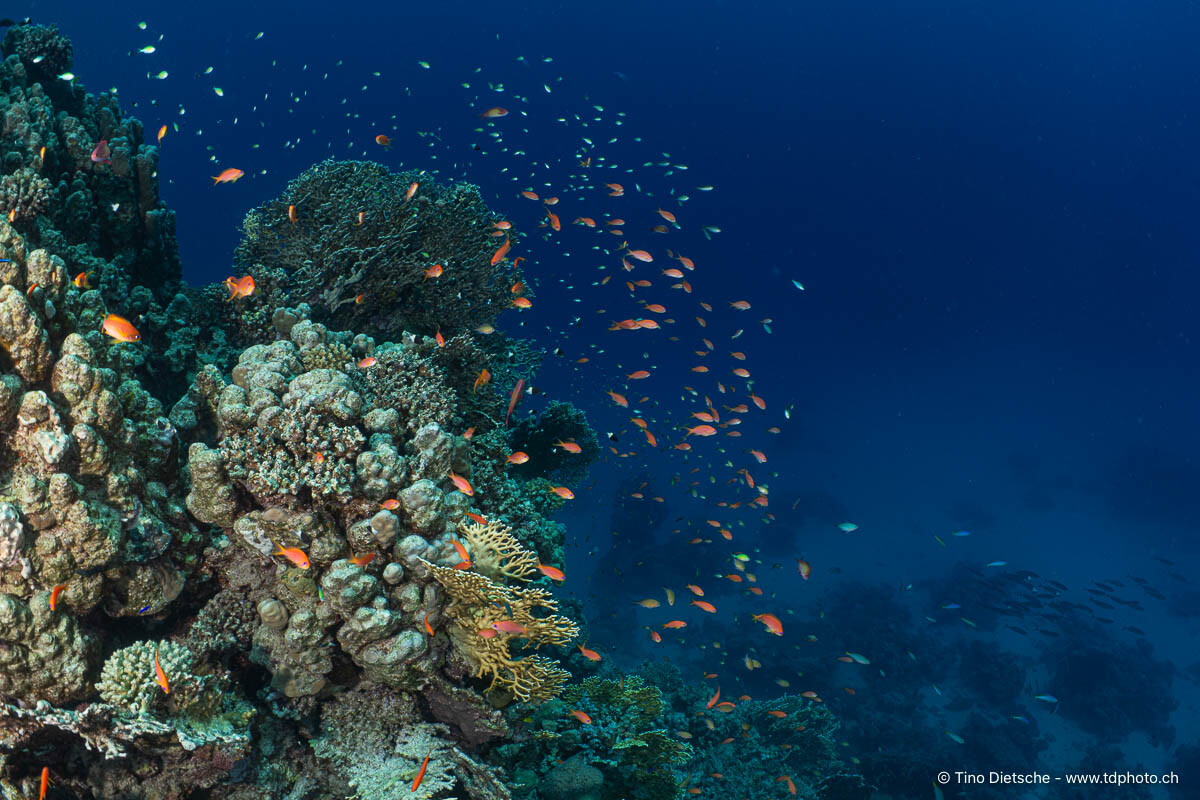
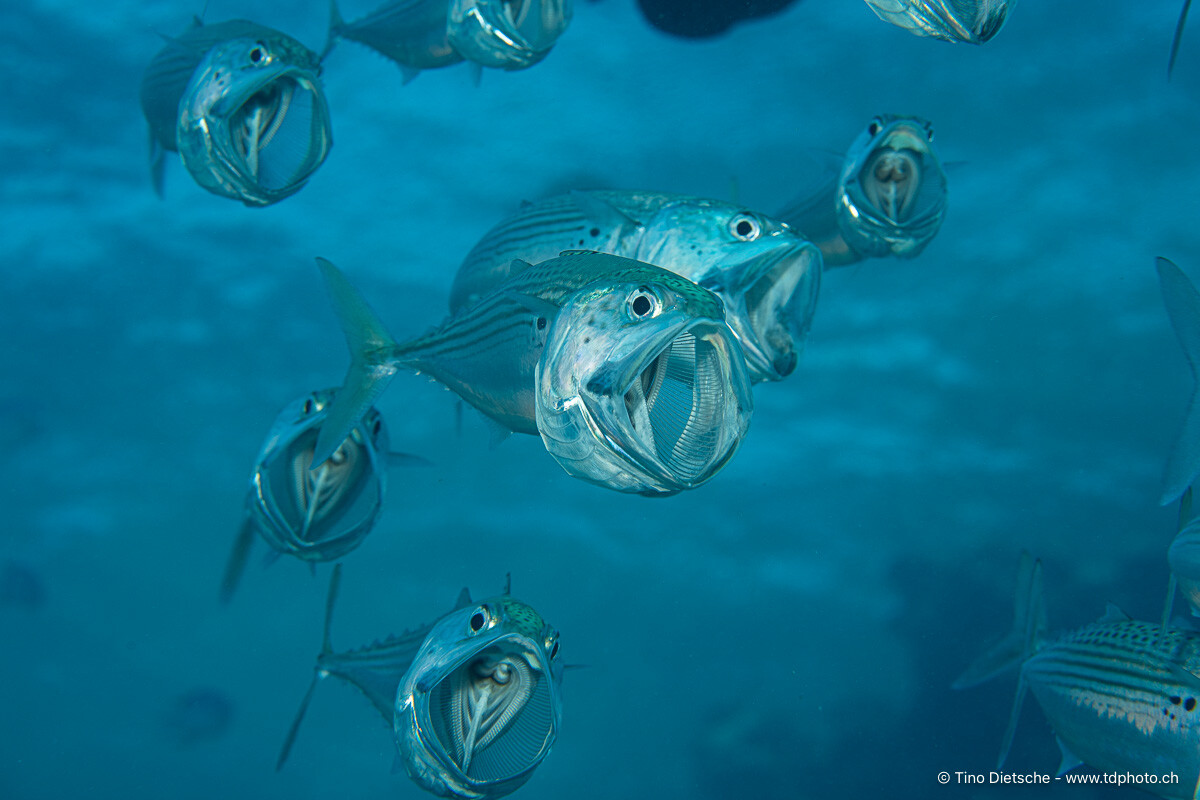
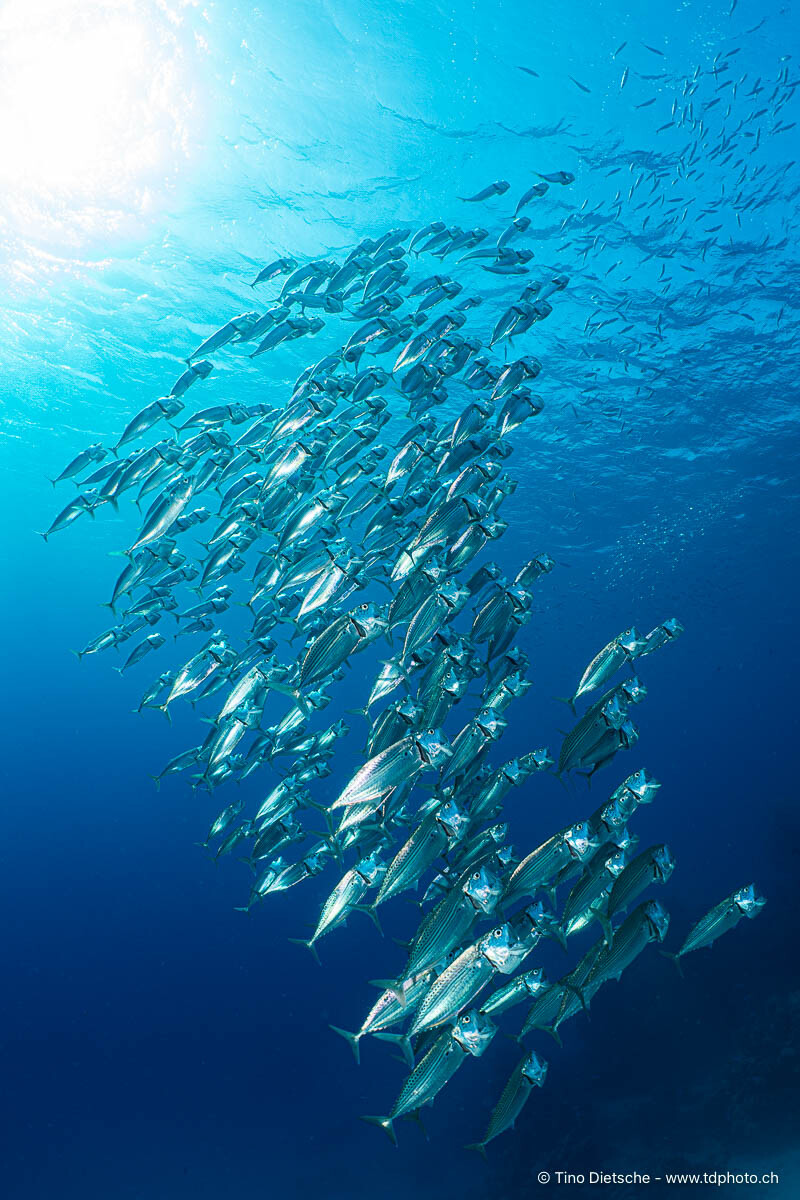

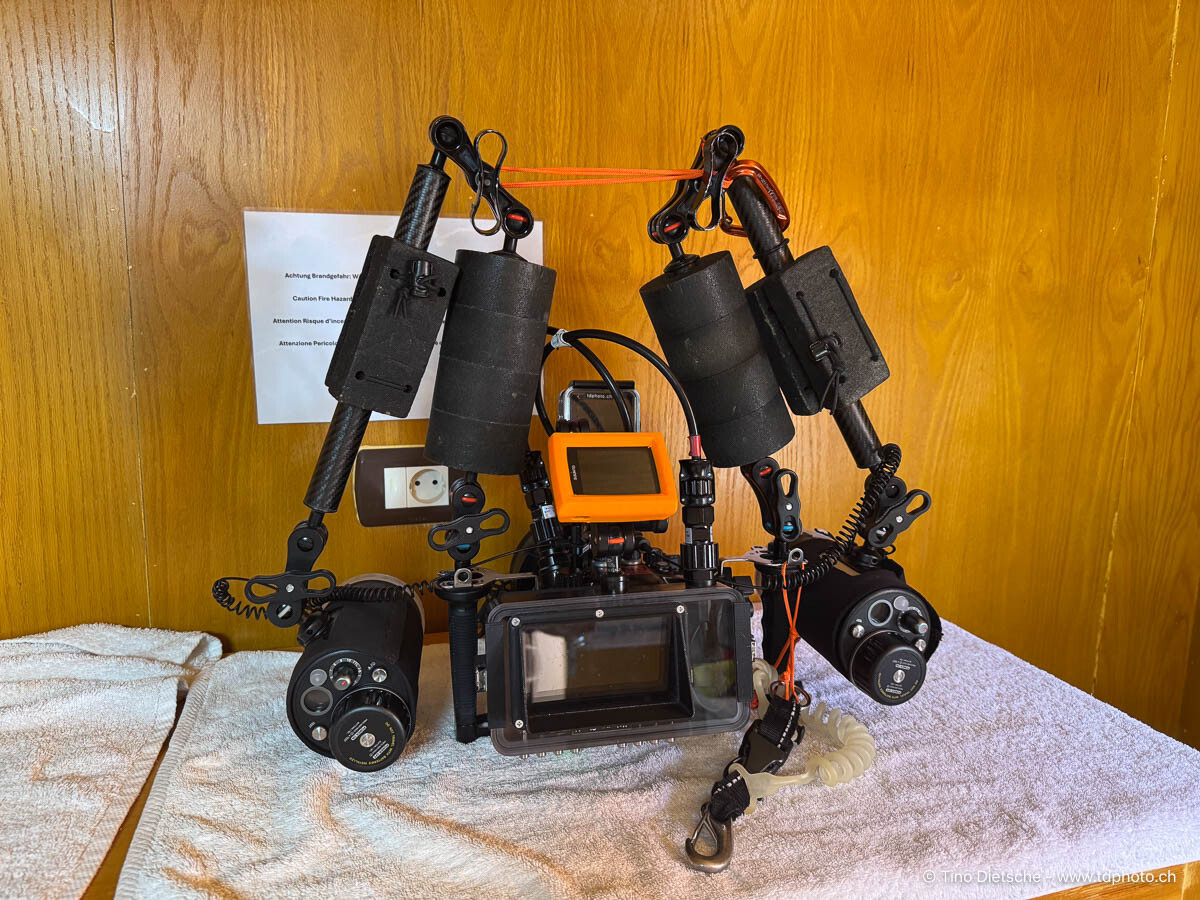 13 points
 -
13 pointsHad a little success with the Frogfish this year, all comments and critique welcomed Mike
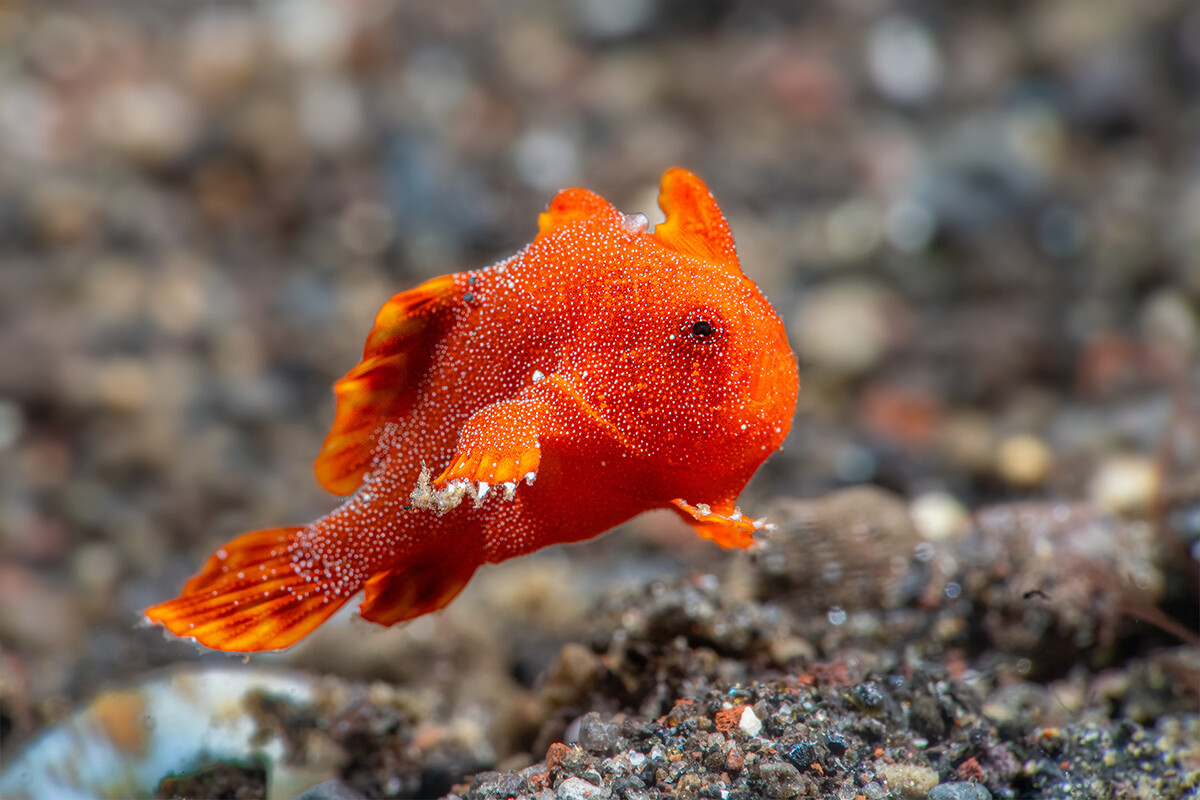
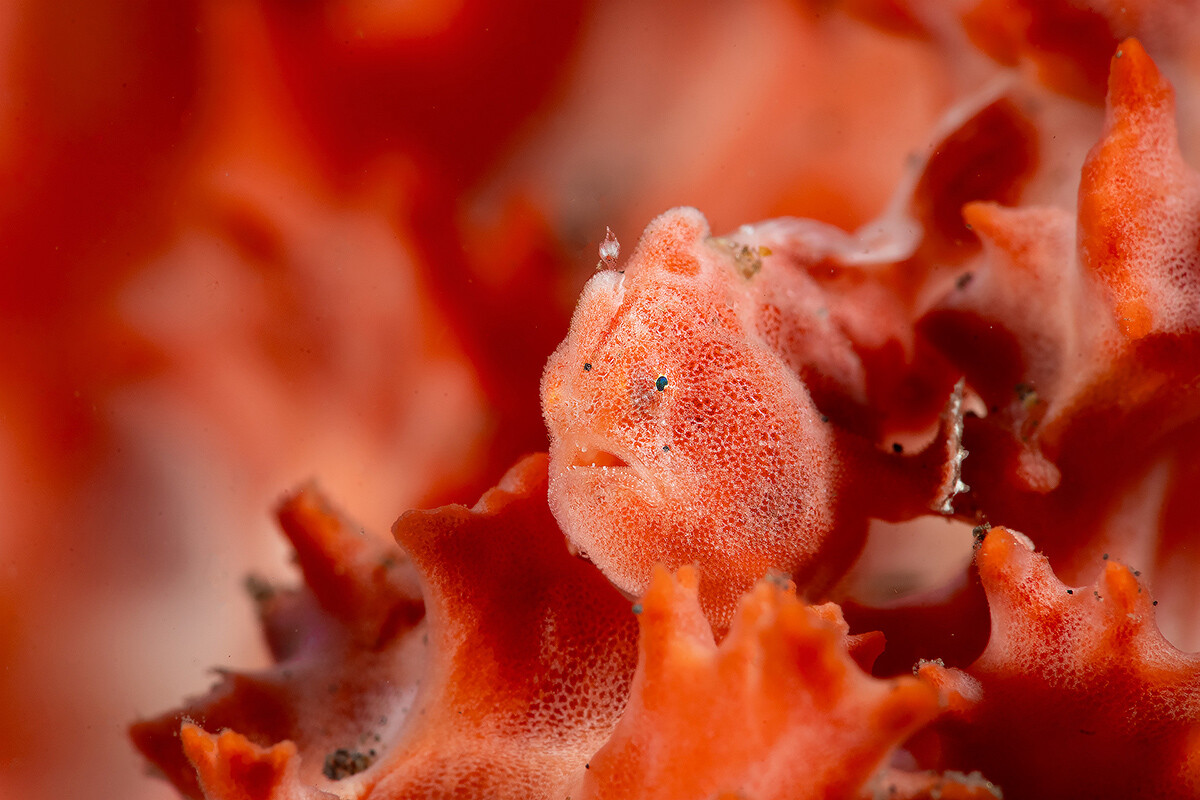
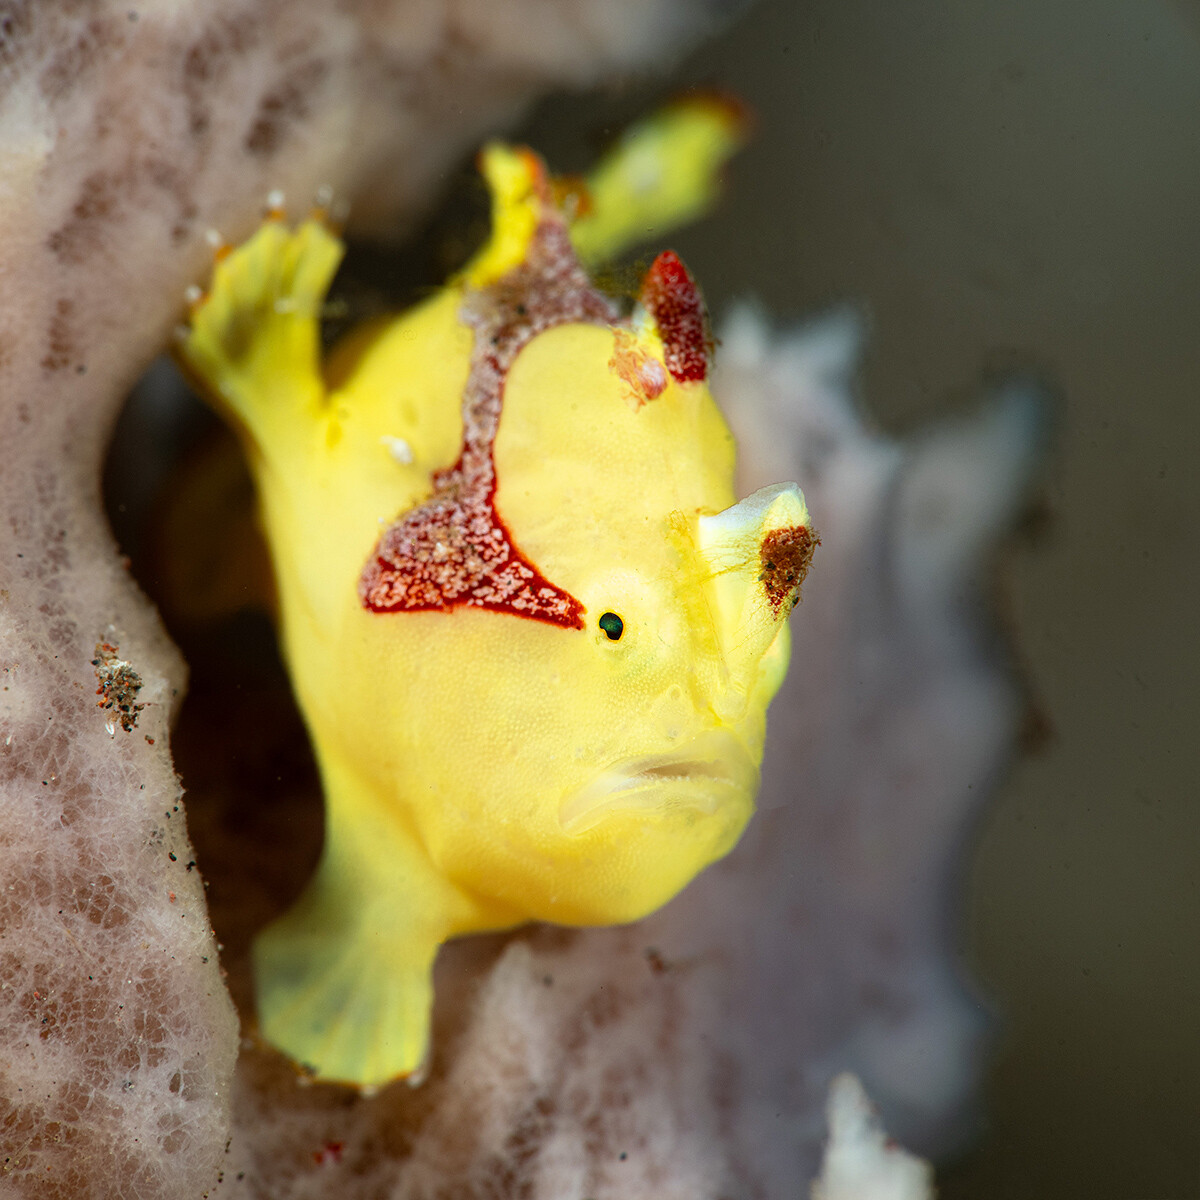
 13 points
 -
13 pointsHere’s a little clip I shot this week on Okinawa Main Island’s Pacific coast (Kin Red Beach) — a classic but colourful commensal / symbiotic combo: Emperor shrimps (Zenopontonia rex) riding their lofty nudibranch palace (?Ceratosoma trilobatum?). Edited to “Raindrop” by Tomotsugu Nakamura (sound on if possible) This was shot on my old Lumix LX10 compact in 4K/30fps, using either the Nauticam CMC-1 alone or stacked with a UCL-165 close-up lens. Lighting was from two Kraken Hydra 8000 V2 lights and one Backscatter MW4300. There was a bit of water movement and suspended silt, so I'll need to be more careful with light placement next time using the triple-light setup... Cheers and happy bubbles, Ben13 points
-
With a small "dome" of less than 4in/100mm, the RS 13mm is never going to be as good for splits as a large dome. A large dome makes the water line smaller and easier to keep positioned where you want it - especially in wavy conditions. A large dome also decreases the focus difference between underwater and topside portions (so the topside is less blurry). That said, splits are possible with the RS 13mm, and a small dome actually has a couple of advantages in that you can do splits of smaller subjects and in shallower water. Here are a few examples. Note that I didn't stop down the aperture very much for these (f/5.6-f/.8). Obviously, shooting at something like f/16 would give a less blurry topside if that's what you're going for.
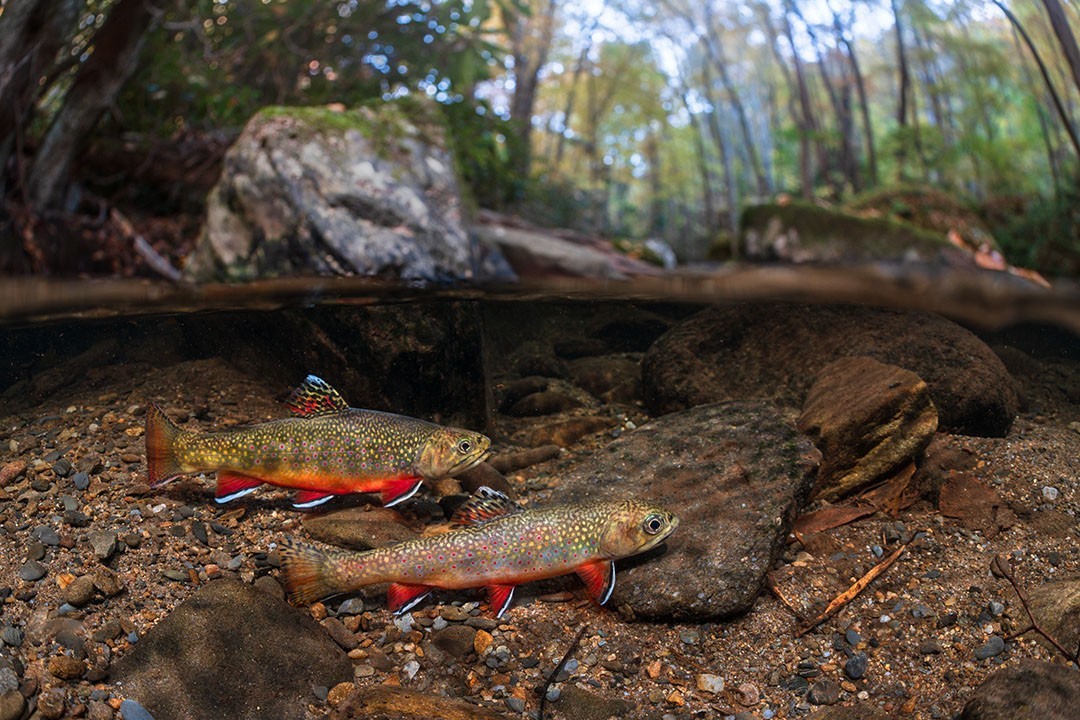
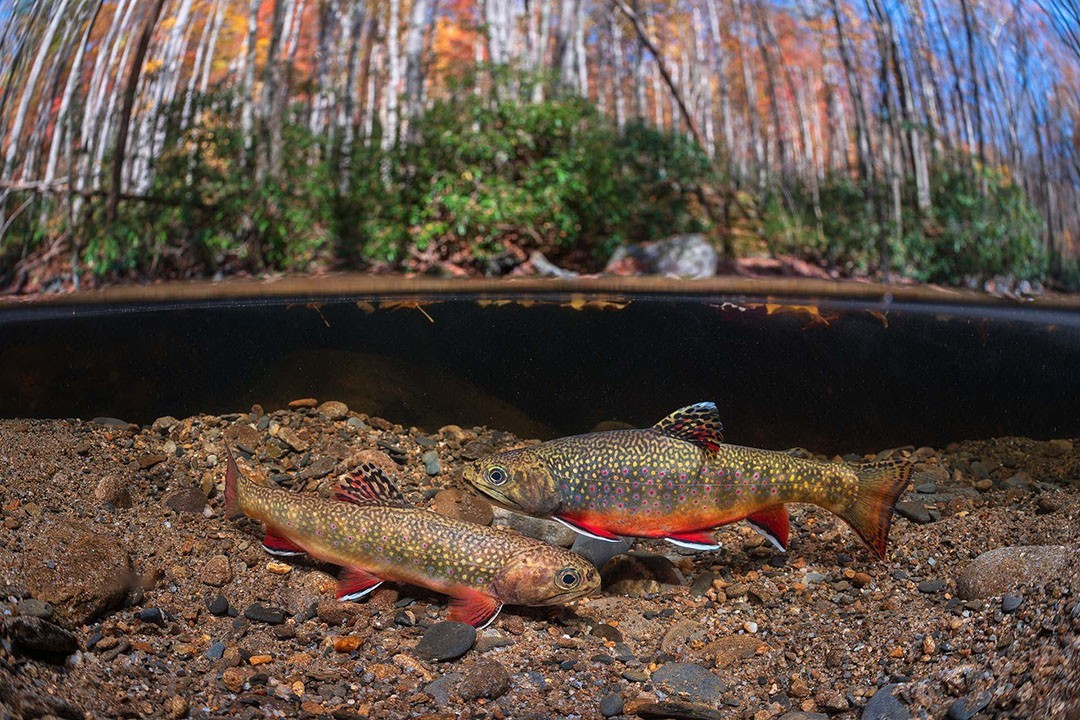
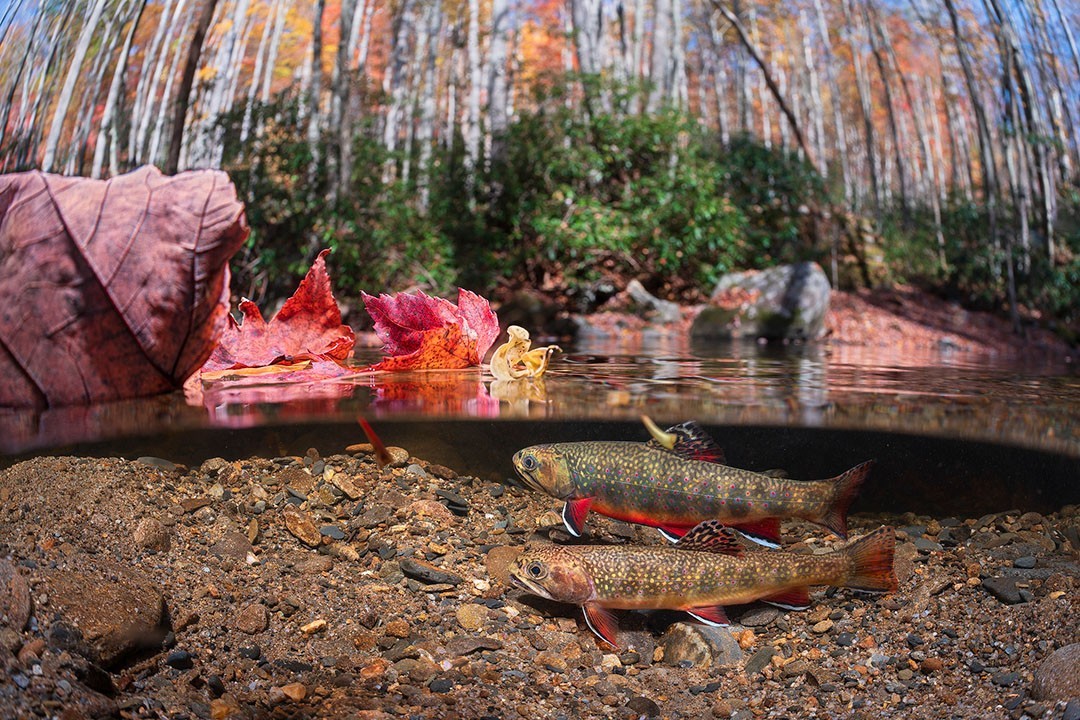
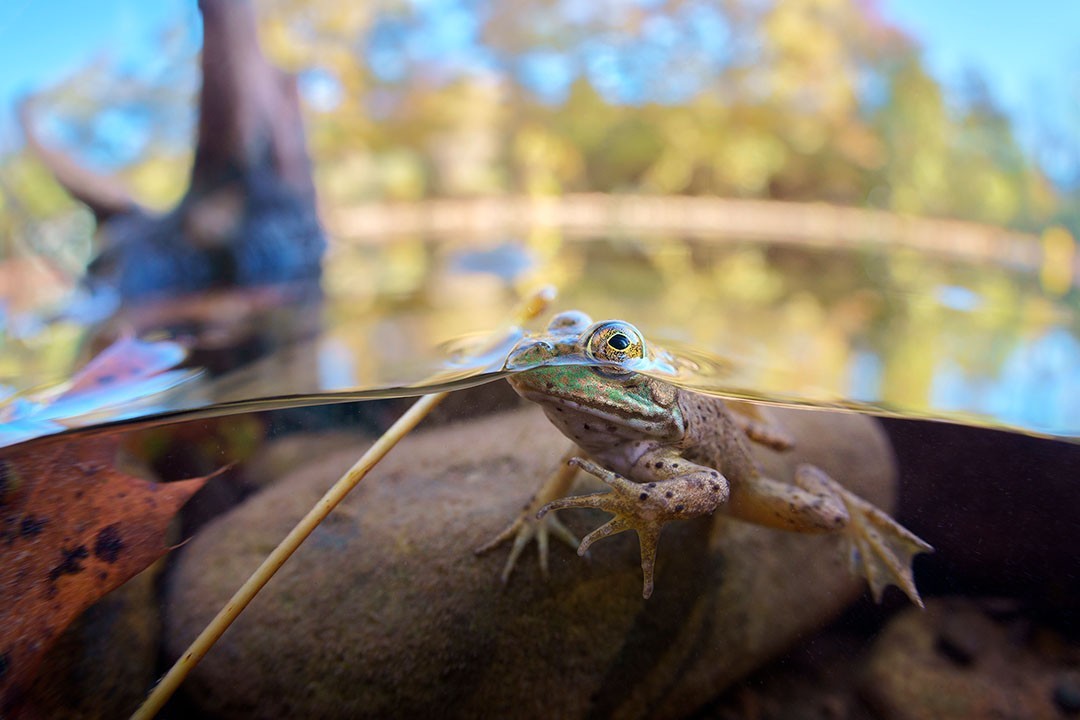 13 points
 -
13 points
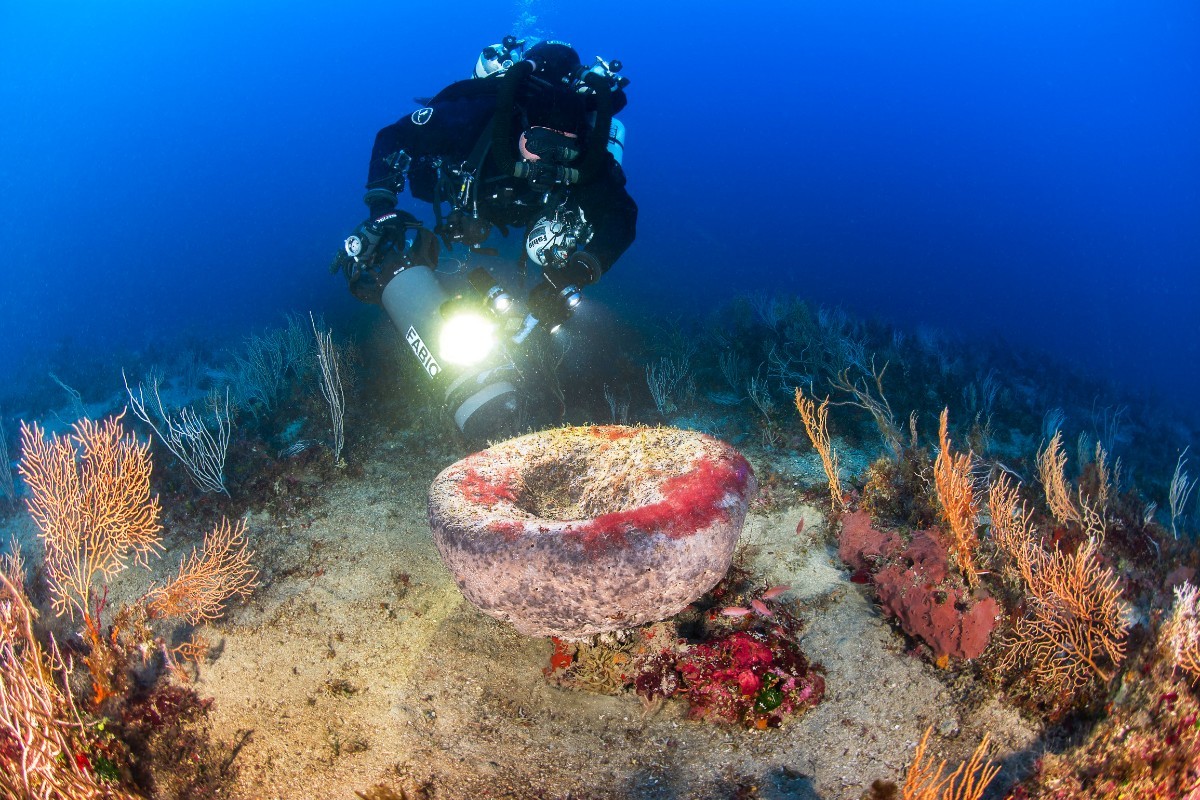 Text and images: Davide De Benedictis - Claudio Valerio Cover photo: Marco Bartolomucci If we told you how long we've been diving, you'd immediately know how old we are. We'd just tell you that we've been diving for a long time and that our passion for the sea has always been a part of us. We've spent most of our time in the Mediterranean, and by diving year-round, we've seen the gradual changes in the sea we love the most. A while back, we observed some novice divers during our decompression stop and wondered what it was like for them exploring the seafloor. Are they aware of the changes they're witnessing, or are they unwitting victims of shifting baseline syndrome? Unfortunately, this is what we've been observing for years in the Mediterranean during the summer: a carpet of mucilage in the first few meters of depth. The video text is based on Greta Thunberg's famous speech at the Youth4Climate event in Milan in 2021. This speech, with its great impact and appealing style, has been used in lots of different contexts. However, to my knowledge, it hasn't been used in relation to the marine world. When we were editing the images, we thought of the old saying "Once it was all countryside here", which makes you think about the past in a nostalgic way. But even the most overused clichés have a grain of truth. To paraphrase the cliché, we could say that "Once it was all sargassum and Cystoseira here". These seaweeds, which are common in the Mediterranean, were an important part of the marine ecosystem. There were large groups of Sargassum and Cystoseira, which alternated with Posidonia oceanica bushes and seafloors covered with calcareous algae (maerl). Some of the algae were the size of a fist. The bottoms were also decorated with white gorgonians, which are typical of these shallow waters. Today, although these species are still present, many of them are difficult to observe and suffer from a thick layer of mucilage covering them. This is now so common during the summer months that only those with long diving experience, or observing the seabed in winter, can tell the difference. When we showed these images to a non-diving audience, even though we had a marine biologist explain them, they were still pretty skeptical until we showed them exactly the same places filmed in winter and spring before temperature rises. Then they finally understood what we were talking about: These two short videos show how challenging it is to communicate the changes taking place in the oceans. The warming waters and human activities are affecting underwater ecosystems just as much as they are affecting land ecosystems. But underwater, the problem is even more pronounced. There's a lack of historical data, which makes it tough to grasp how marine environments are changing (again, it's the shifting baseline syndrome). Plus, our direct experience of the underwater world is limited. Everyone can see the effects of fires in the Amazon rainforest on the news or watch the urban landscape change from the car window. But what's going on underwater? This is why it's so important to communicate the importance of marine ecosystem conservation in a clear and urgent way. This is the challenge we're up against. Given the lack of inspiration in our recreational diving, we've been wondering if there's somewhere where these changes haven't happened yet. It's probably the so-called "mesophotic zone or twilight zone", which is the bathymetric range in the Mediterranean from fifty to one hundred and twenty meters deep. As depth increases in this zone, plant life gradually makes way for animal life due to the decreasing levels of light. Recently, this zone has become really important for studying how climate and human activities are affecting our oceans. It's a completely undiscovered world that could be home to species that could be valuable resources for addressing problems related to global warming and overfishing in the surface marine zone. The trailer on our Underwater Italy channel gives you a sneak peek of the mesophotic seafloor of the Mediterranean. A while back, whenever we talked about our passion for deep diving, the response was always the same: "Why go to the trouble of going deep when there's so much to see here on the surface?" And then, of course, there was the inevitable warning about the dangers of deep diving. How could they be blamed for that? Back then, going beyond the limits of recreational diving was all about deep air and not much else. As it turns out, today in the Mediterranean, we can only observe intact ecosystems through deep diving, and the tools of technical diving allow us to do so in reasonable safety. However, even in these environments, things are changing. For years, we've been seeing signs of suffering in marine animal forests, even in the shallowest parts of the "mesophotic zone". This shows that the effects of climate change are constantly evolving. Here's an example of what's happening to some of the seabed in the Tuscan archipelago, between 50 and 70 meters deep. It seems that the damage is not only proportional to depth, but probably also depends on other factors such as currents and the morphology of the seabed. To get a full understanding of this phenomenon, further scientific studies will be needed. As divers, our role is simply to observe. It's crucial that we keep an eye on these changes in marine ecosystems and keep documentation up to date. Every observation and piece of research helps us to understand our underwater environment better. It's essential that we pay attention and put in the effort to adapt our conservation strategies so that we can meet the challenges that climate change poses. It's an ongoing process, but it's vital to preserve the wonders of the sea for future generations.13 points
 -
13 pointsSince I've gone thourgh all the work of gathering this data from various sources and personal tests over the past few months, I might as well share it here in case other find it helpful. Corrections and additions welcome. Update on 24/06: I've updated the spreadsheet with three new sheets, one showing my detailed Power, Color Temperature and Flash Duration tests,other showing the recycling times / high speed shooting tests, and a final one with images comparing the beam cover with and without diffusers for the strobes I've tested. https://docs.google.com/spreadsheets/d/1hWG6Enh-ukiQXjN5y_3NMTFF8b4dhJ64YfZqyIdpFew/edit?usp=sharing13 points
-
13 pointsHere's a few from a recent trip to the sites close to Tulamben 1. Frogfish 2. Donut nudi 3. Goby with eggs 4. The ever faithful Shaun the Sheep nudi 5. Velvet Ghost Pipefish 6. Leaf-fish hiding in coral 7. Juvenile batfish Mike
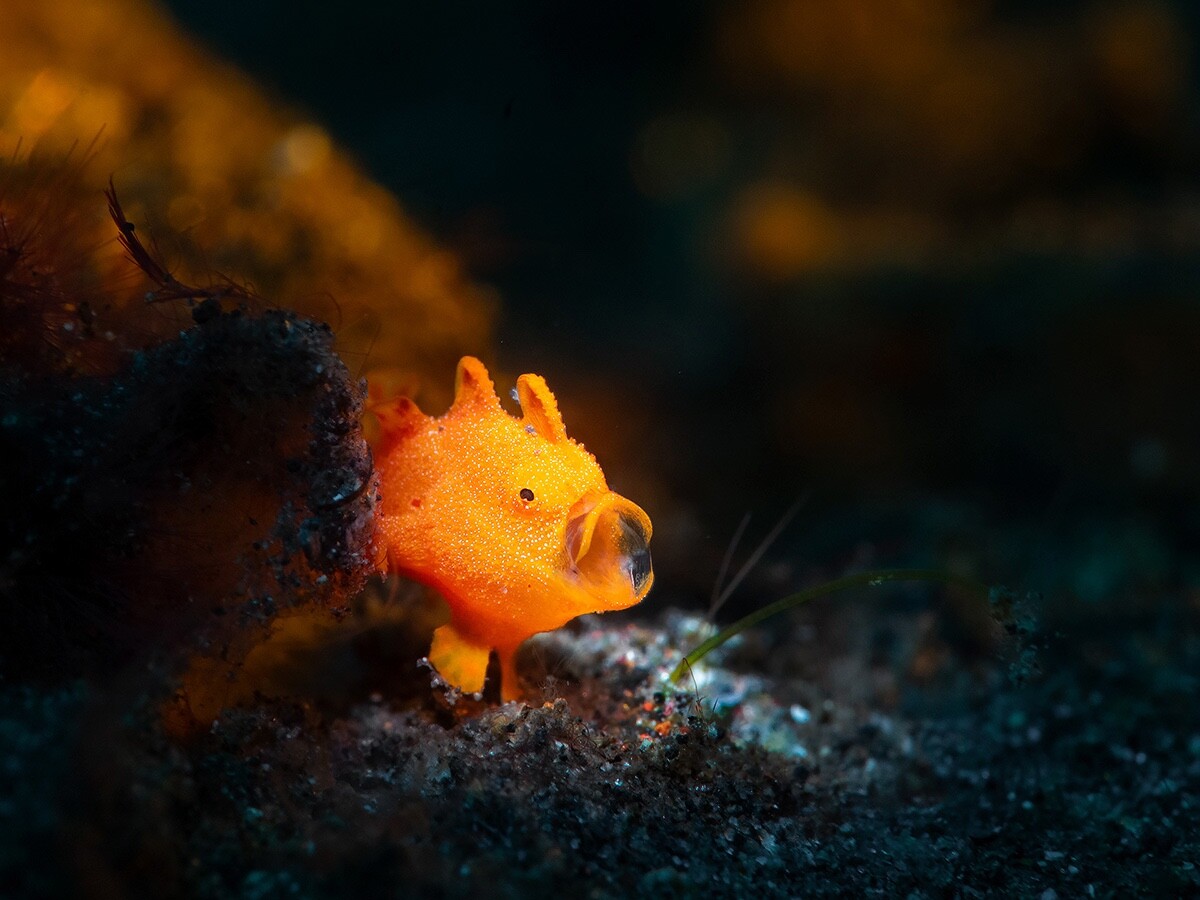
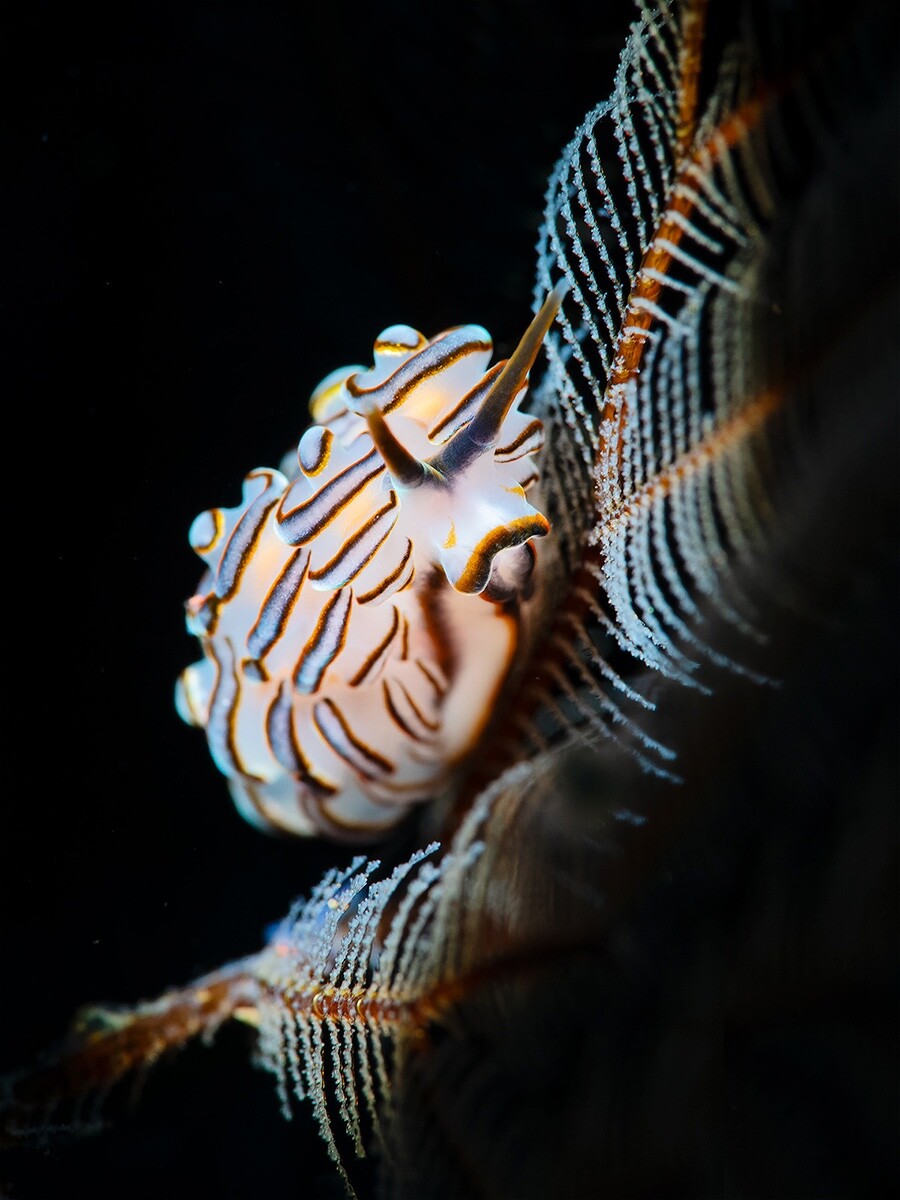
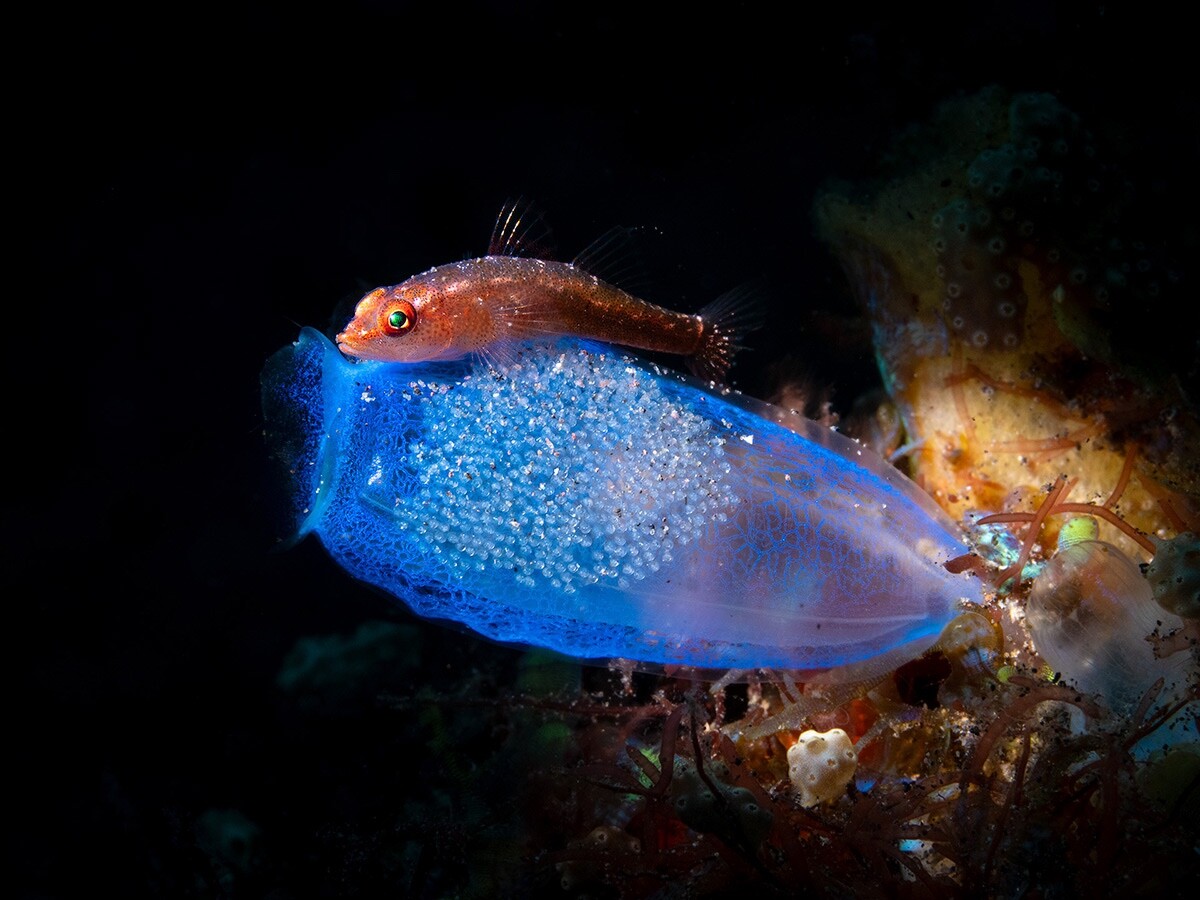
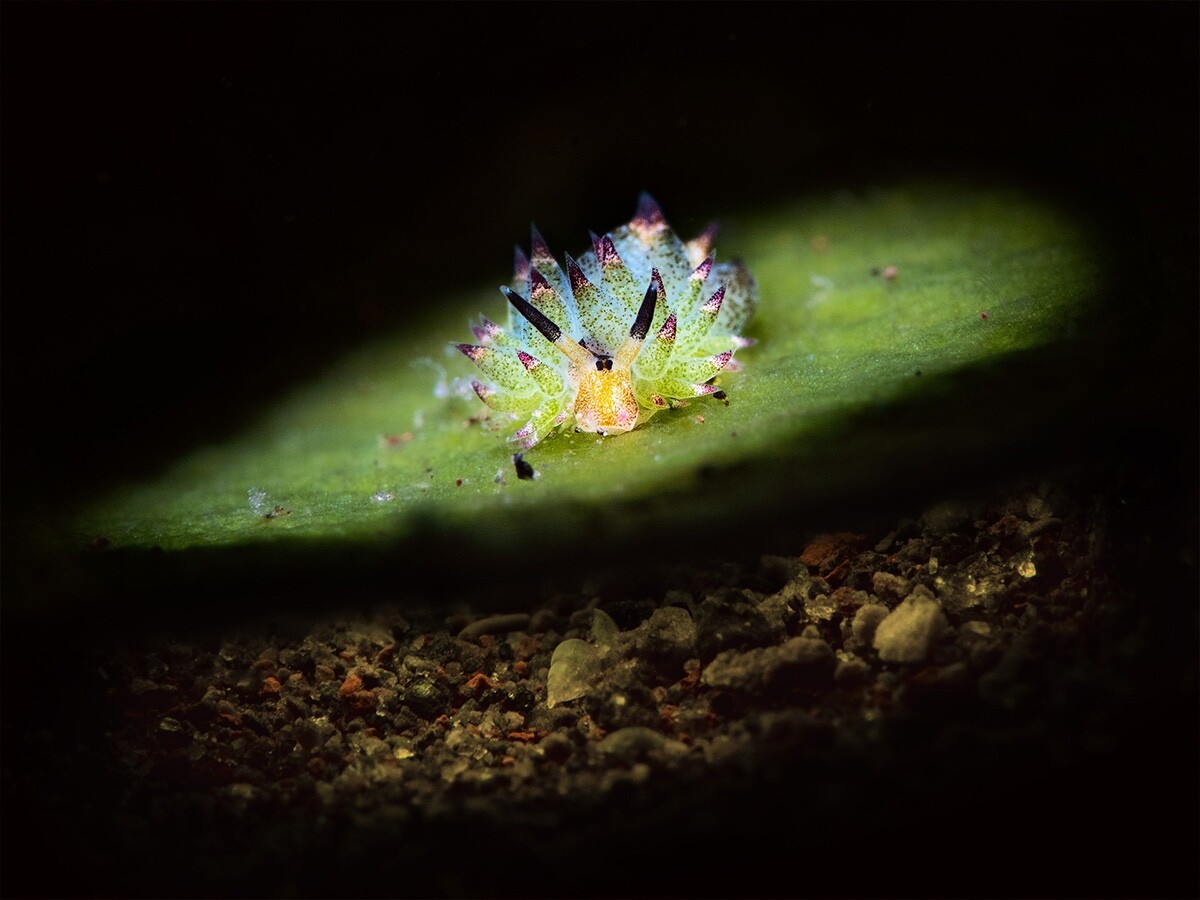
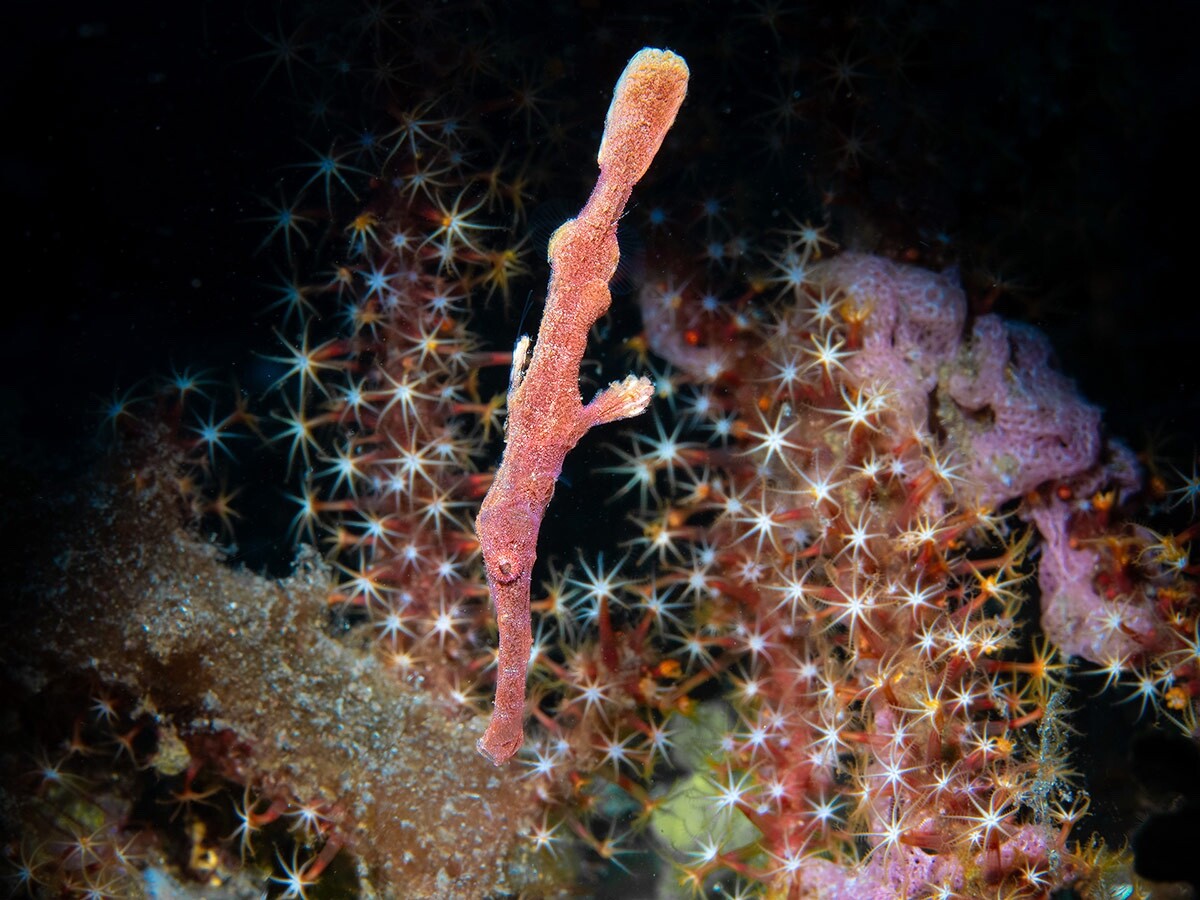
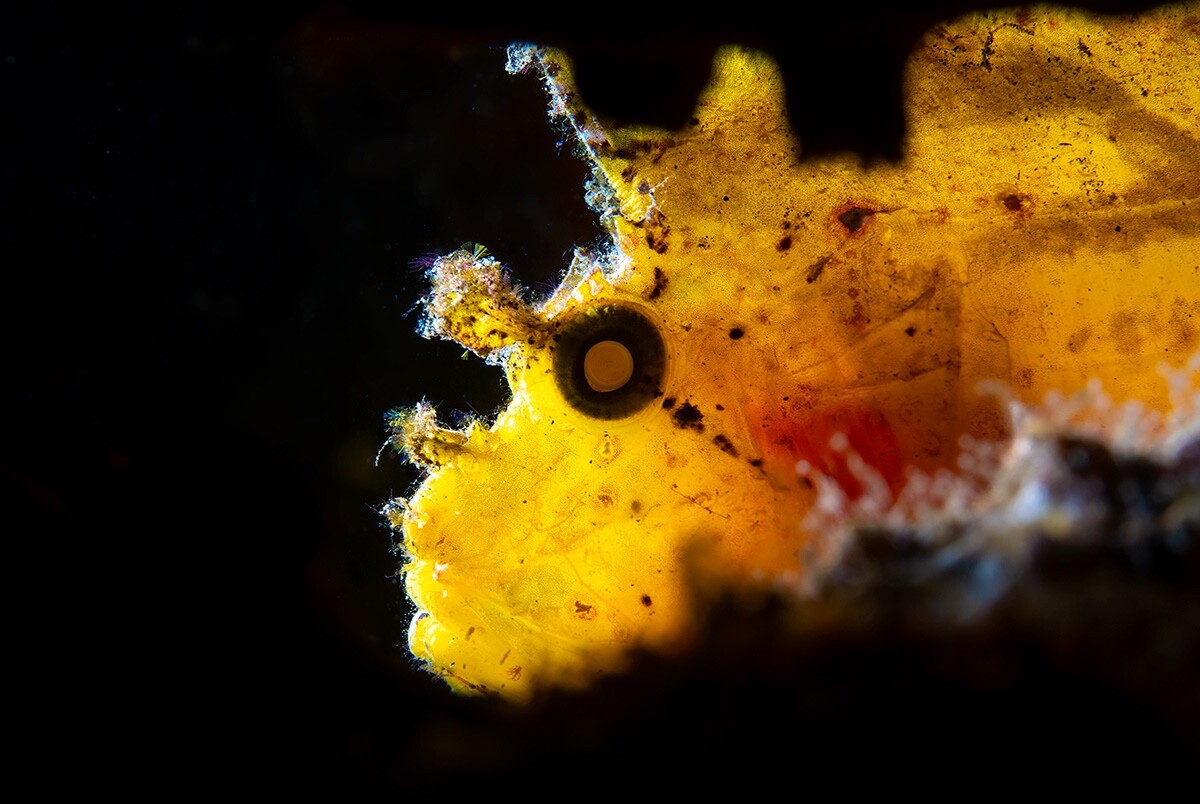
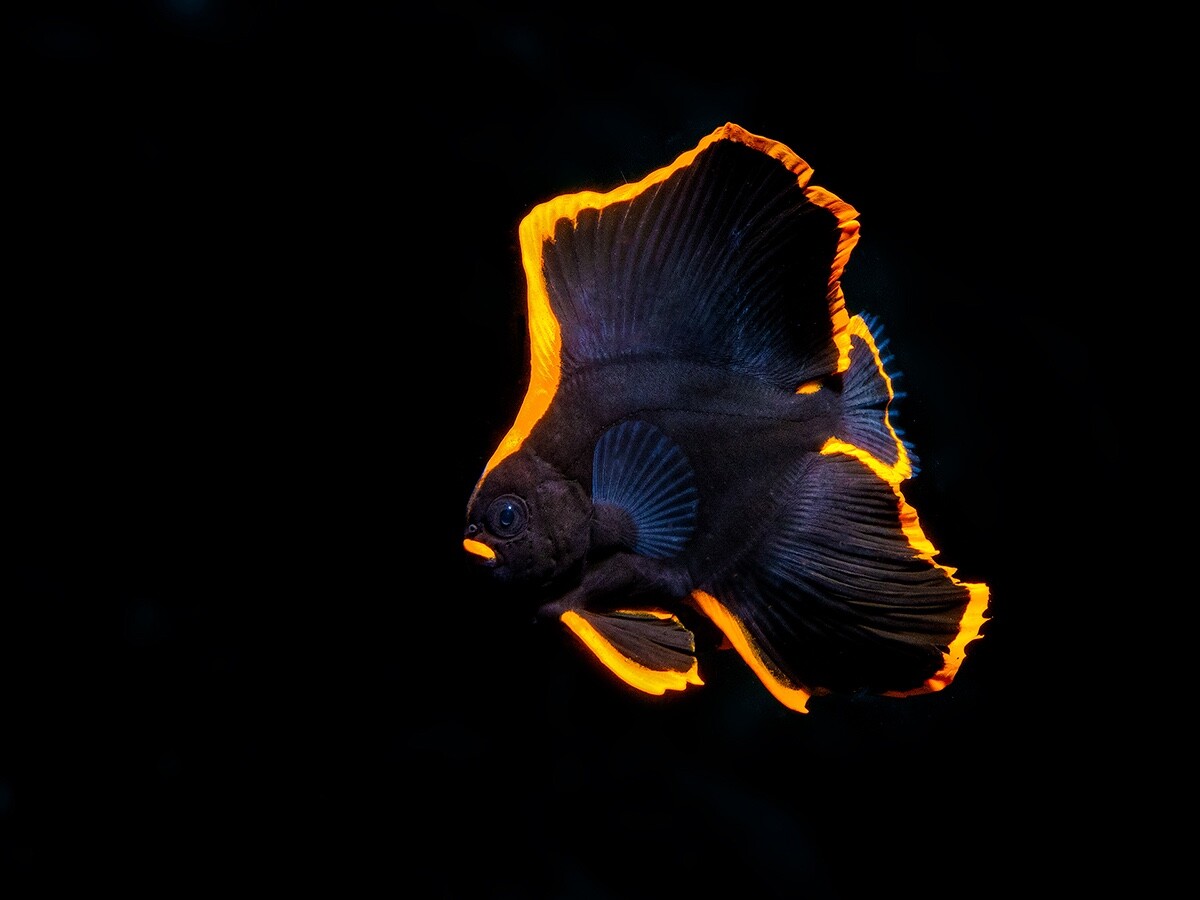 13 points
 -
13 pointsGuys I have the impression that this thread has reached a dead end. Everyone has had a chance to express their preferences on flashes and battery packs and in particular on the novelty introduced by Retra. We also had a direct feedback from Oskar. It is not often that we have the privilege of a manufacturer participating in the forum.... Long story short: now we all have an informed opinion and try to remember the old adage: agree to disagree 😉13 points
-
13 pointsMy favourite photo of 2023, for obvious reasons... doubt I'll ever get so lucky again. What an animal!!
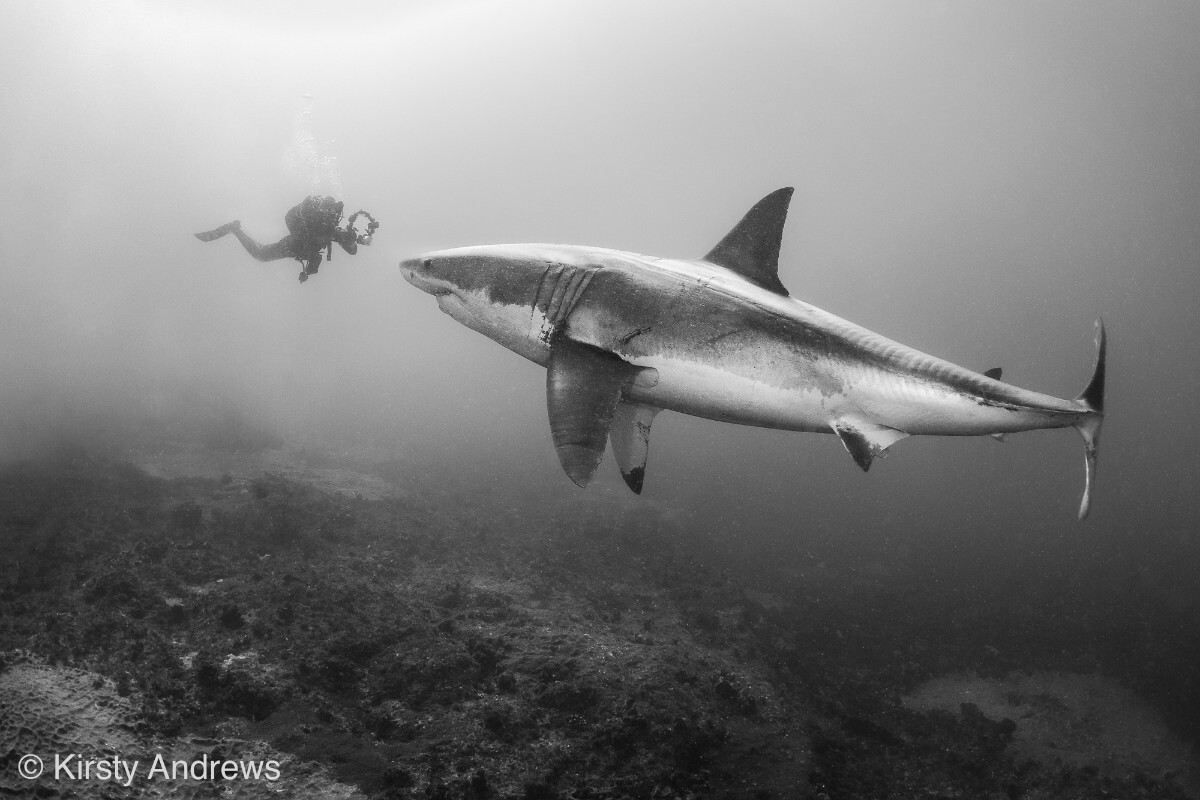 13 points
 -
13 pointsI flew into Cabo a year or so ago with bags full of Rebreather and Camera gear. My strategy to avoid getting nabbed by the camera-tax vultures was simple but effective: I put the dive gear in a pair of big pelican cases I put the camera gear in a standard checked suitcase (well packed, Nauticam housing in its padded box) I walked the pelicans through customs myself, and the vultures pounced on me instantly, only to be disappointed that I only had diving equipment. My wife walked right behind me with the standard suitcases, and strolled right on past.13 points
-
12 pointsHeres a video from my recent trip to Cocos. It was my second time at Cocos since 2006. We saw six different shark species, but seeing & getting good footage are two different things. As you know, sharks are shy when there is no bait in the water, even the big Tigers. I also saw big Hammerheads schools twice. The first time i had an 18mm WW lense set up (the first time after a few days because the second dive was planned at an arch. I switched lenses too early – a big mistake). I saw the HH school swimming in shallow water, while i stayed at 25-30m at Alcyon. I filmed them, but they looked like ants in the footage…The 2nd time at Alcyone with the proper 28mm lense…the HH school in shallow water again, but too strong current during descent…no chance to set and focus on the camera, as i reached the bottom the sharks were gone I uploaded directly from DVR in 4K on YT. The 4K video has only 360MB…that resulted in some color banding in the uploaded YT clip, which i don´t have in DVR with a 16bit color depth cam or rendered in decent 4K resolution. No slow-down uw footage in post.12 points
-
I've just got home from a terrific 12-night Raja Ampat trip on Emperor Diver's vessel, MV Harmoni. The itinerary started in Kaimana, covered Triton Bay, Misool and the Dampier Straits - and ended in Sorong. Others have written about the diving delights of the area so I won't rehash that. Suffice it to say that, my first trip to this part of Indonesia, I found the diving just fabulous. Abundance and variety of marine life was something else. Whale sharks and mantas included. I've been fortunate to have been on lots of liveaboards over the years. This was, by far, the best I have ever done. Harmoni has a crew of 21 for 24 guests and is spacious,. comfortable and relaxed. Lead by a first class Cruise Director, the entire crew were unfailingly helpful and considerate. We splurged and got an Upper Deck cabin. This was roomy with a ?king-size bed (depending on what side of the Atlantic you live), sofa, wardrobe and a bathroom that two people could actually use at the same time, tons of hot (and cold) water and quality shower and hair gels. I'm not sure if it is a blessing or a curse, but Harmoni has Starlink WiFi which is included in the trip price. So if the mood takes you, internet is available in the galley at all times throughout the trip. It reaches some cabins too. Diving was from a RIB with four guests accompanied by a dive guide. Nitrox was included in the price. Following the usual briefing, divers put on their wetsuits and only had to carry their mask and camera to the RIB. All gear was loaded by the crew with divers being helped into their BCs etc on the RIB immediately before a backward roll onto the divesite. No carrying heavy gear down to the RIB or down to a dive deck. Luxury. A dive guide was assigned to each group of four and rapidly understood what the group wanted to do in terms of photography, ease of the dive, avoidance of current etc. Dive sites were usually 4-5 minutes (enjoyable) RIB-ride from Harmoni with at least one RIB monitoring the dive with several ready for pick ups at the end of the dive. At the end of the drive, the crew moved dive gear, except mask and camera, from the RIB to Harmoni so, again, no lugging of gear. They even rinsed wetsuits after each dive. At the end of the trip, the crew rinsed all dive gear (apart from cameras), got it all dried and delivered into the galley for collection! Food was always excellent and a mix of Asian and European. The system was the classic light breakfast, dive, big breakfast, dive, lunch, dive and dinner. Harmoni had a well-stocked bar complete with barman and espresso machine (yay!) We used the Aston Hotel in Sorong and the Grand Papua Kaimana in Kaimana. Both were good. We flew KLM to Jakarta and then Garuda to Sorong and Wings Air to Kaimana. No problems with any of the flights and the service was always very good. On one flight there was a tiny charge for excess baggage. We applied for Indonesian visas online and were seriously impressed by the arrival formalities in Jakarta: a quick transit through e-gates. I celebrated an "x0-birthday" during the trip and cannot think of a better way of marking the occasion. I can recommend Harmoni highly.
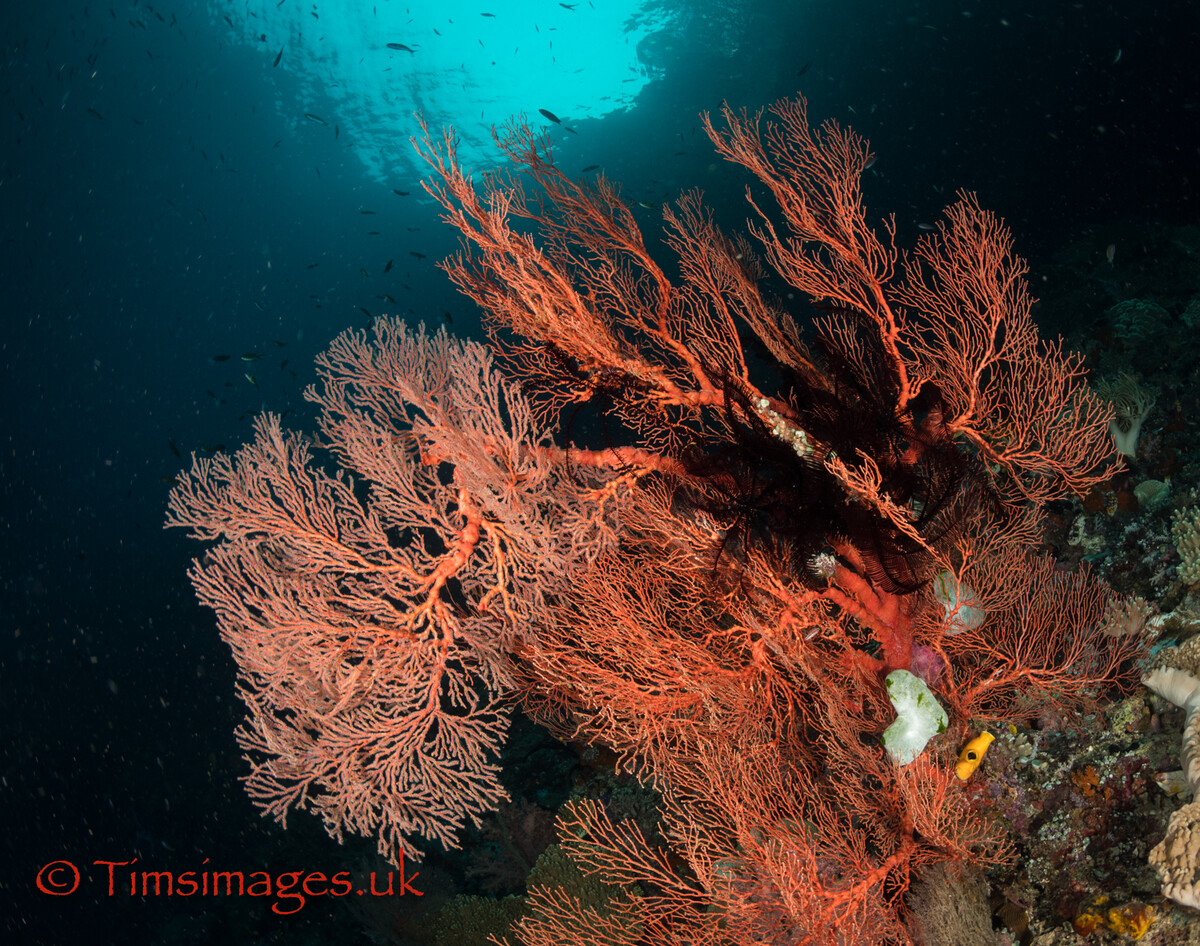 12 points
 -
12 pointsThanks to Dr. Mustard for sharing some of the first images of our new SMC-3 ! What I wanted to achieve was to make use of the experience I accumulated over the years to improve one of the best macro lens even further. While maintaining the same magnification, with the use of some extreme glass material (very high refractive index and special dispersion character), I was able to reduce 1/3 of the weight of the original SMC-1, 40% of the thickness, while increased the longest working distance by 8mm. Theoretically, internal reflection has been eliminated. Yet to be confirmed from extensive field tests. Edward12 points
-
12 pointsMediterranean wreck 'Le Grec' between 40m and 50m deep, close to Porquerolles, France. GoPro 11 and Keldan 4x.12 points
-
12 points
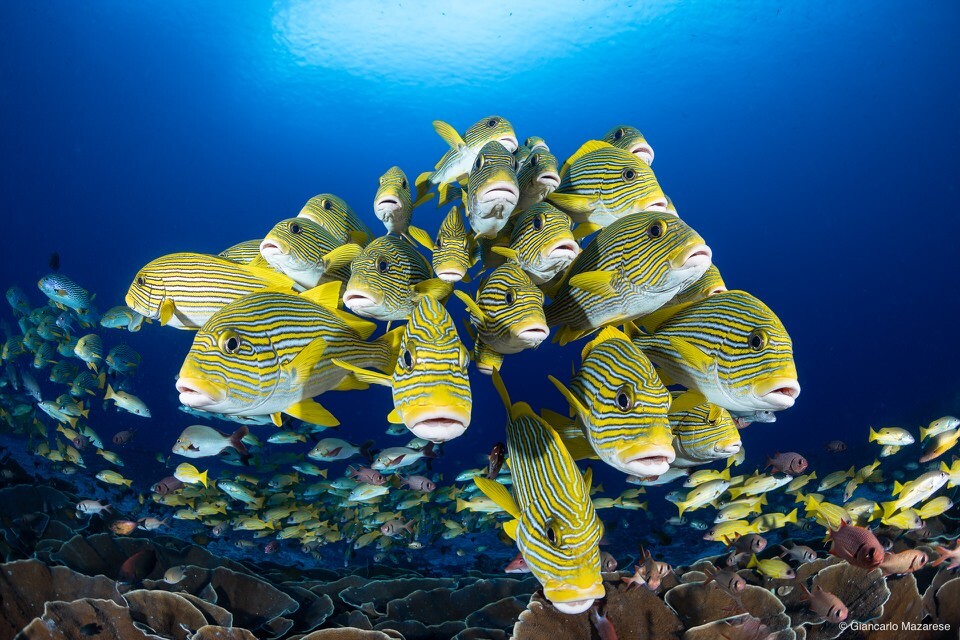 Underwater photography is an incredible experience because it offers enthusiasts the opportunity to discover the underwater world in its most authentic beauty. To capture these extraordinary images it is essential to have the right equipment, and one of the key elements in underwater photography is the strobe. SUPE Scubalamp is a company specialising in the design and production of underwater lighting equipment, including torches, strobes and related accessories. The company, a world market leader for many years, recently launched the new SUPE Scubalamp D-Pro underwater strobe, successor to the glorious D-Max. This product caught the attention of the underwater community due to its exceptional quality, light uniformity and battery life, and these features immediately placed it among the best in the industry. Another distinguishing feature is the high-speed continuous shooting mode, with the strobe supporting 10 frames per second in the first mode, making it much easier to capture shots in quick succession. The D-Pro, with its 4800 degree Kelvin circular lamp with a 160W power output and 150 degree beam angle, ensures an even spread of light over the entire framed area. This means that captured subjects and scenes will appear in natural, vivid colours - in short, your shots will be outstanding. A crucial feature for underwater strobes is battery life. While in the deep sea it is complicated to change batteries easily, so to avoid any kind of problem it is always preferable to do the replacement only at the end of the dives. SUPE Scubalamp D-Pro also excels in this respect, thanks to its 37.8 Wh rechargeable lithium battery (3x 18650), which guarantees from 500 strobes at full power up to 3000 strobes in the first mode. The large battery capacity supports long underwater photo sessions, allowing every moment to be captured without interruption. The strobes also feature a display that shows the battery charge status, allowing you to keep track of the remaining battery life at all times. I have been fascinated by these strobes since their launch and, after hearing feedback from other underwater photographers, I finally had the opportunity to test them first-hand during my recent three-week trip to the breathtaking tropical waters of Raja Ampat, Indonesia. The setup I used for the test consisted of: Canon EOS R5, Canon EF 8-15mm f/4L Fisheye, Nauticam NA-R5 housing, Nauticam 140mm Dome, Nauticam Trigger and Flex-Arm carbon arms. During the first dives I studied the light behaviour of the strobe in order to position it in the best possible way. The circular lamp guarantees excellent uniformity in light distribution and the D-Pro, with its coverage angle of about 150°, provides a considerable amount of light perfectly distributed over the entire frame of the shot. Power adjustment is easy thanks to the power selector. To balance the weight I added a pair of floats, as the strobes tended to be slightly negative. Looking at the shots underwater, previewed on the camera, I was impressed and couldn't wait to review them on my computer once back on land. Upon review I was even more surprised by the quality, quantity and uniformity of the light, everything was simply amazing. While diving, I tried to 'exploit' the strobes to the best of my ability in a variety of situations, and they never let me down; on the contrary, they always provided the best of their light. I was particularly satisfied with the battery life. I always recharged the batteries after 6 dives, with an average of about 100-130 shots per dive, the display allowed me to accurately monitor the remaining charge, eliminating uncertainty about whether I could continue shooting. Recharging the batteries was simple, just remove them from the compartment and plug them into the supplied transformer, waiting for the LED to turn green to indicate a full charge. I'm not sure of the exact hours needed, I always did this before going to sleep, in the morning the batteries were ready, fully charged. As an optional extra Supe supplies a diffuser (D200-Diffuser) for wide angles. It is a hotly debated topic among underwater photographers whether they should be used or not. Not being able to provide scientific measurements with appropriate instruments, I can only give you my personal feelings. I felt good in both cases, with and without, the difference I noticed was only in the type of scene shot. I shot very often without a diffuser, because I had the feeling that the strobe had more penetration and the light was more incident on subjects with a greater distance to the lens. On the other hand, with very close-up shots, I found the shots with the use of the diffuser with a softer and more even light more pleasing. After three weeks of diving I did not experience any problems with their operation, the strobes were always ready to fire. The size and weight did not have a major impact during the dives, I appreciated their ease of use. I personally think that the SUPE Scubalamp D-Pro is currently one of the best underwater strobes available on the market in terms of value for money. However, it is important to emphasise that I have not been able to assess its reliability in the long term; my testing period was, in fact, limited. However, I am also confident in terms of reliability because the quality I found during use was evident. I would like to thank my friend Scipione, who allowed me to test these strobes, and Raymon Bao, owner of SUPE Scubalamp, who was always available to answer my requests for further details about the product. F8 - 1/125 - ISO 100 F11 - 1/160 - ISO 320 F13 - 1/160 - ISO 250 F10 - 1/125 - ISO 250 F8 - 1/160 - ISO 250 F11 - 1/125 - ISO 250 F10 - 1/125 - ISO 200 F8 - 1/125 - ISO 160 F9 - 1/125 - ISO 20012 points
 -
12 pointsTaken in "La Gravière du Fort". A pond in Alsace, France, near Strasbourg, managed by and dedicated to divers. Not as cool as some exotic places, but only one hour from home, and many friends there. Olympus EM-1 mkII with Olympus 8mm Fisheye in Nauticam housing and 2x Retra Pro Xnull
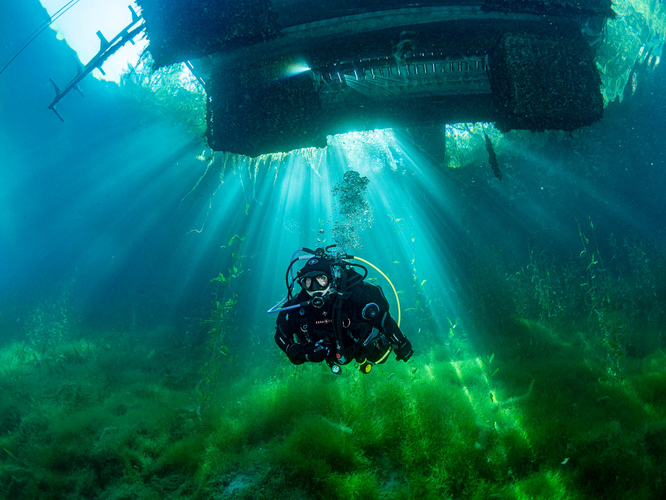 12 points